HP Xw4550 HP xw4550 Workstation - Service and Technical Reference Guide - Page 132
Run the Computer Setup F10 Utility. If Setup already - workstation processor upgrade
 |
UPC - 883585505951
View all HP Xw4550 manuals
Add to My Manuals
Save this manual to your list of manuals |
Page 132 highlights
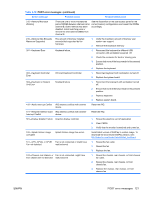
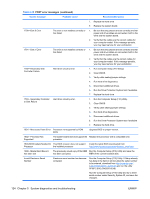
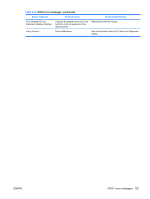
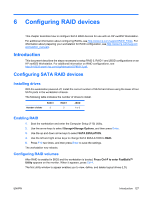
Table 5-18 POST error messages (continued) Screen message Probable cause Recommended action 7. Replace the hard drive. 8. Replace the system board. 1790-Disk 0 Error The drive is not installed correctly or has failed. 1. Be sure that any jumpers are set correctly and that power and drive cables are connected, both to the drive and the system board. 2. Verify that the cables are the correct cables for your computer model. If this message persists, you may need service for your workstation. 1791-Disk 1 Error The drive is not installed correctly or has failed. 1. Be sure that any jumpers are set correctly and that power and drive cables are connected, both to the drive and the system board. 2. Verify that the cables are the correct cables for your computer model. If this message persists, you may need service for your workstation 1792-Secondary Disk Controller Failure Hard drive circuitry error. 1. Run Computer Setup (F10 Setup). 2. Clear CMOS. 3. Verify cable seating/jumper settings. 4. Run hard drive diagnostics. 5. Disconnect additional drives. 6. Run the Drive Protection System test if available. 7. Replace the hard drive. 1793-Secondary Controller Hard drive circuitry error. or Disk Failure 1. Run the Computer Setup (F10) Utility. 2. Clear CMOS. 3. Verify cable seating/jumper settings. 4. Run hard drive diagnostics. 5. Disconnect additional drives. 6. Run the Drive Protection System test if available. 7. Replace the hard drive. 1801-Microcode Patch Error Processor not supported by ROM BIOS. Upgrade BIOS to proper version. 1802-Processor Not Supported The system board does not support the Replace the processor with a compatible one. processor. 1803-BIOS Update Needed for This BIOS revision does not support Install the latest BIOS downloaded from Processor the installed processor. http://www.hp.com/support/workstation_swdrivers. 1998-Master Boot Record has been lost The previously saved copy of the MBR Run the Computer Setup (F10) Utility and save the has been corrupted. MBR of the current bootable disk. Invalid Electronic Serial Number Electronic serial number has become corrupted. Run the Computer Setup (F10) Utility. If Setup already has data in the field or will not allow the serial number to be entered, download from http://www.hp.com/ support/workstation_swdrivers and run the utility SP5572.EXE (SNZERO.EXE). Run the Computer Setup (F10) Utility and try to enter serial number under Security, System ID, and save the changes. 124 Chapter 5 System diagnostics and troubleshooting ENWW
-
 1
1 -
2
-
3
-
4
-
5
-
6
-
7
-
8
-
9
-
10
-
11
-
12
-
13
-
14
-
15
-
16
-
17
-
18
-
19
-
20
-
21
-
22
-
23
-
24
-
25
-
26
-
27
-
28
-
29
-
30
-
31
-
32
-
33
-
34
-
35
-
36
-
37
-
38
-
39
-
40
-
41
-
42
-
43
-
44
-
45
-
46
-
47
-
48
-
49
-
50
-
51
-
52
-
53
-
54
-
55
-
56
-
57
-
58
-
59
-
60
-
61
-
62
-
63
-
64
-
65
-
66
-
67
-
68
-
69
-
70
-
71
-
72
-
73
-
74
-
75
-
76
-
77
-
78
-
79
-
80
-
81
-
82
-
83
-
84
-
85
-
86
-
87
-
88
-
89
-
90
-
91
-
92
-
93
-
94
-
95
-
96
-
97
-
98
-
99
-
100
-
101
-
102
-
103
-
104
-
105
-
106
-
107
-
108
-
109
-
110
-
111
-
112
-
113
-
114
-
115
-
116
-
117
-
118
-
119
-
120
-
121
-
122
-
123
-
124
-
125
-
126
-
 127
127 -
 128
128 -
 129
129 -
 130
130 -
 131
131 -
 132
132 -
 133
133 -
 134
134 -
 135
135 -
 136
136 -
 137
137 -
138
-
139
-
140
-
141
-
142
-
143
-
144
-
145
-
146
-
147
-
148
-
149
-
150
-
151
-
152
-
153
-
154
 |
 |
