HP Xw4550 HP xw4550 Workstation - Service and Technical Reference Guide - Page 81
Connect the power cable first
 |
UPC - 883585505951
View all HP Xw4550 manuals
Add to My Manuals
Save this manual to your list of manuals |
Page 81 highlights
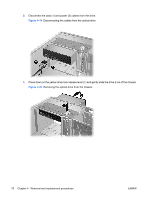
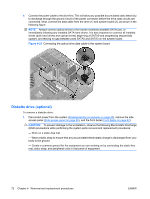
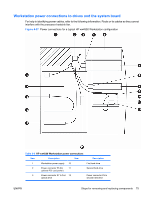
2. Disconnect the data (1) and power (2) cables from the back of the diskette drive. Figure 4-24 Disconnecting the cables from the diskette drive 3. Lift the green drive-lock release tab (1) and gently slide the drive 2 out at the same time. Figure 4-25 Removing the diskette drive from the chassis To replace a diskette drive: 1. Align the metal protrusions on the side of the drive with the grooves in the diskette drive bay and slide the diskette drive into the bay until it stops. 2. Connect the power cable first, then the data cable (in that order) to the drive and the system board. This sequence will allow any possible accumulated static electricity to discharge through the ground circuit of the power connector before the drive data circuits are connected. 3. Connect the cables to the back of the diskette drive. ENWW Steps for removing and replacing components 73
-
 1
1 -
2
-
3
-
4
-
5
-
6
-
7
-
8
-
9
-
10
-
11
-
12
-
13
-
14
-
15
-
16
-
17
-
18
-
19
-
20
-
21
-
22
-
23
-
24
-
25
-
26
-
27
-
28
-
29
-
30
-
31
-
32
-
33
-
34
-
35
-
36
-
37
-
38
-
39
-
40
-
41
-
42
-
43
-
44
-
45
-
46
-
47
-
48
-
49
-
50
-
51
-
52
-
53
-
54
-
55
-
56
-
57
-
58
-
59
-
60
-
61
-
62
-
63
-
64
-
65
-
66
-
67
-
68
-
69
-
70
-
71
-
72
-
73
-
74
-
75
-
 76
76 -
 77
77 -
 78
78 -
 79
79 -
 80
80 -
 81
81 -
 82
82 -
 83
83 -
 84
84 -
 85
85 -
 86
86 -
87
-
88
-
89
-
90
-
91
-
92
-
93
-
94
-
95
-
96
-
97
-
98
-
99
-
100
-
101
-
102
-
103
-
104
-
105
-
106
-
107
-
108
-
109
-
110
-
111
-
112
-
113
-
114
-
115
-
116
-
117
-
118
-
119
-
120
-
121
-
122
-
123
-
124
-
125
-
126
-
127
-
128
-
129
-
130
-
131
-
132
-
133
-
134
-
135
-
136
-
137
-
138
-
139
-
140
-
141
-
142
-
143
-
144
-
145
-
146
-
147
-
148
-
149
-
150
-
151
-
152
-
153
-
154
 |
 |
