HP Xw4550 HP xw4550 Workstation - Service and Technical Reference Guide - Page 34
BIOS ROM, Using the Computer Setup (F10) Utility
 |
UPC - 883585505951
View all HP Xw4550 manuals
Add to My Manuals
Save this manual to your list of manuals |
Page 34 highlights
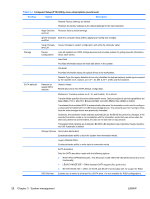
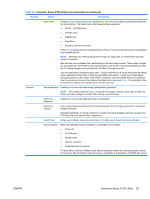
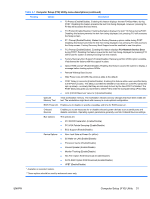
● Enable power-on password prompting during system restarts (warm boots) and power-on. ● Hide or make available the integrated I/O functionality, including the serial, or USB ports, audio, or embedded network interface controller (NIC). Any hidden devices are inaccessible and increase overall system security. ● Enable or disable removable media boot ability. ● Enable or disable removable media write ability (when supported by hardware). ● Replicate your system setup by saving system configuration information on diskette and restoring it on one or more workstations. ● Execute self-tests on specified SATA hard drives (when supported by the drive). BIOS ROM The BIOS of the computer is a collection of machine language programs stored as firmware in ROM. The BIOS ROM includes such functions as POST, PCI device initialization, plug-in-play support, power management activities, and the Computer Setup (F10) Utility. The firmware contained in the BIOS ROM supports the following systems and specifications: ● Microsoft WHQL ● Alert-On-LAN (AOL) and Wake-On-LAN (WOL) ● ACPI 1.0 and OnNow ● SMBIOS 2.3.5 ● PC98/99/00 and NetPC ● PXE boot ROM for the integrated LAN controller ● BIOS Boot Specification 1.01 ● Enhanced Disk Drive Specification 3.0 ● "El Torito" Bootable CD-ROM Format Specification 1.0 ● ATAPI Removable Media Device BIOS Specification 1.0 ● MPS Specification 1.4 (for booting Linux SMP) The BIOS ROM is a 1MB Serial Peripheral Interface (SPI) part. The runtime portion of the BIOS resides in a 128-K block from E0000h to FFFFFh. Using the Computer Setup (F10) Utility You can only open the Computer Setup (F10) Utility by powering on the workstation or restarting the workstation. To access the Computer Setup (F10) Utility menu: 1. Power on or restart the workstation. 2. Press the F10 key as soon as your display is active and you see F10=Setup appear in the lower right corner of the screen. NOTE: If you do not press F10 at the appropriate time, try again. Turn the workstation off, then on, and press F10 again to access the utility, or press the Ctrl + Alt + Delete keys before boot if you miss the opportunity to press F10. 3. Select your language from the list and press the Enter key. In the Computer Setup (F10) Utility menu, five headings are displayed: File, Storage, Security, Power, and Advanced. 26 Chapter 3 System management ENWW
-
 1
1 -
2
-
3
-
4
-
5
-
6
-
7
-
8
-
9
-
10
-
11
-
12
-
13
-
14
-
15
-
16
-
17
-
18
-
19
-
20
-
21
-
22
-
23
-
24
-
25
-
26
-
27
-
28
-
 29
29 -
 30
30 -
 31
31 -
 32
32 -
 33
33 -
 34
34 -
 35
35 -
 36
36 -
 37
37 -
 38
38 -
 39
39 -
40
-
41
-
42
-
43
-
44
-
45
-
46
-
47
-
48
-
49
-
50
-
51
-
52
-
53
-
54
-
55
-
56
-
57
-
58
-
59
-
60
-
61
-
62
-
63
-
64
-
65
-
66
-
67
-
68
-
69
-
70
-
71
-
72
-
73
-
74
-
75
-
76
-
77
-
78
-
79
-
80
-
81
-
82
-
83
-
84
-
85
-
86
-
87
-
88
-
89
-
90
-
91
-
92
-
93
-
94
-
95
-
96
-
97
-
98
-
99
-
100
-
101
-
102
-
103
-
104
-
105
-
106
-
107
-
108
-
109
-
110
-
111
-
112
-
113
-
114
-
115
-
116
-
117
-
118
-
119
-
120
-
121
-
122
-
123
-
124
-
125
-
126
-
127
-
128
-
129
-
130
-
131
-
132
-
133
-
134
-
135
-
136
-
137
-
138
-
139
-
140
-
141
-
142
-
143
-
144
-
145
-
146
-
147
-
148
-
149
-
150
-
151
-
152
-
153
-
154
 |
 |