HP Xw4550 HP xw4550 Workstation - Service and Technical Reference Guide - Page 73
Power button, System speaker,
 |
UPC - 883585505951
View all HP Xw4550 manuals
Add to My Manuals
Save this manual to your list of manuals |
Page 73 highlights
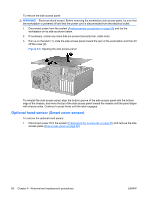
Power button To remove the power button: 1. Disconnect power from the system (Predisassembly procedures on page 55), remove the side access panel (Side access panel on page 59), remove the front bezel (Front Bezel on page 62), and remove the front panel I/O device assembly (Front panel I/O device assembly on page 63). 2. Disconnect the power button assembly cable from the system board. 3. Press in on the clips (1) that secure the power button to the chassis. 4. Dislodge the metal clip from the chassis by rocking the power button back and forth. Then slide the power button assembly (2) out from the front of the chassis. Figure 4-12 Removing the power button To replace the power button, reverse the previous steps. System speaker To remove the speaker: 1. Disconnect power from the system (Predisassembly procedures on page 55) and remove the side access panel (Side access panel on page 59). 2. Disconnect the speaker cable (1) from the system board. ENWW Steps for removing and replacing components 65
-
 1
1 -
2
-
3
-
4
-
5
-
6
-
7
-
8
-
9
-
10
-
11
-
12
-
13
-
14
-
15
-
16
-
17
-
18
-
19
-
20
-
21
-
22
-
23
-
24
-
25
-
26
-
27
-
28
-
29
-
30
-
31
-
32
-
33
-
34
-
35
-
36
-
37
-
38
-
39
-
40
-
41
-
42
-
43
-
44
-
45
-
46
-
47
-
48
-
49
-
50
-
51
-
52
-
53
-
54
-
55
-
56
-
57
-
58
-
59
-
60
-
61
-
62
-
63
-
64
-
65
-
66
-
67
-
 68
68 -
 69
69 -
 70
70 -
 71
71 -
 72
72 -
 73
73 -
 74
74 -
 75
75 -
 76
76 -
 77
77 -
 78
78 -
79
-
80
-
81
-
82
-
83
-
84
-
85
-
86
-
87
-
88
-
89
-
90
-
91
-
92
-
93
-
94
-
95
-
96
-
97
-
98
-
99
-
100
-
101
-
102
-
103
-
104
-
105
-
106
-
107
-
108
-
109
-
110
-
111
-
112
-
113
-
114
-
115
-
116
-
117
-
118
-
119
-
120
-
121
-
122
-
123
-
124
-
125
-
126
-
127
-
128
-
129
-
130
-
131
-
132
-
133
-
134
-
135
-
136
-
137
-
138
-
139
-
140
-
141
-
142
-
143
-
144
-
145
-
146
-
147
-
148
-
149
-
150
-
151
-
152
-
153
-
154
 |
 |
