IBM 4230 User Guide - Page 157
Models 201, 2S2, and 5S3 Coaxial Attachment, Attaching a Coaxial Signal Cable to the Printer
 |
View all IBM 4230 manuals
Add to My Manuals
Save this manual to your list of manuals |
Page 157 highlights
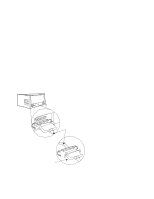
Models 201, 2S2, and 5S3 Coaxial Attachment Supported computers include: 3270 Information Display Systems 43xx Processors ES/9000* and ES/9370* Processors 3174 and 3274 Remote Control Units. Attaching a Coaxial Signal Cable to the Printer CAUTION: Make sure the machine is turned Off (O) before you connect or disconnect the power cord or other cables. If the machine has cables other than the power cord, you must connect them before you plug the power cord into an outlet. You must first unplug the power cord from the outlet when you remove the other cables. Chapter 2. Attaching the 4230 Printer to Your Computer 2-17
-
 1
1 -
2
-
3
-
4
-
5
-
6
-
7
-
8
-
9
-
10
-
11
-
12
-
13
-
14
-
15
-
16
-
17
-
18
-
19
-
20
-
21
-
22
-
23
-
24
-
25
-
26
-
27
-
28
-
29
-
30
-
31
-
32
-
33
-
34
-
35
-
36
-
37
-
38
-
39
-
40
-
41
-
42
-
43
-
44
-
45
-
46
-
47
-
48
-
49
-
50
-
51
-
52
-
53
-
54
-
55
-
56
-
57
-
58
-
59
-
60
-
61
-
62
-
63
-
64
-
65
-
66
-
67
-
68
-
69
-
70
-
71
-
72
-
73
-
74
-
75
-
76
-
77
-
78
-
79
-
80
-
81
-
82
-
83
-
84
-
85
-
86
-
87
-
88
-
89
-
90
-
91
-
92
-
93
-
94
-
95
-
96
-
97
-
98
-
99
-
100
-
101
-
102
-
103
-
104
-
105
-
106
-
107
-
108
-
109
-
110
-
111
-
112
-
113
-
114
-
115
-
116
-
117
-
118
-
119
-
120
-
121
-
122
-
123
-
124
-
125
-
126
-
127
-
128
-
129
-
130
-
131
-
132
-
133
-
134
-
135
-
136
-
137
-
138
-
139
-
140
-
141
-
142
-
143
-
144
-
145
-
146
-
147
-
148
-
149
-
150
-
151
-
 152
152 -
 153
153 -
 154
154 -
 155
155 -
 156
156 -
 157
157 -
 158
158 -
 159
159 -
 160
160 -
 161
161 -
 162
162 -
163
-
164
-
165
-
166
-
167
-
168
-
169
-
170
-
171
-
172
-
173
-
174
-
175
-
176
-
177
-
178
-
179
-
180
-
181
-
182
-
183
-
184
-
185
-
186
-
187
-
188
-
189
-
190
-
191
-
192
-
193
-
194
-
195
-
196
-
197
-
198
-
199
-
200
-
201
-
202
-
203
-
204
-
205
-
206
-
207
-
208
-
209
-
210
-
211
-
212
-
213
-
214
-
215
-
216
-
217
-
218
-
219
-
220
-
221
-
222
-
223
-
224
-
225
-
226
-
227
-
228
-
229
-
230
-
231
-
232
-
233
-
234
-
235
-
236
-
237
-
238
-
239
-
240
-
241
-
242
-
243
-
244
-
245
-
246
-
247
-
248
-
249
-
250
-
251
-
252
-
253
-
254
-
255
-
256
-
257
-
258
-
259
-
260
-
261
-
262
-
263
-
264
-
265
-
266
-
267
-
268
-
269
-
270
-
271
-
272
-
273
-
274
-
275
-
276
-
277
-
278
-
279
-
280
-
281
-
282
-
283
-
284
-
285
-
286
-
287
-
288
-
289
-
290
-
291
-
292
-
293
-
294
-
295
-
296
-
297
-
298
-
299
-
300
-
301
-
302
-
303
-
304
-
305
-
306
-
307
-
308
-
309
-
310
-
311
-
312
-
313
-
314
-
315
-
316
-
317
-
318
-
319
-
320
 |
 |

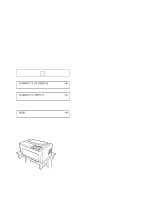
Models 201, 2S2, and 5S3 Coaxial Attachment
Supported computers include:
±
3270 Information Display Systems
±
43xx Processors
±
ES/9000* and ES/9370* Processors
±
3174 and 3274 Remote Control Units.
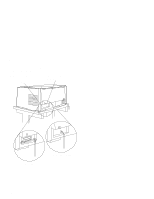
Attaching a Coaxial Signal Cable to the Printer
CAUTION:
±
Make sure the machine is turned Off (O) before you connect
or disconnect the power cord or other cables.
±
If the machine has cables other than the power cord, you
must connect them before you plug the power cord into an
outlet.
You must first unplug the power cord from the outlet
when you remove the other cables.
Chapter 2.
Attaching the 4230 Printer to Your Computer
2-17