IBM 4230 User Guide - Page 78
platen rod
 |
View all IBM 4230 manuals
Add to My Manuals
Save this manual to your list of manuals |
Page 78 highlights
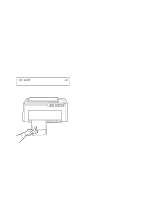
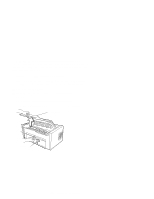
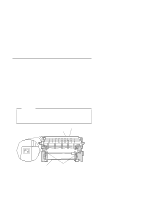
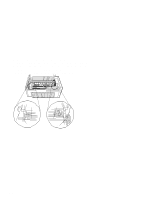
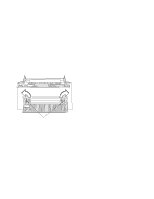
2. Unlock the right blue locking lever and move the right tractor assembly to the extreme right. Te a r B a r Blue Sliding Guides Top of Forms Device Bottom Metal Bar Blue Locking Lever Right Tractor Assembly 3. Lower the forms device into the printer behind the platen rod. Be sure that F2 is in the upper left corner facing you and the blue tractor doors at the bottom of the device enter the printer first. Align the ends of the device with the slots in the frame. Continue to lower the device until the ends of the device rest in the slots of the frame. To p o f Forms Device End of Device Slot in Frame Platen Rod End of Device Slot in Frame 1-56 User's Guide
-
 1
1 -
2
-
3
-
4
-
5
-
6
-
7
-
8
-
9
-
10
-
11
-
12
-
13
-
14
-
15
-
16
-
17
-
18
-
19
-
20
-
21
-
22
-
23
-
24
-
25
-
26
-
27
-
28
-
29
-
30
-
31
-
32
-
33
-
34
-
35
-
36
-
37
-
38
-
39
-
40
-
41
-
42
-
43
-
44
-
45
-
46
-
47
-
48
-
49
-
50
-
51
-
52
-
53
-
54
-
55
-
56
-
57
-
58
-
59
-
60
-
61
-
62
-
63
-
64
-
65
-
66
-
67
-
68
-
69
-
70
-
71
-
72
-
 73
73 -
 74
74 -
 75
75 -
 76
76 -
 77
77 -
 78
78 -
 79
79 -
 80
80 -
 81
81 -
 82
82 -
 83
83 -
84
-
85
-
86
-
87
-
88
-
89
-
90
-
91
-
92
-
93
-
94
-
95
-
96
-
97
-
98
-
99
-
100
-
101
-
102
-
103
-
104
-
105
-
106
-
107
-
108
-
109
-
110
-
111
-
112
-
113
-
114
-
115
-
116
-
117
-
118
-
119
-
120
-
121
-
122
-
123
-
124
-
125
-
126
-
127
-
128
-
129
-
130
-
131
-
132
-
133
-
134
-
135
-
136
-
137
-
138
-
139
-
140
-
141
-
142
-
143
-
144
-
145
-
146
-
147
-
148
-
149
-
150
-
151
-
152
-
153
-
154
-
155
-
156
-
157
-
158
-
159
-
160
-
161
-
162
-
163
-
164
-
165
-
166
-
167
-
168
-
169
-
170
-
171
-
172
-
173
-
174
-
175
-
176
-
177
-
178
-
179
-
180
-
181
-
182
-
183
-
184
-
185
-
186
-
187
-
188
-
189
-
190
-
191
-
192
-
193
-
194
-
195
-
196
-
197
-
198
-
199
-
200
-
201
-
202
-
203
-
204
-
205
-
206
-
207
-
208
-
209
-
210
-
211
-
212
-
213
-
214
-
215
-
216
-
217
-
218
-
219
-
220
-
221
-
222
-
223
-
224
-
225
-
226
-
227
-
228
-
229
-
230
-
231
-
232
-
233
-
234
-
235
-
236
-
237
-
238
-
239
-
240
-
241
-
242
-
243
-
244
-
245
-
246
-
247
-
248
-
249
-
250
-
251
-
252
-
253
-
254
-
255
-
256
-
257
-
258
-
259
-
260
-
261
-
262
-
263
-
264
-
265
-
266
-
267
-
268
-
269
-
270
-
271
-
272
-
273
-
274
-
275
-
276
-
277
-
278
-
279
-
280
-
281
-
282
-
283
-
284
-
285
-
286
-
287
-
288
-
289
-
290
-
291
-
292
-
293
-
294
-
295
-
296
-
297
-
298
-
299
-
300
-
301
-
302
-
303
-
304
-
305
-
306
-
307
-
308
-
309
-
310
-
311
-
312
-
313
-
314
-
315
-
316
-
317
-
318
-
319
-
320
 |
 |

2. Unlock the right
blue locking lever
and move the right tractor
assembly to the extreme right.
Blue Sliding
Guides
Blue Locking Lever
Bottom Metal Bar
Right Tractor Assembly
Top of Forms Device
Tear Bar
3. Lower the forms device into the printer behind the
platen rod
.
Be sure that
F2
is in the upper left corner facing you and the
blue tractor doors
at the bottom of the device enter the printer
first.
Align the ends of the device with the slots in the frame.
Continue to lower the device until the ends of the device rest in
the slots of the frame.
End of
Device
End of
Device
Slot in
Frame
Slot in
Frame
Top of
Forms
Device
Platen Rod
1-56
User’s Guide