IBM 4840-544 Service Guide - Page 117
Keyboard, integration, mounting, countertop, drawer
 |
View all IBM 4840-544 manuals
Add to My Manuals
Save this manual to your list of manuals |
Page 117 highlights
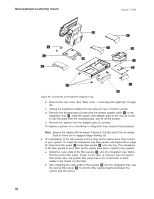
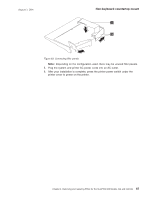
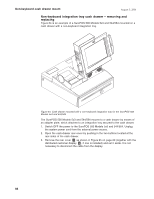
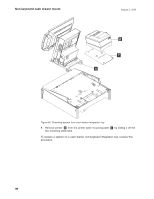
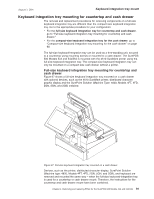
August 3, 2006 Keyboard integration tray mount Keyboard integration tray mounting for countertop and cash drawer The removal and replacement procedures for removing components on a full-size keyboard integration tray are different than the compact-size keyboard integration tray. Go to the appropriate procedure for your configuration: v For the full-size keyboard integration tray for countertop and cash drawer, go to "Full-size keyboard integration tray mounting for countertop and cash drawer." v For the compact-size keyboard integration tray for the cash drawer, go to "Compact-size keyboard integration tray mounting for the cash drawer" on page 98. The full-size keyboard-integration tray can be used as a free-standing unit, secured to a countertop using mounting screws or mounted to a cash drawer. The SurePOS 500 Models 5x3 and 544/564 is mounted with the 4610 SureMark printer using the full-size keyboard-integration tray. The compact-size keyboard-integration tray can only be mounted on a compact-size cash drawer without a printer. Full-size keyboard integration tray mounting for countertop and cash drawer Figure 67 shows a full-size keyboard integration tray mounted on a cash drawer with optional devices, such as the 4610 SureMark printer, distributed character graphic display and the SurePoint Solution (Machine Type: 4820, Models 4FT, 4FD, 2GN, 5GN, and 2GB) installed. Figure 67. Full-size keyboard integration tray mounted on a cash drawer Devices, such as the printer, distributed character display, SurePoint Solution (Machine type: 4820, Models 4FT, 4FD, 2GN, 5GN, and 2GB), and keyboard are removed and mounted the same way - when the full-size keyboard-integration tray is used for a countertop or cash drawer mount. Therefore, the instructions for the countertop and cash drawer mount have been combined. Chapter 4. Removing and replacing FRUs for the SurePOS 500 Models 5x3 and 544/564 91
-
 1
1 -
2
-
3
-
4
-
5
-
6
-
7
-
8
-
9
-
10
-
11
-
12
-
13
-
14
-
15
-
16
-
17
-
18
-
19
-
20
-
21
-
22
-
23
-
24
-
25
-
26
-
27
-
28
-
29
-
30
-
31
-
32
-
33
-
34
-
35
-
36
-
37
-
38
-
39
-
40
-
41
-
42
-
43
-
44
-
45
-
46
-
47
-
48
-
49
-
50
-
51
-
52
-
53
-
54
-
55
-
56
-
57
-
58
-
59
-
60
-
61
-
62
-
63
-
64
-
65
-
66
-
67
-
68
-
69
-
70
-
71
-
72
-
73
-
74
-
75
-
76
-
77
-
78
-
79
-
80
-
81
-
82
-
83
-
84
-
85
-
86
-
87
-
88
-
89
-
90
-
91
-
92
-
93
-
94
-
95
-
96
-
97
-
98
-
99
-
100
-
101
-
102
-
103
-
104
-
105
-
106
-
107
-
108
-
109
-
110
-
111
-
 112
112 -
 113
113 -
 114
114 -
 115
115 -
 116
116 -
 117
117 -
 118
118 -
 119
119 -
 120
120 -
 121
121 -
 122
122 -
123
-
124
-
125
-
126
-
127
-
128
-
129
-
130
-
131
-
132
-
133
-
134
-
135
-
136
-
137
-
138
-
139
-
140
-
141
-
142
-
143
-
144
-
145
-
146
-
147
-
148
-
149
-
150
-
151
-
152
-
153
-
154
-
155
-
156
-
157
-
158
-
159
-
160
-
161
-
162
-
163
-
164
-
165
-
166
-
167
-
168
-
169
-
170
-
171
-
172
-
173
-
174
-
175
-
176
-
177
-
178
-
179
-
180
-
181
-
182
-
183
-
184
-
185
-
186
-
187
-
188
-
189
-
190
-
191
-
192
-
193
-
194
-
195
-
196
-
197
-
198
-
199
-
200
-
201
-
202
-
203
-
204
-
205
-
206
-
207
-
208
-
209
-
210
-
211
-
212
-
213
-
214
-
215
-
216
-
217
-
218
-
219
-
220
-
221
-
222
-
223
-
224
-
225
-
226
-
227
-
228
-
229
-
230
-
231
-
232
-
233
-
234
-
235
-
236
-
237
-
238
-
239
-
240
-
241
-
242
-
243
-
244
-
245
-
246
-
247
-
248
-
249
-
250
-
251
-
252
-
253
-
254
-
255
-
256
-
257
-
258
 |
 |
