IBM 4840-544 Service Guide - Page 60
Handling, static-sensitive, devices
 |
View all IBM 4840-544 manuals
Add to My Manuals
Save this manual to your list of manuals |
Page 60 highlights
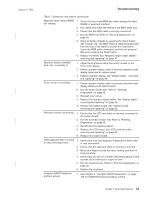
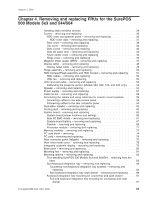
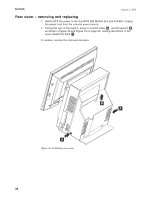
Removing and replacing August 3, 2006 Compact-size keyboard integration tray mounting for the cash drawer. . . . 98 Cash drawer FRUs - removing and replacing 105 Full-size cash drawer FRUs - removing and replacing 105 Removing and replacing a full-size drawer 105 Removing and replacing a full-size slide assembly 106 Compact cash drawer FRUs - removing and replacing 108 Removing and replacing a compact cash drawer 108 Removing and replacing the slide latches 108 Removing and replacing the compact slide assembly 109 Removing and replacing the rollers 110 Removing and replacing the coin-roll cutter 111 Removing and replacing the security clip 112 Common cash-drawer FRUs - removing and replacing 113 Removing and replacing the top cover 113 Removing and replacing the keylock assembly 113 Removing and replacing the latch and sensor assembly 114 Removing and replacing components of the latch and sensor assembly 115 Removing and replacing the keylock insert 116 Removing and replacing the blank lock insert 116 Distributed customer display - disassembling 118 IBM 4610 SureMark printers - removing and replacing 121 4610 SureMark - removal 122 4610 SureMark printer - replacing 123 4610 SureMark printer installation on a non-keyboard integration tray . . . 124 4610 SureMark printer installation on a keyboard integration tray . . . . . 126 4820 SurePoint Solution 127 Distributed 4820 SurePoint Solution 127 Integrated 4820 SurePoint Solution 127 4820 removal on a free-standing SurePOS 500 Models 5x3 and 544/564 127 4820 SurePoint Solution Model 4FT, 4FD, 2GN, 5GN, or 2GB removal on keyboard integration tray 130 Mounting the display tablet on a remote display stand 132 This chapter contains the FRU removal and replacement procedures for all SurePOS 500 Models 5x3 and 544/564 models (4840), although some procedures are for features that are not available on all models. Notes: 1. Before you perform any removal and replacement procedures, see the section titled "Safety Information" on page xiii. 2. The machine serial number for the 4840 is located on the lower right, front frame. See Figure 10 on page 16. Handling static-sensitive devices Attention: Static electricity can damage electronic devices and your system. To avoid damage, keep static-sensitive devices in their static protective bags until you are ready to install them. To reduce the possibility of electrostatic discharge, observe the following precautions: v Limit your movement. Movement can cause static electricity to build up around you. v Handle the device carefully, holding it by its edges or its frame. 34
-
 1
1 -
2
-
3
-
4
-
5
-
6
-
7
-
8
-
9
-
10
-
11
-
12
-
13
-
14
-
15
-
16
-
17
-
18
-
19
-
20
-
21
-
22
-
23
-
24
-
25
-
26
-
27
-
28
-
29
-
30
-
31
-
32
-
33
-
34
-
35
-
36
-
37
-
38
-
39
-
40
-
41
-
42
-
43
-
44
-
45
-
46
-
47
-
48
-
49
-
50
-
51
-
52
-
53
-
54
-
 55
55 -
 56
56 -
 57
57 -
 58
58 -
 59
59 -
 60
60 -
 61
61 -
 62
62 -
 63
63 -
 64
64 -
 65
65 -
66
-
67
-
68
-
69
-
70
-
71
-
72
-
73
-
74
-
75
-
76
-
77
-
78
-
79
-
80
-
81
-
82
-
83
-
84
-
85
-
86
-
87
-
88
-
89
-
90
-
91
-
92
-
93
-
94
-
95
-
96
-
97
-
98
-
99
-
100
-
101
-
102
-
103
-
104
-
105
-
106
-
107
-
108
-
109
-
110
-
111
-
112
-
113
-
114
-
115
-
116
-
117
-
118
-
119
-
120
-
121
-
122
-
123
-
124
-
125
-
126
-
127
-
128
-
129
-
130
-
131
-
132
-
133
-
134
-
135
-
136
-
137
-
138
-
139
-
140
-
141
-
142
-
143
-
144
-
145
-
146
-
147
-
148
-
149
-
150
-
151
-
152
-
153
-
154
-
155
-
156
-
157
-
158
-
159
-
160
-
161
-
162
-
163
-
164
-
165
-
166
-
167
-
168
-
169
-
170
-
171
-
172
-
173
-
174
-
175
-
176
-
177
-
178
-
179
-
180
-
181
-
182
-
183
-
184
-
185
-
186
-
187
-
188
-
189
-
190
-
191
-
192
-
193
-
194
-
195
-
196
-
197
-
198
-
199
-
200
-
201
-
202
-
203
-
204
-
205
-
206
-
207
-
208
-
209
-
210
-
211
-
212
-
213
-
214
-
215
-
216
-
217
-
218
-
219
-
220
-
221
-
222
-
223
-
224
-
225
-
226
-
227
-
228
-
229
-
230
-
231
-
232
-
233
-
234
-
235
-
236
-
237
-
238
-
239
-
240
-
241
-
242
-
243
-
244
-
245
-
246
-
247
-
248
-
249
-
250
-
251
-
252
-
253
-
254
-
255
-
256
-
257
-
258
 |
 |