IBM 4840-544 Service Guide - Page 45
Starting, Setup, Utility
 |
View all IBM 4840-544 manuals
Add to My Manuals
Save this manual to your list of manuals |
Page 45 highlights
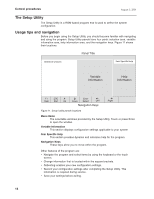
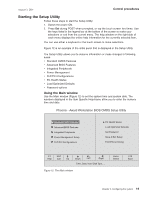
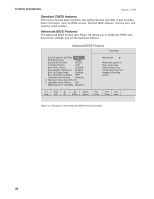
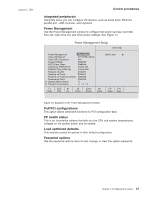
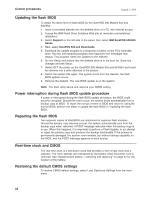
August 3, 2006 Control procedures Starting the Setup Utility Follow these steps to start the Setup Utility: 1. Switch the power ON. 2. Press Del during POST when prompted, or tap the touch screen two times. Use the keys listed in the legend bar at the bottom of the screen to make your selections or exit from the current menu. The help window on the right side of each menu displays the online help information for the currently selected item.. You can use either a keyboard or the touch screen to make selections. Figure 12 is an example of the initial panel that is displayed in the Setup Utility. The Setup Utility allows you to observe information or make changes in following areas: v Standard CMOS Features v Advanced BIOS Features v Integrated Peripherals v Power Management v PnP/PCI Configurations v PC Health Status v Load Optimized Defaults v Password options Using the Main window Use the Main window (Figure 12) to set the system time and system date. The numbers displayed in the Item Specific Help-frame allow you to enter the numeric time and date. Phoenix - Award Workstation BIOS CMOS Setup Utility Standard CM0S Features Advanced BIOS Features Integrated Peripherals Power Management Setup PnP/PCI Configurations PC Health Status Load Optimized Defaults Set Password Save & Exit Setup Exit Without Saving F1 ESC Help Exit Up Down Left Right Time, Date, Hard Disk Type..... Figure 12. The Main window Enter Select F10 Save Chapter 2. Configuring the system 19
-
 1
1 -
2
-
3
-
4
-
5
-
6
-
7
-
8
-
9
-
10
-
11
-
12
-
13
-
14
-
15
-
16
-
17
-
18
-
19
-
20
-
21
-
22
-
23
-
24
-
25
-
26
-
27
-
28
-
29
-
30
-
31
-
32
-
33
-
34
-
35
-
36
-
37
-
38
-
39
-
 40
40 -
 41
41 -
 42
42 -
 43
43 -
 44
44 -
 45
45 -
 46
46 -
 47
47 -
 48
48 -
 49
49 -
 50
50 -
51
-
52
-
53
-
54
-
55
-
56
-
57
-
58
-
59
-
60
-
61
-
62
-
63
-
64
-
65
-
66
-
67
-
68
-
69
-
70
-
71
-
72
-
73
-
74
-
75
-
76
-
77
-
78
-
79
-
80
-
81
-
82
-
83
-
84
-
85
-
86
-
87
-
88
-
89
-
90
-
91
-
92
-
93
-
94
-
95
-
96
-
97
-
98
-
99
-
100
-
101
-
102
-
103
-
104
-
105
-
106
-
107
-
108
-
109
-
110
-
111
-
112
-
113
-
114
-
115
-
116
-
117
-
118
-
119
-
120
-
121
-
122
-
123
-
124
-
125
-
126
-
127
-
128
-
129
-
130
-
131
-
132
-
133
-
134
-
135
-
136
-
137
-
138
-
139
-
140
-
141
-
142
-
143
-
144
-
145
-
146
-
147
-
148
-
149
-
150
-
151
-
152
-
153
-
154
-
155
-
156
-
157
-
158
-
159
-
160
-
161
-
162
-
163
-
164
-
165
-
166
-
167
-
168
-
169
-
170
-
171
-
172
-
173
-
174
-
175
-
176
-
177
-
178
-
179
-
180
-
181
-
182
-
183
-
184
-
185
-
186
-
187
-
188
-
189
-
190
-
191
-
192
-
193
-
194
-
195
-
196
-
197
-
198
-
199
-
200
-
201
-
202
-
203
-
204
-
205
-
206
-
207
-
208
-
209
-
210
-
211
-
212
-
213
-
214
-
215
-
216
-
217
-
218
-
219
-
220
-
221
-
222
-
223
-
224
-
225
-
226
-
227
-
228
-
229
-
230
-
231
-
232
-
233
-
234
-
235
-
236
-
237
-
238
-
239
-
240
-
241
-
242
-
243
-
244
-
245
-
246
-
247
-
248
-
249
-
250
-
251
-
252
-
253
-
254
-
255
-
256
-
257
-
258
 |
 |
