IBM 4840-544 Service Guide - Page 148
SureMark, removal
 |
View all IBM 4840-544 manuals
Add to My Manuals
Save this manual to your list of manuals |
Page 148 highlights
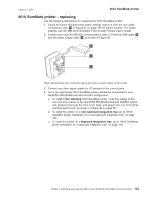
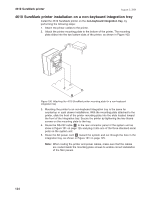
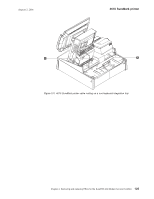
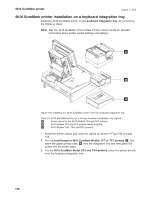
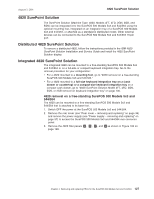
4610 SureMark printer August 3, 2006 4610 SureMark - removal 1. Switch OFF the power at the SurePOS 500 Models 5x3 and 544/564. 2. Remove the SurePOS 500 Models 5x3 and 544/564 rear cover and filler panels (see "Rear cover - removing and replacing" on page 38). 3. Remove the power supply (see "Power supply - removing and replacing" on page 57) to get access to the system unit rear connector panel. See Figure 40 on page 60 for rear connector port assignment. 4. If the printer is mounted on a cash-drawer integration tray or a countertop integration tray, remove the filler panels to get access to the printer mounting plate. Untighten the two thumb screw on the mounting plate to the tray. 5. Remove the 4610 SureMark printer from the integration tray: a. For the 4610 SureMark TG3, TG4 or TG5, lift the printer up and off the integration tray. b. For the 4610 SureMark TF6 or TF7 printer on a non-keybard integration tray, remove the mounting plate from the printer. See Figure 98 for details. Figure 98. Detaching the 4610 SureMark TF6 printer mounting plate for the non-keyboard integration tray c. For the 4610 SureMark TF6 or TF7 printer on a keyboard integration tray, lift the printer up and off the printer base. See Figure 102 on page 126 for details. 6. Disconnect the printer cable. 7. See "4610 SureMark printer - replacing" on page 123 for information on replacing the printer. 122
-
 1
1 -
2
-
3
-
4
-
5
-
6
-
7
-
8
-
9
-
10
-
11
-
12
-
13
-
14
-
15
-
16
-
17
-
18
-
19
-
20
-
21
-
22
-
23
-
24
-
25
-
26
-
27
-
28
-
29
-
30
-
31
-
32
-
33
-
34
-
35
-
36
-
37
-
38
-
39
-
40
-
41
-
42
-
43
-
44
-
45
-
46
-
47
-
48
-
49
-
50
-
51
-
52
-
53
-
54
-
55
-
56
-
57
-
58
-
59
-
60
-
61
-
62
-
63
-
64
-
65
-
66
-
67
-
68
-
69
-
70
-
71
-
72
-
73
-
74
-
75
-
76
-
77
-
78
-
79
-
80
-
81
-
82
-
83
-
84
-
85
-
86
-
87
-
88
-
89
-
90
-
91
-
92
-
93
-
94
-
95
-
96
-
97
-
98
-
99
-
100
-
101
-
102
-
103
-
104
-
105
-
106
-
107
-
108
-
109
-
110
-
111
-
112
-
113
-
114
-
115
-
116
-
117
-
118
-
119
-
120
-
121
-
122
-
123
-
124
-
125
-
126
-
127
-
128
-
129
-
130
-
131
-
132
-
133
-
134
-
135
-
136
-
137
-
138
-
139
-
140
-
141
-
142
-
 143
143 -
 144
144 -
 145
145 -
 146
146 -
 147
147 -
 148
148 -
 149
149 -
 150
150 -
 151
151 -
 152
152 -
 153
153 -
154
-
155
-
156
-
157
-
158
-
159
-
160
-
161
-
162
-
163
-
164
-
165
-
166
-
167
-
168
-
169
-
170
-
171
-
172
-
173
-
174
-
175
-
176
-
177
-
178
-
179
-
180
-
181
-
182
-
183
-
184
-
185
-
186
-
187
-
188
-
189
-
190
-
191
-
192
-
193
-
194
-
195
-
196
-
197
-
198
-
199
-
200
-
201
-
202
-
203
-
204
-
205
-
206
-
207
-
208
-
209
-
210
-
211
-
212
-
213
-
214
-
215
-
216
-
217
-
218
-
219
-
220
-
221
-
222
-
223
-
224
-
225
-
226
-
227
-
228
-
229
-
230
-
231
-
232
-
233
-
234
-
235
-
236
-
237
-
238
-
239
-
240
-
241
-
242
-
243
-
244
-
245
-
246
-
247
-
248
-
249
-
250
-
251
-
252
-
253
-
254
-
255
-
256
-
257
-
258
 |
 |
