IBM 4840-544 Service Guide - Page 95
Fansink, removing, replacing
 |
View all IBM 4840-544 manuals
Add to My Manuals
Save this manual to your list of manuals |
Page 95 highlights
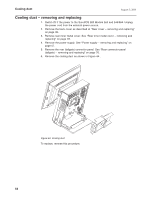
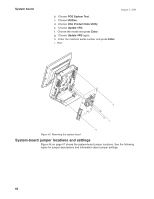
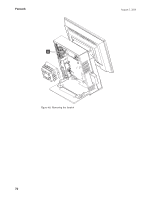
August 3, 2006 Fansink Fansink - removing and replacing Attention: Establish personal grounding before touching this unit. See "Electrostatic discharge (ESD)" on page 197. Notes: 1. The thermal interface material on the fansink is reusable. Do not discard. 2. The fansink should be removed from the processor only when warm. Allow the machine to run for 20 minutes to warm the thermal material before switching OFF power and removing the fansink. 3. If the processor pulls free from the system board while still attached to the fansink, you must carefully remove it. Use the following steps to replace the fansink. Refer to Figure 48 on page 70. 1. Switch OFF the power to the SurePOS 500 Models 5x3 and 544/564. Unplug the power cord from the external power source. 2. Remove the back cover as described at "Covers - removing and replacing" on page 36. 3. Remove the cooling duct. See "Cooling duct - removing and replacing" on page 64. 4. Disconnect the fan cable from the system board. 5. See Figure 48 on page 70. Loosen the two screws A and pivot the clips to the side. 6. Remove the fansink from the processor by twisting slightly to break the thermal material bond. Pulling the heatsink up might pull the processor free from the system board. See Figure 48 on page 70. To replace the fansink, reverse this procedure. The thermal interface material may be reused if: v this is the first time it has been removed v you are using the same processor that was previously mated to the fansink. Chapter 4. Removing and replacing FRUs for the SurePOS 500 Models 5x3 and 544/564 69
-
 1
1 -
2
-
3
-
4
-
5
-
6
-
7
-
8
-
9
-
10
-
11
-
12
-
13
-
14
-
15
-
16
-
17
-
18
-
19
-
20
-
21
-
22
-
23
-
24
-
25
-
26
-
27
-
28
-
29
-
30
-
31
-
32
-
33
-
34
-
35
-
36
-
37
-
38
-
39
-
40
-
41
-
42
-
43
-
44
-
45
-
46
-
47
-
48
-
49
-
50
-
51
-
52
-
53
-
54
-
55
-
56
-
57
-
58
-
59
-
60
-
61
-
62
-
63
-
64
-
65
-
66
-
67
-
68
-
69
-
70
-
71
-
72
-
73
-
74
-
75
-
76
-
77
-
78
-
79
-
80
-
81
-
82
-
83
-
84
-
85
-
86
-
87
-
88
-
89
-
 90
90 -
 91
91 -
 92
92 -
 93
93 -
 94
94 -
 95
95 -
 96
96 -
 97
97 -
 98
98 -
 99
99 -
 100
100 -
101
-
102
-
103
-
104
-
105
-
106
-
107
-
108
-
109
-
110
-
111
-
112
-
113
-
114
-
115
-
116
-
117
-
118
-
119
-
120
-
121
-
122
-
123
-
124
-
125
-
126
-
127
-
128
-
129
-
130
-
131
-
132
-
133
-
134
-
135
-
136
-
137
-
138
-
139
-
140
-
141
-
142
-
143
-
144
-
145
-
146
-
147
-
148
-
149
-
150
-
151
-
152
-
153
-
154
-
155
-
156
-
157
-
158
-
159
-
160
-
161
-
162
-
163
-
164
-
165
-
166
-
167
-
168
-
169
-
170
-
171
-
172
-
173
-
174
-
175
-
176
-
177
-
178
-
179
-
180
-
181
-
182
-
183
-
184
-
185
-
186
-
187
-
188
-
189
-
190
-
191
-
192
-
193
-
194
-
195
-
196
-
197
-
198
-
199
-
200
-
201
-
202
-
203
-
204
-
205
-
206
-
207
-
208
-
209
-
210
-
211
-
212
-
213
-
214
-
215
-
216
-
217
-
218
-
219
-
220
-
221
-
222
-
223
-
224
-
225
-
226
-
227
-
228
-
229
-
230
-
231
-
232
-
233
-
234
-
235
-
236
-
237
-
238
-
239
-
240
-
241
-
242
-
243
-
244
-
245
-
246
-
247
-
248
-
249
-
250
-
251
-
252
-
253
-
254
-
255
-
256
-
257
-
258
 |
 |
