IBM 4840-544 Service Guide - Page 131
drawer, removing, replacing, Full-size
 |
View all IBM 4840-544 manuals
Add to My Manuals
Save this manual to your list of manuals |
Page 131 highlights
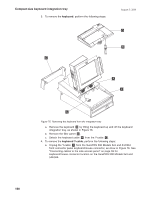
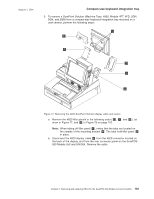
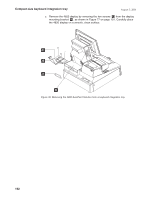
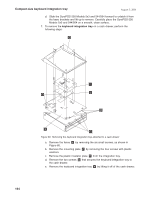
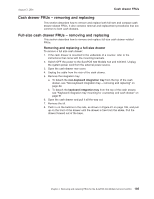
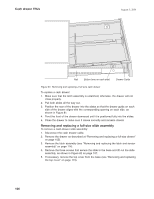
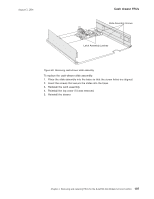
August 3, 2006 Cash drawer FRUs Cash drawer FRUs - removing and replacing This section describes how to remove and replace both full-size and compact cash drawer-related FRUs. It also contains removal and replacement procedures that are common to both cash drawers. Full-size cash drawer FRUs - removing and replacing This section describes how to remove and replace full-size cash drawer-related FRUs. Removing and replacing a full-size drawer To remove a full size cash drawer: 1. If the cash drawer is mounted to the underside of a counter, refer to the instructions that came with the mounting brackets. 2. Switch OFF the power to the SurePOS 500 Models 5x3 and 544/564. Unplug the system power cord from the external power source. 3. Open the cash-drawer rear cover. 4. Unplug the cable from the rear of the cash drawer. 5. Remove the integration tray: a. To detach the non-keyboard integration tray from the top of the cash drawer, see "Non-keyboard integration tray - removing and replacing" on page 84. b. To detach the keyboard integration tray from the top of the cash drawer, see "Keyboard integration tray mounting for countertop and cash drawer" on page 91 6. Open the cash drawer and pull it all the way out. 7. Remove the till. 8. Push in on the buttons in the rails, as shown in Figure 81 on page 106, and pull up on the front of the drawer until the drawer is free from the slides. Pull the drawer forward out of the base. Chapter 4. Removing and replacing FRUs for the SurePOS 500 Models 5x3 and 544/564 105
-
 1
1 -
2
-
3
-
4
-
5
-
6
-
7
-
8
-
9
-
10
-
11
-
12
-
13
-
14
-
15
-
16
-
17
-
18
-
19
-
20
-
21
-
22
-
23
-
24
-
25
-
26
-
27
-
28
-
29
-
30
-
31
-
32
-
33
-
34
-
35
-
36
-
37
-
38
-
39
-
40
-
41
-
42
-
43
-
44
-
45
-
46
-
47
-
48
-
49
-
50
-
51
-
52
-
53
-
54
-
55
-
56
-
57
-
58
-
59
-
60
-
61
-
62
-
63
-
64
-
65
-
66
-
67
-
68
-
69
-
70
-
71
-
72
-
73
-
74
-
75
-
76
-
77
-
78
-
79
-
80
-
81
-
82
-
83
-
84
-
85
-
86
-
87
-
88
-
89
-
90
-
91
-
92
-
93
-
94
-
95
-
96
-
97
-
98
-
99
-
100
-
101
-
102
-
103
-
104
-
105
-
106
-
107
-
108
-
109
-
110
-
111
-
112
-
113
-
114
-
115
-
116
-
117
-
118
-
119
-
120
-
121
-
122
-
123
-
124
-
125
-
 126
126 -
 127
127 -
 128
128 -
 129
129 -
 130
130 -
 131
131 -
 132
132 -
 133
133 -
 134
134 -
 135
135 -
 136
136 -
137
-
138
-
139
-
140
-
141
-
142
-
143
-
144
-
145
-
146
-
147
-
148
-
149
-
150
-
151
-
152
-
153
-
154
-
155
-
156
-
157
-
158
-
159
-
160
-
161
-
162
-
163
-
164
-
165
-
166
-
167
-
168
-
169
-
170
-
171
-
172
-
173
-
174
-
175
-
176
-
177
-
178
-
179
-
180
-
181
-
182
-
183
-
184
-
185
-
186
-
187
-
188
-
189
-
190
-
191
-
192
-
193
-
194
-
195
-
196
-
197
-
198
-
199
-
200
-
201
-
202
-
203
-
204
-
205
-
206
-
207
-
208
-
209
-
210
-
211
-
212
-
213
-
214
-
215
-
216
-
217
-
218
-
219
-
220
-
221
-
222
-
223
-
224
-
225
-
226
-
227
-
228
-
229
-
230
-
231
-
232
-
233
-
234
-
235
-
236
-
237
-
238
-
239
-
240
-
241
-
242
-
243
-
244
-
245
-
246
-
247
-
248
-
249
-
250
-
251
-
252
-
253
-
254
-
255
-
256
-
257
-
258
 |
 |