IBM 4840-544 Service Guide - Page 139
Common, cash-drawer, removing, replacing
 |
View all IBM 4840-544 manuals
Add to My Manuals
Save this manual to your list of manuals |
Page 139 highlights
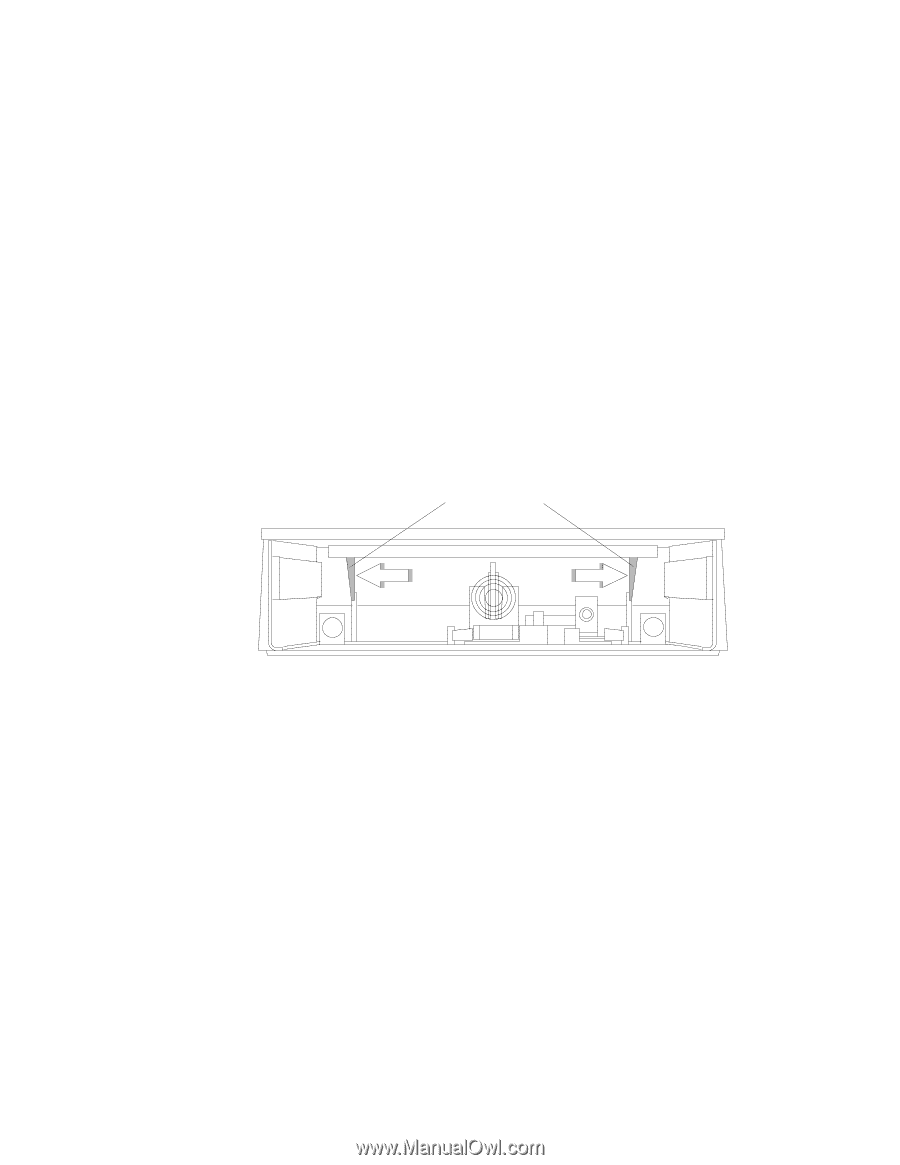
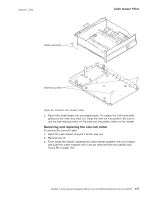
August 3, 2006 Common cash drawer FRUs Common cash-drawer FRUs - removing and replacing This section describes how to remove and replace compact cash-drawer-related FRUs that are common to both the full-size and compact cash drawers. Removing and replacing the top cover To remove the top cover of a cash drawer: 1. Disconnect the cash drawer cable from the rear of the cash drawer. (There may be other cables routed through the rear of the top cover.) Remove the rear panel by releasing it at the pivots. Separate the top cover and base without disturbing these cables. Disconnect cables from the terminal unit when necessary. 2. Open the rear panel by pushing the buttons at the upper rear corners of the cover. 3. Set the devices mounted on the top cover to the side. 4. Remove the drawer (see "Removing and replacing a full-size drawer" on page 105 or "Removing and replacing a compact cash drawer" on page 108). 5. To separate the top cover from the base, reach in from the front and push the cover latches outward while pushing them to the rear. The cover slides off toward the rear (see Figure 90). Cover Latches Figure 90. Removing and replacing the top cover Removing and replacing the keylock assembly To remove the keylock assembly: 1. Remove the cash drawer (see "Removing and replacing a compact cash drawer" on page 108 or "Removing and replacing a full-size drawer" on page 105). 2. Remove the lock retainer clip holding the keylock assembly on the inside of the drawer (see Figure 91 on page 114). 3. Slide the keylock assembly out of the front of the drawer. Note: It might require some force to free the keylock assembly. Chapter 4. Removing and replacing FRUs for the SurePOS 500 Models 5x3 and 544/564 113
-
 1
1 -
2
-
3
-
4
-
5
-
6
-
7
-
8
-
9
-
10
-
11
-
12
-
13
-
14
-
15
-
16
-
17
-
18
-
19
-
20
-
21
-
22
-
23
-
24
-
25
-
26
-
27
-
28
-
29
-
30
-
31
-
32
-
33
-
34
-
35
-
36
-
37
-
38
-
39
-
40
-
41
-
42
-
43
-
44
-
45
-
46
-
47
-
48
-
49
-
50
-
51
-
52
-
53
-
54
-
55
-
56
-
57
-
58
-
59
-
60
-
61
-
62
-
63
-
64
-
65
-
66
-
67
-
68
-
69
-
70
-
71
-
72
-
73
-
74
-
75
-
76
-
77
-
78
-
79
-
80
-
81
-
82
-
83
-
84
-
85
-
86
-
87
-
88
-
89
-
90
-
91
-
92
-
93
-
94
-
95
-
96
-
97
-
98
-
99
-
100
-
101
-
102
-
103
-
104
-
105
-
106
-
107
-
108
-
109
-
110
-
111
-
112
-
113
-
114
-
115
-
116
-
117
-
118
-
119
-
120
-
121
-
122
-
123
-
124
-
125
-
126
-
127
-
128
-
129
-
130
-
131
-
132
-
133
-
 134
134 -
 135
135 -
 136
136 -
 137
137 -
 138
138 -
 139
139 -
 140
140 -
 141
141 -
 142
142 -
 143
143 -
 144
144 -
145
-
146
-
147
-
148
-
149
-
150
-
151
-
152
-
153
-
154
-
155
-
156
-
157
-
158
-
159
-
160
-
161
-
162
-
163
-
164
-
165
-
166
-
167
-
168
-
169
-
170
-
171
-
172
-
173
-
174
-
175
-
176
-
177
-
178
-
179
-
180
-
181
-
182
-
183
-
184
-
185
-
186
-
187
-
188
-
189
-
190
-
191
-
192
-
193
-
194
-
195
-
196
-
197
-
198
-
199
-
200
-
201
-
202
-
203
-
204
-
205
-
206
-
207
-
208
-
209
-
210
-
211
-
212
-
213
-
214
-
215
-
216
-
217
-
218
-
219
-
220
-
221
-
222
-
223
-
224
-
225
-
226
-
227
-
228
-
229
-
230
-
231
-
232
-
233
-
234
-
235
-
236
-
237
-
238
-
239
-
240
-
241
-
242
-
243
-
244
-
245
-
246
-
247
-
248
-
249
-
250
-
251
-
252
-
253
-
254
-
255
-
256
-
257
-
258
 |
 |