IBM 4840-544 Service Guide - Page 119
keyboard, Y-cable
 |
View all IBM 4840-544 manuals
Add to My Manuals
Save this manual to your list of manuals |
Page 119 highlights
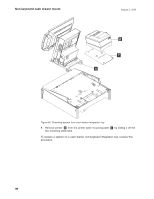
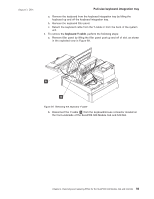
August 3, 2006 Full-size keyboard integration tray a. Remove the keyboard from the keyboard integration tray by lifting the keyboard up and off the keyboard integration tray. b. Remove the keyboard filler panel. c. Detach the keyboard cable from the Y-cable or from the back of the system unit. 4. To remove the keyboard Y-cable, perform the following steps: a. Remove filler panel by lifting the filler panel post up and off of slot, as shown in the exploded view in Figure 69. A B Figure 69. Removing the keyboard Y-cable b. Disconnect the Y-cable A from the keyboard/mouse connector located on the front-underside of the SurePOS 500 Models 5x3 and 544/564. Chapter 4. Removing and replacing FRUs for the SurePOS 500 Models 5x3 and 544/564 93
-
 1
1 -
2
-
3
-
4
-
5
-
6
-
7
-
8
-
9
-
10
-
11
-
12
-
13
-
14
-
15
-
16
-
17
-
18
-
19
-
20
-
21
-
22
-
23
-
24
-
25
-
26
-
27
-
28
-
29
-
30
-
31
-
32
-
33
-
34
-
35
-
36
-
37
-
38
-
39
-
40
-
41
-
42
-
43
-
44
-
45
-
46
-
47
-
48
-
49
-
50
-
51
-
52
-
53
-
54
-
55
-
56
-
57
-
58
-
59
-
60
-
61
-
62
-
63
-
64
-
65
-
66
-
67
-
68
-
69
-
70
-
71
-
72
-
73
-
74
-
75
-
76
-
77
-
78
-
79
-
80
-
81
-
82
-
83
-
84
-
85
-
86
-
87
-
88
-
89
-
90
-
91
-
92
-
93
-
94
-
95
-
96
-
97
-
98
-
99
-
100
-
101
-
102
-
103
-
104
-
105
-
106
-
107
-
108
-
109
-
110
-
111
-
112
-
113
-
 114
114 -
 115
115 -
 116
116 -
 117
117 -
 118
118 -
 119
119 -
 120
120 -
 121
121 -
 122
122 -
 123
123 -
 124
124 -
125
-
126
-
127
-
128
-
129
-
130
-
131
-
132
-
133
-
134
-
135
-
136
-
137
-
138
-
139
-
140
-
141
-
142
-
143
-
144
-
145
-
146
-
147
-
148
-
149
-
150
-
151
-
152
-
153
-
154
-
155
-
156
-
157
-
158
-
159
-
160
-
161
-
162
-
163
-
164
-
165
-
166
-
167
-
168
-
169
-
170
-
171
-
172
-
173
-
174
-
175
-
176
-
177
-
178
-
179
-
180
-
181
-
182
-
183
-
184
-
185
-
186
-
187
-
188
-
189
-
190
-
191
-
192
-
193
-
194
-
195
-
196
-
197
-
198
-
199
-
200
-
201
-
202
-
203
-
204
-
205
-
206
-
207
-
208
-
209
-
210
-
211
-
212
-
213
-
214
-
215
-
216
-
217
-
218
-
219
-
220
-
221
-
222
-
223
-
224
-
225
-
226
-
227
-
228
-
229
-
230
-
231
-
232
-
233
-
234
-
235
-
236
-
237
-
238
-
239
-
240
-
241
-
242
-
243
-
244
-
245
-
246
-
247
-
248
-
249
-
250
-
251
-
252
-
253
-
254
-
255
-
256
-
257
-
258
 |
 |

a.
Remove
the
keyboard
from
the
keyboard
integration
tray
by
lifting
the
keyboard
up
and
off
the
keyboard
integration
tray.
b.
Remove
the
keyboard
filler
panel.
c.
Detach
the
keyboard
cable
from
the
Y-cable
or
from
the
back
of
the
system
unit.
4.
To
remove
the
keyboard
Y-cable
,
perform
the
following
steps:
a.
Remove
filler
panel
by
lifting
the
filler
panel
post
up
and
off
of
slot,
as
shown
in
the
exploded
view
in
Figure
69.
b.
Disconnect
the
Y-cable
±A²
from
the
keyboard/mouse
connector
located
on
the
front-underside
of
the
SurePOS
500
Models
5x3
and
544/564.
B
A
Figure
69.
Removing
the
keyboard
Y-cable
Full-size
keyboard
integration
tray
August
3,
2006
Chapter
4.
Removing
and
replacing
FRUs
for
the
SurePOS
500
Models
5x3
and
544/564
93