IBM 4840-544 Service Guide - Page 55
Recalibrate
 |
View all IBM 4840-544 manuals
Add to My Manuals
Save this manual to your list of manuals |
Page 55 highlights
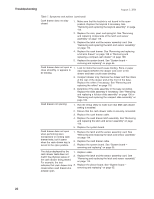
August 3, 2006 | | | | | | | | Troubleshooting Table 7. Symptoms and actions (continued) Magnetic stripe reader (MSR) not reading. 1. Check the three-track MSR dip switch settings for either RS232 or keyboard interface. 2. Run Setup and check the setting in the MSR serial port. 3. Ensure that the MSR cable is securely connected. 4. Run the MSR test. Refer to "Running Diagnostics" on page 30. 5. Reset to factory defaults by pressing the Reset button with a paper clip. The MSR must be removed temporarily from the side of the tablet to access the reset button. Leave the MSR cable connected, and the unit powered ON when pressing the Reset button. 6. Replace the MSR. See "Magnetic stripe reader (MSR) - removing and replacing" on page 47. Operator display backlight: dark, dim, or partially lit. 1. Adjust the brightness using the button located on the front of the display. 2. Ensure operator display cable is securely attached under display tablet and at system board. 3. Replace operator display, see "Display tablet - removing and replacing" on page 48. Touch screen not working. 1. Ensure operator display cable is securely attached under display tablet and at system board. 2. Run the touch screen test. Refer to "Running Diagnostics" on page 30. 3. Reinstall touch driver. 4. Replace the operator display tablet. See "Display tablet - removing and replacing" on page 48. 5. Replace the system board. See "System board - removing and replacing" on page 65. Presence sensor not working. 1. Ensure that the LED card cable is securely connected to the system board. 2. Run the presence sensor test. Refer to "Running Diagnostics" on page 30. 3. Recalibrate the presence sensor. 4. Replace the LED board. See "LED card and cable - removing and replacing" on page 53. 5. Replace the system board. PS/2 keyboard does not work or only some keys work. 1. Ensure that only one keyboard is attached to either side or rear connectors. 2. Ensure that the keyboard cable is securely connected. 3. Move your fingers across the keys, making sure that no keys are stuck. 4. Ensure that you are on a screen that allows typing. Some screens do not allow you to type on them. 5. Run the keyboard test. Refer to "Running Diagnostics" on page 30. 6. Replace the keyboard. Compact ANPOS keyboard problem solving. 1. See Chapter 5, "Compact ANPOS Keyboard," on page 135 for CANPOS Keyboard problem solving. Chapter 3. Resolving problems 29
-
 1
1 -
2
-
3
-
4
-
5
-
6
-
7
-
8
-
9
-
10
-
11
-
12
-
13
-
14
-
15
-
16
-
17
-
18
-
19
-
20
-
21
-
22
-
23
-
24
-
25
-
26
-
27
-
28
-
29
-
30
-
31
-
32
-
33
-
34
-
35
-
36
-
37
-
38
-
39
-
40
-
41
-
42
-
43
-
44
-
45
-
46
-
47
-
48
-
49
-
 50
50 -
 51
51 -
 52
52 -
 53
53 -
 54
54 -
 55
55 -
 56
56 -
 57
57 -
 58
58 -
 59
59 -
 60
60 -
61
-
62
-
63
-
64
-
65
-
66
-
67
-
68
-
69
-
70
-
71
-
72
-
73
-
74
-
75
-
76
-
77
-
78
-
79
-
80
-
81
-
82
-
83
-
84
-
85
-
86
-
87
-
88
-
89
-
90
-
91
-
92
-
93
-
94
-
95
-
96
-
97
-
98
-
99
-
100
-
101
-
102
-
103
-
104
-
105
-
106
-
107
-
108
-
109
-
110
-
111
-
112
-
113
-
114
-
115
-
116
-
117
-
118
-
119
-
120
-
121
-
122
-
123
-
124
-
125
-
126
-
127
-
128
-
129
-
130
-
131
-
132
-
133
-
134
-
135
-
136
-
137
-
138
-
139
-
140
-
141
-
142
-
143
-
144
-
145
-
146
-
147
-
148
-
149
-
150
-
151
-
152
-
153
-
154
-
155
-
156
-
157
-
158
-
159
-
160
-
161
-
162
-
163
-
164
-
165
-
166
-
167
-
168
-
169
-
170
-
171
-
172
-
173
-
174
-
175
-
176
-
177
-
178
-
179
-
180
-
181
-
182
-
183
-
184
-
185
-
186
-
187
-
188
-
189
-
190
-
191
-
192
-
193
-
194
-
195
-
196
-
197
-
198
-
199
-
200
-
201
-
202
-
203
-
204
-
205
-
206
-
207
-
208
-
209
-
210
-
211
-
212
-
213
-
214
-
215
-
216
-
217
-
218
-
219
-
220
-
221
-
222
-
223
-
224
-
225
-
226
-
227
-
228
-
229
-
230
-
231
-
232
-
233
-
234
-
235
-
236
-
237
-
238
-
239
-
240
-
241
-
242
-
243
-
244
-
245
-
246
-
247
-
248
-
249
-
250
-
251
-
252
-
253
-
254
-
255
-
256
-
257
-
258
 |
 |