IBM 4840-544 Service Guide - Page 135
Removing, replacing, compact, slide, assembly
 |
View all IBM 4840-544 manuals
Add to My Manuals
Save this manual to your list of manuals |
Page 135 highlights
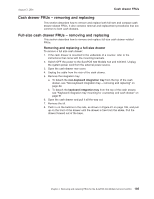
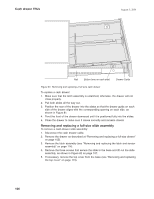
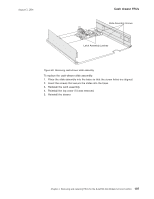
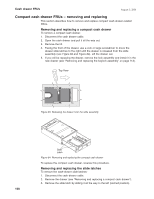
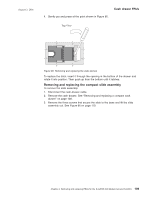
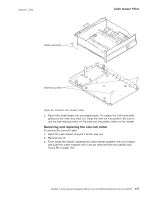
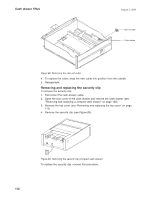
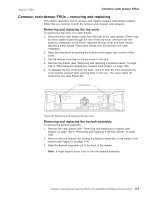
August 3, 2006 Cash drawer FRUs 4. Gently pry and press at the point shown in Figure 85. Figure 85. Removing and replacing the slide latches To replace the latch, insert it through the opening in the bottom of the drawer and rotate it into position. Then push up from the bottom until it latches. Removing and replacing the compact slide assembly To remove the slide assembly: 1. Disconnect the cash-drawer cable. 2. Remove the cash drawer. See "Removing and replacing a compact cash drawer" on page 108. 3. Remove the three screws that secure the slide to the base and lift the slide assembly out. See Figure 86 on page 110. Chapter 4. Removing and replacing FRUs for the SurePOS 500 Models 5x3 and 544/564 109
-
 1
1 -
2
-
3
-
4
-
5
-
6
-
7
-
8
-
9
-
10
-
11
-
12
-
13
-
14
-
15
-
16
-
17
-
18
-
19
-
20
-
21
-
22
-
23
-
24
-
25
-
26
-
27
-
28
-
29
-
30
-
31
-
32
-
33
-
34
-
35
-
36
-
37
-
38
-
39
-
40
-
41
-
42
-
43
-
44
-
45
-
46
-
47
-
48
-
49
-
50
-
51
-
52
-
53
-
54
-
55
-
56
-
57
-
58
-
59
-
60
-
61
-
62
-
63
-
64
-
65
-
66
-
67
-
68
-
69
-
70
-
71
-
72
-
73
-
74
-
75
-
76
-
77
-
78
-
79
-
80
-
81
-
82
-
83
-
84
-
85
-
86
-
87
-
88
-
89
-
90
-
91
-
92
-
93
-
94
-
95
-
96
-
97
-
98
-
99
-
100
-
101
-
102
-
103
-
104
-
105
-
106
-
107
-
108
-
109
-
110
-
111
-
112
-
113
-
114
-
115
-
116
-
117
-
118
-
119
-
120
-
121
-
122
-
123
-
124
-
125
-
126
-
127
-
128
-
129
-
 130
130 -
 131
131 -
 132
132 -
 133
133 -
 134
134 -
 135
135 -
 136
136 -
 137
137 -
 138
138 -
 139
139 -
 140
140 -
141
-
142
-
143
-
144
-
145
-
146
-
147
-
148
-
149
-
150
-
151
-
152
-
153
-
154
-
155
-
156
-
157
-
158
-
159
-
160
-
161
-
162
-
163
-
164
-
165
-
166
-
167
-
168
-
169
-
170
-
171
-
172
-
173
-
174
-
175
-
176
-
177
-
178
-
179
-
180
-
181
-
182
-
183
-
184
-
185
-
186
-
187
-
188
-
189
-
190
-
191
-
192
-
193
-
194
-
195
-
196
-
197
-
198
-
199
-
200
-
201
-
202
-
203
-
204
-
205
-
206
-
207
-
208
-
209
-
210
-
211
-
212
-
213
-
214
-
215
-
216
-
217
-
218
-
219
-
220
-
221
-
222
-
223
-
224
-
225
-
226
-
227
-
228
-
229
-
230
-
231
-
232
-
233
-
234
-
235
-
236
-
237
-
238
-
239
-
240
-
241
-
242
-
243
-
244
-
245
-
246
-
247
-
248
-
249
-
250
-
251
-
252
-
253
-
254
-
255
-
256
-
257
-
258
 |
 |

4.
Gently
pry
and
press
at
the
point
shown
in
Figure
85.
To
replace
the
latch,
insert
it
through
the
opening
in
the
bottom
of
the
drawer
and
rotate
it
into
position.
Then
push
up
from
the
bottom
until
it
latches.
Removing
and
replacing
the
compact
slide
assembly
To
remove
the
slide
assembly:
1.
Disconnect
the
cash-drawer
cable.
2.
Remove
the
cash
drawer.
See
“Removing
and
replacing
a
compact
cash
drawer”
on
page
108.
3.
Remove
the
three
screws
that
secure
the
slide
to
the
base
and
lift
the
slide
assembly
out.
See
Figure
86
on
page
110.
Figure
85.
Removing
and
replacing
the
slide
latches
Cash
drawer
FRUs
August
3,
2006
Chapter
4.
Removing
and
replacing
FRUs
for
the
SurePOS
500
Models
5x3
and
544/564
109