IBM 4840-544 Service Guide - Page 150
SureMark, printer, installation, non-keyboard, integration
 |
View all IBM 4840-544 manuals
Add to My Manuals
Save this manual to your list of manuals |
Page 150 highlights
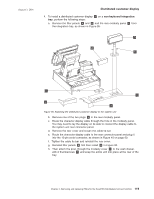
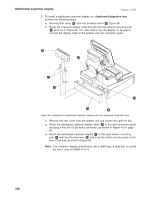
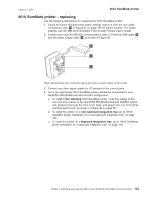
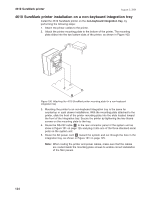
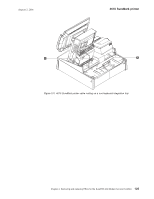
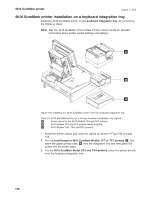
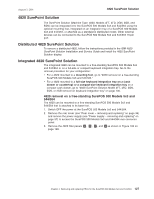
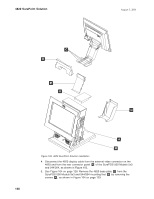
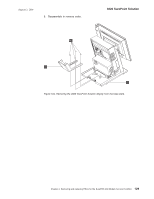
4610 SureMark printer August 3, 2006 4610 SureMark printer installation on a non-keyboard integration tray Install the 4610 SureMark printer on the non-keyboard integration tray, by performing the following steps: 1. Attach the printer cables to the printer. 2. Attach the printer mounting plate to the bottom of the printer. The mounting plate slides into the two bottom slots of the printer, as shown in Figure 100. Figure 100. Attaching the 4610 SureMark printer mounting plate for a non-keyboard integration tray 3. Mounting the printer to an non-keyboard integration tray is the same for countertop or cash drawer installations. With the mounting plate attached to the printer, slide the front of the printer mounting plate into the slots located toward the front of the integration tray. Secure the printer by tightening the two thumb screws on the mounting plate to the tray. 4. Route the RS-232 cable A to the rear connector panel of the system unit as show in Figure 101 on page 125 and plug it into one of the three standard serial ports on the system unit. 5. Route the AC power cord B toward the system and out through the hole in the integration tray, as shown in Figure 101 on page 125. Note: When routing the printer and power cables, make sure that the cables are routed inside the mounting plate screws to enable correct installation of the filler panels. 124
-
 1
1 -
2
-
3
-
4
-
5
-
6
-
7
-
8
-
9
-
10
-
11
-
12
-
13
-
14
-
15
-
16
-
17
-
18
-
19
-
20
-
21
-
22
-
23
-
24
-
25
-
26
-
27
-
28
-
29
-
30
-
31
-
32
-
33
-
34
-
35
-
36
-
37
-
38
-
39
-
40
-
41
-
42
-
43
-
44
-
45
-
46
-
47
-
48
-
49
-
50
-
51
-
52
-
53
-
54
-
55
-
56
-
57
-
58
-
59
-
60
-
61
-
62
-
63
-
64
-
65
-
66
-
67
-
68
-
69
-
70
-
71
-
72
-
73
-
74
-
75
-
76
-
77
-
78
-
79
-
80
-
81
-
82
-
83
-
84
-
85
-
86
-
87
-
88
-
89
-
90
-
91
-
92
-
93
-
94
-
95
-
96
-
97
-
98
-
99
-
100
-
101
-
102
-
103
-
104
-
105
-
106
-
107
-
108
-
109
-
110
-
111
-
112
-
113
-
114
-
115
-
116
-
117
-
118
-
119
-
120
-
121
-
122
-
123
-
124
-
125
-
126
-
127
-
128
-
129
-
130
-
131
-
132
-
133
-
134
-
135
-
136
-
137
-
138
-
139
-
140
-
141
-
142
-
143
-
144
-
 145
145 -
 146
146 -
 147
147 -
 148
148 -
 149
149 -
 150
150 -
 151
151 -
 152
152 -
 153
153 -
 154
154 -
 155
155 -
156
-
157
-
158
-
159
-
160
-
161
-
162
-
163
-
164
-
165
-
166
-
167
-
168
-
169
-
170
-
171
-
172
-
173
-
174
-
175
-
176
-
177
-
178
-
179
-
180
-
181
-
182
-
183
-
184
-
185
-
186
-
187
-
188
-
189
-
190
-
191
-
192
-
193
-
194
-
195
-
196
-
197
-
198
-
199
-
200
-
201
-
202
-
203
-
204
-
205
-
206
-
207
-
208
-
209
-
210
-
211
-
212
-
213
-
214
-
215
-
216
-
217
-
218
-
219
-
220
-
221
-
222
-
223
-
224
-
225
-
226
-
227
-
228
-
229
-
230
-
231
-
232
-
233
-
234
-
235
-
236
-
237
-
238
-
239
-
240
-
241
-
242
-
243
-
244
-
245
-
246
-
247
-
248
-
249
-
250
-
251
-
252
-
253
-
254
-
255
-
256
-
257
-
258
 |
 |
