Netgear GS110TP GS108Tv2/GS110TP Software Reference Manual - Page 22
Web Access, Web Browser Access, Warning
 |
UPC - 606449069129
View all Netgear GS110TP manuals
Add to My Manuals
Save this manual to your list of manuals |
Page 22 highlights
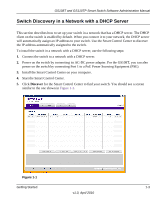
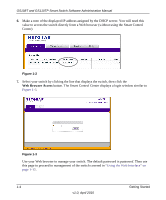
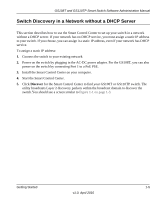
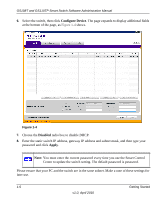
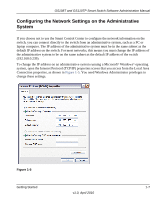
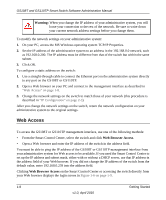
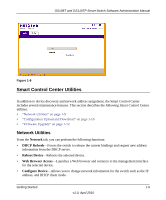
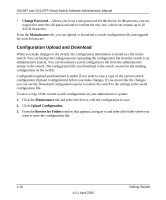
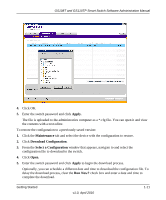
GS108T and GS110TP Smart Switch Software Administration Manual Warning: When you change the IP address of your administrative system, you will loose your connection to the rest of the network. Be sure to write down your current network address settings before you change them. To modify the network settings on your administrative system: 1. On your PC, access the MS Windows operating system TCP/IP Properties. 2. Set the IP address of the administrative system to an address in the 192.168.0.0 network, such as 192.168.0.200. The IP address must be different from that of the switch but within the same subnet. 3. Click OK. To configure a static address on the switch: 1. Use a straight-through cable to connect the Ethernet port on the administrative system directly to any port on the GS108T or GS110TP. 2. Open a Web browser on your PC and connect to the management interface as described in "Web Access" on page 1-8. 3. Change the network settings on the switch to match those of your network (this procedure is described in "IP Configuration" on page 2-3). After you change the network settings on the switch, return the network configuration on your administrative system to the original settings. Web Access To access the GS108T or GS110TP management interface, use one of the following methods: • From the Smart Control Center, select the switch and click Web Browser Access. • Open a Web browser and enter the IP address of the switch in the address field. You must be able to ping the IP address of the GS108T or GS110TP management interface from your administrative system for Web access to be available. If you used the Smart Control Center to set up the IP address and subnet mask, either with or without a DHCP server, use that IP address in the address field of your Web browser. If you did not change the IP address of the switch from the default value, enter 192.168.0.239 into the address field. Clicking Web Browser Access on the Smart Control Center or accessing the switch directly from your Web browser displays the login screen in Figure 1-6 on page 1-9. 1-8 Getting Started v1.0, April 2010
-
 1
1 -
2
-
3
-
4
-
5
-
6
-
7
-
8
-
9
-
10
-
11
-
12
-
13
-
14
-
15
-
16
-
 17
17 -
 18
18 -
 19
19 -
 20
20 -
 21
21 -
 22
22 -
 23
23 -
 24
24 -
 25
25 -
 26
26 -
 27
27 -
28
-
29
-
30
-
31
-
32
-
33
-
34
-
35
-
36
-
37
-
38
-
39
-
40
-
41
-
42
-
43
-
44
-
45
-
46
-
47
-
48
-
49
-
50
-
51
-
52
-
53
-
54
-
55
-
56
-
57
-
58
-
59
-
60
-
61
-
62
-
63
-
64
-
65
-
66
-
67
-
68
-
69
-
70
-
71
-
72
-
73
-
74
-
75
-
76
-
77
-
78
-
79
-
80
-
81
-
82
-
83
-
84
-
85
-
86
-
87
-
88
-
89
-
90
-
91
-
92
-
93
-
94
-
95
-
96
-
97
-
98
-
99
-
100
-
101
-
102
-
103
-
104
-
105
-
106
-
107
-
108
-
109
-
110
-
111
-
112
-
113
-
114
-
115
-
116
-
117
-
118
-
119
-
120
-
121
-
122
-
123
-
124
-
125
-
126
-
127
-
128
-
129
-
130
-
131
-
132
-
133
-
134
-
135
-
136
-
137
-
138
-
139
-
140
-
141
-
142
-
143
-
144
-
145
-
146
-
147
-
148
-
149
-
150
-
151
-
152
-
153
-
154
-
155
-
156
-
157
-
158
-
159
-
160
-
161
-
162
-
163
-
164
-
165
-
166
-
167
-
168
-
169
-
170
-
171
-
172
-
173
-
174
-
175
-
176
-
177
-
178
-
179
-
180
-
181
-
182
-
183
-
184
-
185
-
186
-
187
-
188
-
189
-
190
-
191
-
192
-
193
-
194
-
195
-
196
-
197
-
198
-
199
-
200
-
201
-
202
-
203
-
204
-
205
-
206
-
207
-
208
-
209
-
210
-
211
-
212
-
213
-
214
-
215
-
216
-
217
-
218
-
219
-
220
-
221
-
222
-
223
-
224
-
225
-
226
-
227
-
228
-
229
-
230
-
231
-
232
-
233
-
234
-
235
-
236
-
237
-
238
-
239
-
240
-
241
-
242
-
243
-
244
-
245
-
246
-
247
-
248
-
249
-
250
-
251
-
252
-
253
-
254
-
255
-
256
-
257
-
258
-
259
-
260
-
261
-
262
-
263
-
264
-
265
-
266
-
267
-
268
-
269
-
270
-
271
-
272
-
273
-
274
-
275
-
276
-
277
-
278
-
279
-
280
-
281
-
282
-
283
-
284
-
285
-
286
-
287
-
288
-
289
-
290
-
291
-
292
-
293
-
294
-
295
-
296
-
297
-
298
-
299
-
300
-
301
-
302
 |
 |
