Samsung SGH-T989 User Manual (user Manual) (ver.f5) (English(north America)) - Page 103
Additional Contact Options - for parts
 |
View all Samsung SGH-T989 manuals
Add to My Manuals
Save this manual to your list of manuals |
Page 103 highlights
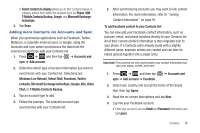
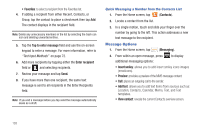
Additional Contact Options Sending an Email to a Contact Note: Contacts must contain and email account and address before you can use the Send email feature. 1. From the Home screen, tap . 2. Press and then tap More ➔ Send email. Contacts that contain an email address display. 3. Tap the contact(s) to which you want to send an email. A check mark displays next to the selection. Note: The select contact must have an email as part of their details screen. 4. Tap Send. 5. Select an email account type. 6. Compose the email and tap Send. Export/Import For more information, refer to "Copying Contact Information" on page 94. Contact List Settings From this menu you can determine the default storage location for Contacts, display your phone's primary number, and view service numbers listed in your Contact list. 1. From the Home screen, tap . 2. Press and then tap More ➔ Settings. 3. Select one of the following options: • Save new contacts to: defines the default storage location of new Contacts. Choose from: Always ask, Phone, SIM, T-Mobile Contacts Backup, Google, or Microsoft Exchange ActiveSync. • Send contact: allows you to define what set of namecards are sent when you choose to send namecards to other sources. - Read the on-screen description of this feature and tap Next. - Select either Send all namecards or Send individual namecards. Contacts 98
-
 1
1 -
2
-
3
-
4
-
5
-
6
-
7
-
8
-
9
-
10
-
11
-
12
-
13
-
14
-
15
-
16
-
17
-
18
-
19
-
20
-
21
-
22
-
23
-
24
-
25
-
26
-
27
-
28
-
29
-
30
-
31
-
32
-
33
-
34
-
35
-
36
-
37
-
38
-
39
-
40
-
41
-
42
-
43
-
44
-
45
-
46
-
47
-
48
-
49
-
50
-
51
-
52
-
53
-
54
-
55
-
56
-
57
-
58
-
59
-
60
-
61
-
62
-
63
-
64
-
65
-
66
-
67
-
68
-
69
-
70
-
71
-
72
-
73
-
74
-
75
-
76
-
77
-
78
-
79
-
80
-
81
-
82
-
83
-
84
-
85
-
86
-
87
-
88
-
89
-
90
-
91
-
92
-
93
-
94
-
95
-
96
-
97
-
 98
98 -
 99
99 -
 100
100 -
 101
101 -
 102
102 -
 103
103 -
 104
104 -
 105
105 -
 106
106 -
 107
107 -
 108
108 -
109
-
110
-
111
-
112
-
113
-
114
-
115
-
116
-
117
-
118
-
119
-
120
-
121
-
122
-
123
-
124
-
125
-
126
-
127
-
128
-
129
-
130
-
131
-
132
-
133
-
134
-
135
-
136
-
137
-
138
-
139
-
140
-
141
-
142
-
143
-
144
-
145
-
146
-
147
-
148
-
149
-
150
-
151
-
152
-
153
-
154
-
155
-
156
-
157
-
158
-
159
-
160
-
161
-
162
-
163
-
164
-
165
-
166
-
167
-
168
-
169
-
170
-
171
-
172
-
173
-
174
-
175
-
176
-
177
-
178
-
179
-
180
-
181
-
182
-
183
-
184
-
185
-
186
-
187
-
188
-
189
-
190
-
191
-
192
-
193
-
194
-
195
-
196
-
197
-
198
-
199
-
200
-
201
-
202
-
203
-
204
-
205
-
206
-
207
-
208
-
209
-
210
-
211
-
212
-
213
-
214
-
215
-
216
-
217
-
218
-
219
-
220
-
221
-
222
-
223
-
224
-
225
-
226
-
227
-
228
-
229
-
230
-
231
-
232
-
233
-
234
-
235
-
236
-
237
-
238
-
239
-
240
-
241
-
242
-
243
-
244
-
245
-
246
-
247
-
248
-
249
-
250
-
251
-
252
-
253
-
254
-
255
-
256
-
257
-
258
-
259
-
260
-
261
-
262
-
263
-
264
-
265
-
266
-
267
-
268
-
269
-
270
-
271
-
272
-
273
-
274
-
275
-
276
-
277
-
278
 |
 |