Samsung SGH-T989 User Manual (user Manual) (ver.f5) (English(north America)) - Page 117
Send email from this account by default, Add account.
 |
View all Samsung SGH-T989 manuals
Add to My Manuals
Save this manual to your list of manuals |
Page 117 highlights
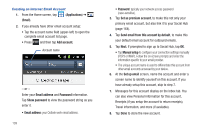
Setting Up a Microsoft Exchange Email account 1. From the Home screen, tap ➔ (Email). 2. If you already have other email account setup: • Tap the account name field (upper-left) to open the complete email account list page. • Press and then tap Add account. Account name - or - Enter your Email address and Password information. Tap Show password to view the password string as you enter it. • Email address: your Outlook work email address. • Password: typically your network access password (case-sensitive). 3. Tap Set as premium account, to make this not only your primary email account, but also link it to your Social Hub (page 164). 4. Tap Send email from this account by default, to make this your default email account for outbound emails. 5. Tap Done ➔ Next. Consult your Network or IT Administrator for further details and support. 6. Tap Microsoft Exchange ActiveSync (from the add new email account screen). 7. When prompted to provide additional detailed information, enter an updated Domain, and confirm your User name and Password information. • If your network requires SSL encryption, tap the Use secure connection (SSL) field to place a check mark in the box and activate this additional level. Most often, this option should be enabled. • If your network requires that you accept SSL certificates, tap the Accept all SSL certificates field to place a check mark in the box and activate this additional level. Most often, this option is not required. Confirm this information with your IT Administrator. Important!: If your exchange server requires this feature, leaving this field unchecked can prevent connection. Messages 112
-
 1
1 -
2
-
3
-
4
-
5
-
6
-
7
-
8
-
9
-
10
-
11
-
12
-
13
-
14
-
15
-
16
-
17
-
18
-
19
-
20
-
21
-
22
-
23
-
24
-
25
-
26
-
27
-
28
-
29
-
30
-
31
-
32
-
33
-
34
-
35
-
36
-
37
-
38
-
39
-
40
-
41
-
42
-
43
-
44
-
45
-
46
-
47
-
48
-
49
-
50
-
51
-
52
-
53
-
54
-
55
-
56
-
57
-
58
-
59
-
60
-
61
-
62
-
63
-
64
-
65
-
66
-
67
-
68
-
69
-
70
-
71
-
72
-
73
-
74
-
75
-
76
-
77
-
78
-
79
-
80
-
81
-
82
-
83
-
84
-
85
-
86
-
87
-
88
-
89
-
90
-
91
-
92
-
93
-
94
-
95
-
96
-
97
-
98
-
99
-
100
-
101
-
102
-
103
-
104
-
105
-
106
-
107
-
108
-
109
-
110
-
111
-
 112
112 -
 113
113 -
 114
114 -
 115
115 -
 116
116 -
 117
117 -
 118
118 -
 119
119 -
 120
120 -
 121
121 -
 122
122 -
123
-
124
-
125
-
126
-
127
-
128
-
129
-
130
-
131
-
132
-
133
-
134
-
135
-
136
-
137
-
138
-
139
-
140
-
141
-
142
-
143
-
144
-
145
-
146
-
147
-
148
-
149
-
150
-
151
-
152
-
153
-
154
-
155
-
156
-
157
-
158
-
159
-
160
-
161
-
162
-
163
-
164
-
165
-
166
-
167
-
168
-
169
-
170
-
171
-
172
-
173
-
174
-
175
-
176
-
177
-
178
-
179
-
180
-
181
-
182
-
183
-
184
-
185
-
186
-
187
-
188
-
189
-
190
-
191
-
192
-
193
-
194
-
195
-
196
-
197
-
198
-
199
-
200
-
201
-
202
-
203
-
204
-
205
-
206
-
207
-
208
-
209
-
210
-
211
-
212
-
213
-
214
-
215
-
216
-
217
-
218
-
219
-
220
-
221
-
222
-
223
-
224
-
225
-
226
-
227
-
228
-
229
-
230
-
231
-
232
-
233
-
234
-
235
-
236
-
237
-
238
-
239
-
240
-
241
-
242
-
243
-
244
-
245
-
246
-
247
-
248
-
249
-
250
-
251
-
252
-
253
-
254
-
255
-
256
-
257
-
258
-
259
-
260
-
261
-
262
-
263
-
264
-
265
-
266
-
267
-
268
-
269
-
270
-
271
-
272
-
273
-
274
-
275
-
276
-
277
-
278
 |
 |