Samsung SGH-T989 User Manual (user Manual) (ver.f5) (English(north America)) - Page 19
Initial Device Configuration, Switching the Device On or Off, Power off - update
 |
View all Samsung SGH-T989 manuals
Add to My Manuals
Save this manual to your list of manuals |
Page 19 highlights
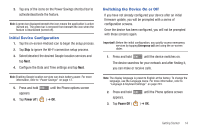
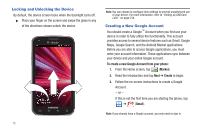
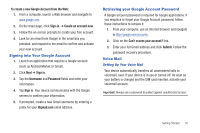
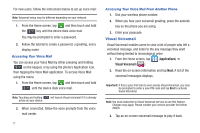
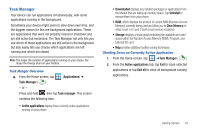
3. Tap any of the icons on the Power Savings shortcut bar to activate/deactivate the feature. Note: A green bar displayed beneath the icon means the application is active (turned on). The green bar is removed from beneath the icon when the feature is deactivated (turned off). Initial Device Configuration 1. Tap the on-screen Android icon to begin the setup process. 2. Tap Skip to ignore the Wi-Fi connection setup process. 3. Select/deselect the desired Google location services and tap Next. 4. Configure the Data and Time settings and tap Next. Note: Enabling Google location services can drain battery power. For more information, refer to "Power Savings" on page 13. 5. Press and hold appears. 6. Tap Power off ( until the Phone options screen ) ➔ OK. Switching the Device On or Off If you have not already configured your device after an initial firmware update, you will be prompted with a series of configuration screens. Once the device has been configured, you will not be prompted with these screens again. Important!: Before the initial configuration, you quickly access emergency services by tapping Emergency call and using the on-screen dialer. 1. Press and hold until the device switches on. The device searches for your network and after finding it, you can make or receive calls. Note: The display language is preset to English at the factory. To change the language, use the Language menu. For more information, refer to "Language & Keyboard Settings" on page 223. 2. Press and hold appears. 3. Tap Power Off ( until the Phone options screen ) ➔ OK. Getting Started 14
-
 1
1 -
2
-
3
-
4
-
5
-
6
-
7
-
8
-
9
-
10
-
11
-
12
-
13
-
 14
14 -
 15
15 -
 16
16 -
 17
17 -
 18
18 -
 19
19 -
 20
20 -
 21
21 -
 22
22 -
 23
23 -
 24
24 -
25
-
26
-
27
-
28
-
29
-
30
-
31
-
32
-
33
-
34
-
35
-
36
-
37
-
38
-
39
-
40
-
41
-
42
-
43
-
44
-
45
-
46
-
47
-
48
-
49
-
50
-
51
-
52
-
53
-
54
-
55
-
56
-
57
-
58
-
59
-
60
-
61
-
62
-
63
-
64
-
65
-
66
-
67
-
68
-
69
-
70
-
71
-
72
-
73
-
74
-
75
-
76
-
77
-
78
-
79
-
80
-
81
-
82
-
83
-
84
-
85
-
86
-
87
-
88
-
89
-
90
-
91
-
92
-
93
-
94
-
95
-
96
-
97
-
98
-
99
-
100
-
101
-
102
-
103
-
104
-
105
-
106
-
107
-
108
-
109
-
110
-
111
-
112
-
113
-
114
-
115
-
116
-
117
-
118
-
119
-
120
-
121
-
122
-
123
-
124
-
125
-
126
-
127
-
128
-
129
-
130
-
131
-
132
-
133
-
134
-
135
-
136
-
137
-
138
-
139
-
140
-
141
-
142
-
143
-
144
-
145
-
146
-
147
-
148
-
149
-
150
-
151
-
152
-
153
-
154
-
155
-
156
-
157
-
158
-
159
-
160
-
161
-
162
-
163
-
164
-
165
-
166
-
167
-
168
-
169
-
170
-
171
-
172
-
173
-
174
-
175
-
176
-
177
-
178
-
179
-
180
-
181
-
182
-
183
-
184
-
185
-
186
-
187
-
188
-
189
-
190
-
191
-
192
-
193
-
194
-
195
-
196
-
197
-
198
-
199
-
200
-
201
-
202
-
203
-
204
-
205
-
206
-
207
-
208
-
209
-
210
-
211
-
212
-
213
-
214
-
215
-
216
-
217
-
218
-
219
-
220
-
221
-
222
-
223
-
224
-
225
-
226
-
227
-
228
-
229
-
230
-
231
-
232
-
233
-
234
-
235
-
236
-
237
-
238
-
239
-
240
-
241
-
242
-
243
-
244
-
245
-
246
-
247
-
248
-
249
-
250
-
251
-
252
-
253
-
254
-
255
-
256
-
257
-
258
-
259
-
260
-
261
-
262
-
263
-
264
-
265
-
266
-
267
-
268
-
269
-
270
-
271
-
272
-
273
-
274
-
275
-
276
-
277
-
278
 |
 |
