Samsung SGH-T989 User Manual (user Manual) (ver.f5) (English(north America)) - Page 22
Visual Voicemail
 |
View all Samsung SGH-T989 manuals
Add to My Manuals
Save this manual to your list of manuals |
Page 22 highlights
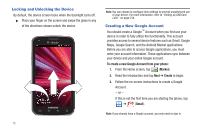
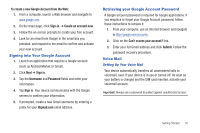
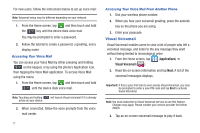
For new users, follow the instructions below to set up voice mail: Note: Voicemail setup may be different depending on your network. 1. From the Home screen, tap and then touch and hold the 1 key until the device dials voice mail. You may be prompted to enter a password. 2. Follow the tutorial to create a password, a greeting, and a display name. Accessing Your Voice Mail You can access your Voice Mail by either pressing and holding 1 on the keypad, or by using the phone's Application icon, then tapping the Voice Mail application. To access Voice Mail using the menu: 1. From the Home screen, tap and then touch and hold 1 until the device dials voice mail. Note: Touching and holding 1 will launch Visual voicemail if it is already active on your device. 2. When connected, follow the voice prompts from the voice mail center. 17 Accessing Your Voice Mail From Another Phone 1. Dial your wireless phone number. 2. When you hear your voicemail greeting, press the asterisk key on the phone you are using. 3. Enter your passcode. Visual Voicemail Visual Voicemail enables users to view a list of people who left a voicemail message, and listen to the any message they want without being limited to chronological order. 1. From the Home screen, tap (Applications) ➔ Visual Voicemail ( ). 2. Read the on-screen information and tap Next. A list of the voicemail messages displays. Important!: If this is your first time to ever access Visual Voicemail, you may be prompted to enter a new PIN code and tap Next to activate Visual Voicemail. Note: You must subscribe to Visual Voicemail service to use this feature. Charges may apply. Please contact your service provider for further details. 3. Tap an on-screen voicemail message to play it back.
-
 1
1 -
2
-
3
-
4
-
5
-
6
-
7
-
8
-
9
-
10
-
11
-
12
-
13
-
14
-
15
-
16
-
 17
17 -
 18
18 -
 19
19 -
 20
20 -
 21
21 -
 22
22 -
 23
23 -
 24
24 -
 25
25 -
 26
26 -
 27
27 -
28
-
29
-
30
-
31
-
32
-
33
-
34
-
35
-
36
-
37
-
38
-
39
-
40
-
41
-
42
-
43
-
44
-
45
-
46
-
47
-
48
-
49
-
50
-
51
-
52
-
53
-
54
-
55
-
56
-
57
-
58
-
59
-
60
-
61
-
62
-
63
-
64
-
65
-
66
-
67
-
68
-
69
-
70
-
71
-
72
-
73
-
74
-
75
-
76
-
77
-
78
-
79
-
80
-
81
-
82
-
83
-
84
-
85
-
86
-
87
-
88
-
89
-
90
-
91
-
92
-
93
-
94
-
95
-
96
-
97
-
98
-
99
-
100
-
101
-
102
-
103
-
104
-
105
-
106
-
107
-
108
-
109
-
110
-
111
-
112
-
113
-
114
-
115
-
116
-
117
-
118
-
119
-
120
-
121
-
122
-
123
-
124
-
125
-
126
-
127
-
128
-
129
-
130
-
131
-
132
-
133
-
134
-
135
-
136
-
137
-
138
-
139
-
140
-
141
-
142
-
143
-
144
-
145
-
146
-
147
-
148
-
149
-
150
-
151
-
152
-
153
-
154
-
155
-
156
-
157
-
158
-
159
-
160
-
161
-
162
-
163
-
164
-
165
-
166
-
167
-
168
-
169
-
170
-
171
-
172
-
173
-
174
-
175
-
176
-
177
-
178
-
179
-
180
-
181
-
182
-
183
-
184
-
185
-
186
-
187
-
188
-
189
-
190
-
191
-
192
-
193
-
194
-
195
-
196
-
197
-
198
-
199
-
200
-
201
-
202
-
203
-
204
-
205
-
206
-
207
-
208
-
209
-
210
-
211
-
212
-
213
-
214
-
215
-
216
-
217
-
218
-
219
-
220
-
221
-
222
-
223
-
224
-
225
-
226
-
227
-
228
-
229
-
230
-
231
-
232
-
233
-
234
-
235
-
236
-
237
-
238
-
239
-
240
-
241
-
242
-
243
-
244
-
245
-
246
-
247
-
248
-
249
-
250
-
251
-
252
-
253
-
254
-
255
-
256
-
257
-
258
-
259
-
260
-
261
-
262
-
263
-
264
-
265
-
266
-
267
-
268
-
269
-
270
-
271
-
272
-
273
-
274
-
275
-
276
-
277
-
278
 |
 |