Samsung SGH-T989 User Manual (user Manual) (ver.f5) (English(north America)) - Page 170
T-Mobile Mall, T-Mobile Name ID, T-Mobile TV
 |
View all Samsung SGH-T989 manuals
Add to My Manuals
Save this manual to your list of manuals |
Page 170 highlights
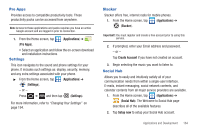
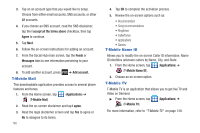
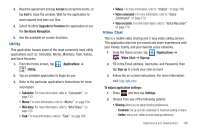
3. Tap on an account type that you would like to setup. Choose from either email accounts, SNS accounts, or other IM accounts. 4. If you choose an SNS account, read the SNS disclaimer, tap the I accept all the terms above checkbox, then tap Agree to continue. 5. Tap Next. 6. Follow the on-screen instructions for adding an account. 7. From the Social Hub main screen, tap the Feeds or Messages tabs to see information pertaining to your account. 8. To add another account, press T-Mobile Mall ➔ Add account. This downloadable application provides access to several phone features and tunes. 1. From the Home screen, tap (Applications) ➔ (T-Mobile Mall). 2. Read the on-screen disclaimer and tap I agree. 3. Read the legal disclaimer screen and tap Yes to agree or No to disagree to its terms. 165 4. Tap OK to complete the activation process. 5. Review the on-screen options such as: • Recommended • Song recommendations • Ringtones • CallerTunes • Applications • Games T-Mobile Name ID Allows you to modify the on-screen Caller ID information. Name ID identifies unknown callers by Name, City, and State. 1. From the Home screen, tap (Applications) ➔ (T-Mobile Name ID). 2. Choose an on-screen option. T-Mobile TV T-Mobile TV is an application that allows you to get live TV and Video on Demand. ᮣ From the Home screen, tap (Applications) ➔ (T-Mobile TV). For more information, refer to "T-Mobile TV" on page 139.
-
 1
1 -
2
-
3
-
4
-
5
-
6
-
7
-
8
-
9
-
10
-
11
-
12
-
13
-
14
-
15
-
16
-
17
-
18
-
19
-
20
-
21
-
22
-
23
-
24
-
25
-
26
-
27
-
28
-
29
-
30
-
31
-
32
-
33
-
34
-
35
-
36
-
37
-
38
-
39
-
40
-
41
-
42
-
43
-
44
-
45
-
46
-
47
-
48
-
49
-
50
-
51
-
52
-
53
-
54
-
55
-
56
-
57
-
58
-
59
-
60
-
61
-
62
-
63
-
64
-
65
-
66
-
67
-
68
-
69
-
70
-
71
-
72
-
73
-
74
-
75
-
76
-
77
-
78
-
79
-
80
-
81
-
82
-
83
-
84
-
85
-
86
-
87
-
88
-
89
-
90
-
91
-
92
-
93
-
94
-
95
-
96
-
97
-
98
-
99
-
100
-
101
-
102
-
103
-
104
-
105
-
106
-
107
-
108
-
109
-
110
-
111
-
112
-
113
-
114
-
115
-
116
-
117
-
118
-
119
-
120
-
121
-
122
-
123
-
124
-
125
-
126
-
127
-
128
-
129
-
130
-
131
-
132
-
133
-
134
-
135
-
136
-
137
-
138
-
139
-
140
-
141
-
142
-
143
-
144
-
145
-
146
-
147
-
148
-
149
-
150
-
151
-
152
-
153
-
154
-
155
-
156
-
157
-
158
-
159
-
160
-
161
-
162
-
163
-
164
-
 165
165 -
 166
166 -
 167
167 -
 168
168 -
 169
169 -
 170
170 -
 171
171 -
 172
172 -
 173
173 -
 174
174 -
 175
175 -
176
-
177
-
178
-
179
-
180
-
181
-
182
-
183
-
184
-
185
-
186
-
187
-
188
-
189
-
190
-
191
-
192
-
193
-
194
-
195
-
196
-
197
-
198
-
199
-
200
-
201
-
202
-
203
-
204
-
205
-
206
-
207
-
208
-
209
-
210
-
211
-
212
-
213
-
214
-
215
-
216
-
217
-
218
-
219
-
220
-
221
-
222
-
223
-
224
-
225
-
226
-
227
-
228
-
229
-
230
-
231
-
232
-
233
-
234
-
235
-
236
-
237
-
238
-
239
-
240
-
241
-
242
-
243
-
244
-
245
-
246
-
247
-
248
-
249
-
250
-
251
-
252
-
253
-
254
-
255
-
256
-
257
-
258
-
259
-
260
-
261
-
262
-
263
-
264
-
265
-
266
-
267
-
268
-
269
-
270
-
271
-
272
-
273
-
274
-
275
-
276
-
277
-
278
 |
 |