Samsung SGH-T989 User Manual (user Manual) (ver.f5) (English(north America)) - Page 194
Con portable Wi-Fi, Network SSID
 |
View all Samsung SGH-T989 manuals
Add to My Manuals
Save this manual to your list of manuals |
Page 194 highlights
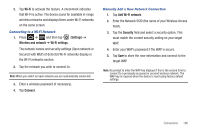
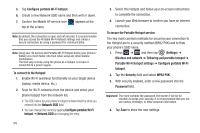
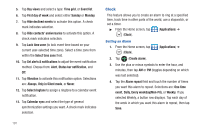
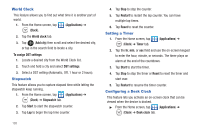
5. Tap Configure portable Wi-Fi hotspot. 6. Create a new Network SSID name and then write it down. 7. Confirm the Mobile AP service icon top of the screen. appears at the Note: By default, the connection is open and not secured. It is recommended that you access the Portable Wi-Fi Hotspot settings and create a secure connection by using a password for communication. Note: Using your 4G service and Portable Wi-Fi Hotspot drains your phone's battery at a much faster rate than when using any other feature combination. The best way to keep using the phone as a hotspot is to have it connected to a power supply. To connect to the Hotspot: 1. Enable Wi-Fi (wireless) functionality on your target device (laptop, media device, etc.). 2. Scan for Wi-Fi networks from the device and select your phone hotspot from the network list. • The SSID name for your phone's hotspot is determined by what you entered into the Network SSID field. • You can change the name by tapping Configure portable Wi-Fi hotspot ➔ Network SSID and changing the entry. 189 3. Select this Hotspot and follow your on-screen instructions to complete the connection. 4. Launch your Web browser to confirm you have an Internet connection. To secure the Portable Hotspot service: The two most common methods for securing your connection to the Hotspot are to a security method (WPA2 PSK) and to Hide your phone's SSID name. 1. Press ➔ and then tap (Settings) ➔ Wireless and network ➔ Tethering and portable hotspot ➔ Portable Wi-Fi hotspot settings ➔ Configure portable Wi-Fi hotspot. 2. Tap the Security field and select WPA2 PSK. 3. With security enabled, enter a new password into the Password field. Important!: The more complex the password, the harder it will be for intruders to break your security. It is recommended that you not use names, birthdays, or other personal information. 4. Tap Save to store the new settings.
-
 1
1 -
2
-
3
-
4
-
5
-
6
-
7
-
8
-
9
-
10
-
11
-
12
-
13
-
14
-
15
-
16
-
17
-
18
-
19
-
20
-
21
-
22
-
23
-
24
-
25
-
26
-
27
-
28
-
29
-
30
-
31
-
32
-
33
-
34
-
35
-
36
-
37
-
38
-
39
-
40
-
41
-
42
-
43
-
44
-
45
-
46
-
47
-
48
-
49
-
50
-
51
-
52
-
53
-
54
-
55
-
56
-
57
-
58
-
59
-
60
-
61
-
62
-
63
-
64
-
65
-
66
-
67
-
68
-
69
-
70
-
71
-
72
-
73
-
74
-
75
-
76
-
77
-
78
-
79
-
80
-
81
-
82
-
83
-
84
-
85
-
86
-
87
-
88
-
89
-
90
-
91
-
92
-
93
-
94
-
95
-
96
-
97
-
98
-
99
-
100
-
101
-
102
-
103
-
104
-
105
-
106
-
107
-
108
-
109
-
110
-
111
-
112
-
113
-
114
-
115
-
116
-
117
-
118
-
119
-
120
-
121
-
122
-
123
-
124
-
125
-
126
-
127
-
128
-
129
-
130
-
131
-
132
-
133
-
134
-
135
-
136
-
137
-
138
-
139
-
140
-
141
-
142
-
143
-
144
-
145
-
146
-
147
-
148
-
149
-
150
-
151
-
152
-
153
-
154
-
155
-
156
-
157
-
158
-
159
-
160
-
161
-
162
-
163
-
164
-
165
-
166
-
167
-
168
-
169
-
170
-
171
-
172
-
173
-
174
-
175
-
176
-
177
-
178
-
179
-
180
-
181
-
182
-
183
-
184
-
185
-
186
-
187
-
188
-
 189
189 -
 190
190 -
 191
191 -
 192
192 -
 193
193 -
 194
194 -
 195
195 -
 196
196 -
 197
197 -
 198
198 -
 199
199 -
200
-
201
-
202
-
203
-
204
-
205
-
206
-
207
-
208
-
209
-
210
-
211
-
212
-
213
-
214
-
215
-
216
-
217
-
218
-
219
-
220
-
221
-
222
-
223
-
224
-
225
-
226
-
227
-
228
-
229
-
230
-
231
-
232
-
233
-
234
-
235
-
236
-
237
-
238
-
239
-
240
-
241
-
242
-
243
-
244
-
245
-
246
-
247
-
248
-
249
-
250
-
251
-
252
-
253
-
254
-
255
-
256
-
257
-
258
-
259
-
260
-
261
-
262
-
263
-
264
-
265
-
266
-
267
-
268
-
269
-
270
-
271
-
272
-
273
-
274
-
275
-
276
-
277
-
278
 |
 |