Yamaha M7CL M7cl V1 Owner's Manual - Page 171
Editing the internal effect parameters
 |
View all Yamaha M7CL manuals
Add to My Manuals
Save this manual to your list of manuals |
Page 171 highlights
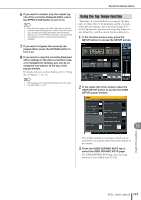
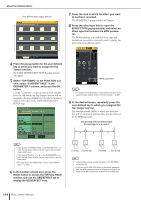
About the internal effects C Input/output meters These indicate the level of the signals before and after the effect. 9 Select the effect type and edit the effect parameters. For details on editing the effect parameters, refer to "Editing the internal effect parameters" that follows. HINT • The levels before and after the effect are shown by the input/ output meters at the upper right of the GEQ/EFFECT popup window. NOTE • Adjust the effect send master level and the effect parameters so that the signal does not reach the overload point at the input or output stage of the effect. 10 Using the fader of the channel you selected as the rack's output destination in step 3, adjust the level as appropriate. Editing the internal effect parameters This section explains how to change the effect type and edit the parameters. 1 As described in "Virtual rack operations" (→ p. 158) steps 1-3, mount an effect in a rack. A rack in which an effect is mounted will show the following information. 1 2 1 Effect title/type This shows the effect title, the name of the type that is used, and a graphic. The number of input/output channels (1 IN/2 OUT or 2 IN/2 OUT) of this effect is also shown. B Input/output meters These indicate the level of the signals before and after the effect. 2 Press the rack in which the effect you want to edit is mounted. The GEQ/EFFECT popup window will appear, allowing you to edit the parameters of the GEQ or effect. In the GEQ/EFFECT popup window you can use the tabs to switch between the eight racks. 1 3 42 5 67 16 Graphic EQ and effects 9 8 1 INPUT L/R buttons These buttons display the OUTPUT CH SELECT popup window. B OUTPUT L/R buttons These buttons display the INPUT CH SELECT popup window. M7CL Owner's Manual 171
-
 1
1 -
2
-
3
-
4
-
5
-
6
-
7
-
8
-
9
-
10
-
11
-
12
-
13
-
14
-
15
-
16
-
17
-
18
-
19
-
20
-
21
-
22
-
23
-
24
-
25
-
26
-
27
-
28
-
29
-
30
-
31
-
32
-
33
-
34
-
35
-
36
-
37
-
38
-
39
-
40
-
41
-
42
-
43
-
44
-
45
-
46
-
47
-
48
-
49
-
50
-
51
-
52
-
53
-
54
-
55
-
56
-
57
-
58
-
59
-
60
-
61
-
62
-
63
-
64
-
65
-
66
-
67
-
68
-
69
-
70
-
71
-
72
-
73
-
74
-
75
-
76
-
77
-
78
-
79
-
80
-
81
-
82
-
83
-
84
-
85
-
86
-
87
-
88
-
89
-
90
-
91
-
92
-
93
-
94
-
95
-
96
-
97
-
98
-
99
-
100
-
101
-
102
-
103
-
104
-
105
-
106
-
107
-
108
-
109
-
110
-
111
-
112
-
113
-
114
-
115
-
116
-
117
-
118
-
119
-
120
-
121
-
122
-
123
-
124
-
125
-
126
-
127
-
128
-
129
-
130
-
131
-
132
-
133
-
134
-
135
-
136
-
137
-
138
-
139
-
140
-
141
-
142
-
143
-
144
-
145
-
146
-
147
-
148
-
149
-
150
-
151
-
152
-
153
-
154
-
155
-
156
-
157
-
158
-
159
-
160
-
161
-
162
-
163
-
164
-
165
-
 166
166 -
 167
167 -
 168
168 -
 169
169 -
 170
170 -
 171
171 -
 172
172 -
 173
173 -
 174
174 -
 175
175 -
 176
176 -
177
-
178
-
179
-
180
-
181
-
182
-
183
-
184
-
185
-
186
-
187
-
188
-
189
-
190
-
191
-
192
-
193
-
194
-
195
-
196
-
197
-
198
-
199
-
200
-
201
-
202
-
203
-
204
-
205
-
206
-
207
-
208
-
209
-
210
-
211
-
212
-
213
-
214
-
215
-
216
-
217
-
218
-
219
-
220
-
221
-
222
-
223
-
224
-
225
-
226
-
227
-
228
-
229
-
230
-
231
-
232
-
233
-
234
-
235
-
236
-
237
-
238
-
239
-
240
-
241
-
242
-
243
-
244
-
245
-
246
-
247
-
248
-
249
-
250
-
251
-
252
-
253
-
254
-
255
-
256
-
257
-
258
-
259
-
260
-
261
-
262
-
263
-
264
-
265
-
266
-
267
-
268
-
269
-
270
-
271
-
272
-
273
-
274
-
275
-
276
-
277
-
278
-
279
-
280
-
281
-
282
 |
 |
