Yamaha M7CL M7cl V1 Owner's Manual - Page 173
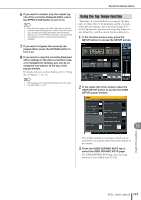
Using the Tap Tempo function
 |
View all Yamaha M7CL manuals
Add to My Manuals
Save this manual to your list of manuals |
Page 173 highlights
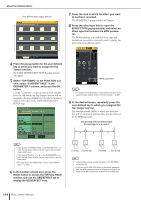
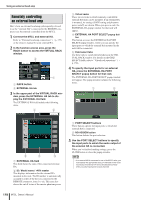
6 If you want to monitor only the output signal of the currently displayed effect, press the EFFECT CUE button to turn it on. HINT • Even if the Cue mode is set to MIX CUE mode (in which all channels whose [CUE] keys are on will be mixed for monitoring), only the output signal of the effect will be monitored when you turn on the EFFECT CUE button. (The [CUE] keys that had been turned on until then will be temporarily defeated.) 7 If you want to bypass the currently displayed effect, press the BYPASS button to turn it on. 8 If you want to copy the currently-displayed effect settings to the effect of another rack, or to initialize the settings, you can do so using the tool buttons at the top of the popup window. For details on how to use these buttons, refer to "Using the tool buttons" (→ p. 31). HINT • Effect settings can be stored and recalled at any time using the effect library (→ p. 31). About the internal effects Using the Tap Tempo function "Tap tempo" is a function that lets you specify the delay time of a delay effect or the modulation speed of a modulation effect by striking a key at the desired interval. To use the Tap function, you must first assign Tap Tempo to a user-defined key, and then operate that user-defined key. 1 In the function access area, press the SETUP button to access the SETUP screen. 2 In the upper left of the screen, press the USER SETUP button to access the USER SETUP popup window. Graphic EQ and effects 16 This window includes several pages, which you can switch between using the tabs located at the bottom of the window. 3 Press the USER DEFINED KEYS tab to select the USER DEFINED KEYS page. The USER DEFINED KEYS page lets you assign functions to user defined keys [1]-[12]. M7CL Owner's Manual 173
-
 1
1 -
2
-
3
-
4
-
5
-
6
-
7
-
8
-
9
-
10
-
11
-
12
-
13
-
14
-
15
-
16
-
17
-
18
-
19
-
20
-
21
-
22
-
23
-
24
-
25
-
26
-
27
-
28
-
29
-
30
-
31
-
32
-
33
-
34
-
35
-
36
-
37
-
38
-
39
-
40
-
41
-
42
-
43
-
44
-
45
-
46
-
47
-
48
-
49
-
50
-
51
-
52
-
53
-
54
-
55
-
56
-
57
-
58
-
59
-
60
-
61
-
62
-
63
-
64
-
65
-
66
-
67
-
68
-
69
-
70
-
71
-
72
-
73
-
74
-
75
-
76
-
77
-
78
-
79
-
80
-
81
-
82
-
83
-
84
-
85
-
86
-
87
-
88
-
89
-
90
-
91
-
92
-
93
-
94
-
95
-
96
-
97
-
98
-
99
-
100
-
101
-
102
-
103
-
104
-
105
-
106
-
107
-
108
-
109
-
110
-
111
-
112
-
113
-
114
-
115
-
116
-
117
-
118
-
119
-
120
-
121
-
122
-
123
-
124
-
125
-
126
-
127
-
128
-
129
-
130
-
131
-
132
-
133
-
134
-
135
-
136
-
137
-
138
-
139
-
140
-
141
-
142
-
143
-
144
-
145
-
146
-
147
-
148
-
149
-
150
-
151
-
152
-
153
-
154
-
155
-
156
-
157
-
158
-
159
-
160
-
161
-
162
-
163
-
164
-
165
-
166
-
167
-
 168
168 -
 169
169 -
 170
170 -
 171
171 -
 172
172 -
 173
173 -
 174
174 -
 175
175 -
 176
176 -
 177
177 -
 178
178 -
179
-
180
-
181
-
182
-
183
-
184
-
185
-
186
-
187
-
188
-
189
-
190
-
191
-
192
-
193
-
194
-
195
-
196
-
197
-
198
-
199
-
200
-
201
-
202
-
203
-
204
-
205
-
206
-
207
-
208
-
209
-
210
-
211
-
212
-
213
-
214
-
215
-
216
-
217
-
218
-
219
-
220
-
221
-
222
-
223
-
224
-
225
-
226
-
227
-
228
-
229
-
230
-
231
-
232
-
233
-
234
-
235
-
236
-
237
-
238
-
239
-
240
-
241
-
242
-
243
-
244
-
245
-
246
-
247
-
248
-
249
-
250
-
251
-
252
-
253
-
254
-
255
-
256
-
257
-
258
-
259
-
260
-
261
-
262
-
263
-
264
-
265
-
266
-
267
-
268
-
269
-
270
-
271
-
272
-
273
-
274
-
275
-
276
-
277
-
278
-
279
-
280
-
281
-
282
 |
 |
