Yamaha M7CL M7cl V1 Owner's Manual - Page 215
Specifying the brightness of the touch screen, LEDs, and lamps
 |
View all Yamaha M7CL manuals
Add to My Manuals
Save this manual to your list of manuals |
Page 215 highlights
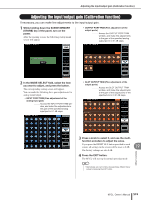
Specifying the brightness of the touch screen, LEDs, and lamps Specifying the brightness of the touch screen, LEDs, and lamps Here's how to specify the brightness of the touch screen, top panel LEDs, and lamps connected to the rear panel LAMP connectors. 1 In the function access area, press the SETUP button to access the SETUP screen. 2 In the BRIGHTNESS field located in the right of the bottom row in the SETUP screen, press the BANK A or BANK B button. You can save two different brightness settings in bank A and B, and switch between them rapidly when desired. 4 If desired, switch between banks A/B and make settings for the other bank in the same way. Now you can switch between the BANK A and BANK B buttons of the BRIGHTNESS field to switch the brightness of the touch screen, LCD, and lamps in a single operation. You can also assign the BRIGHTNESS parameter to a user-defined key, and press that key to switch between banks A and B. 3 Use multifunction encoders 6-8 to set the following parameters. ● SCREEN Adjusts the brightness of the touch screen. ● PANEL Adjusts the brightness of the top panel LEDs. If the optional MBM7CL meter bridge is installed, this will also affect the LEDs of the meter bridge. NOTE • If the AD8HR is connected, the brightness of the AD8HR's LEDs will also change. ● LAMP Adjusts the brightness of the lamps connected to the rear panel LAMP jacks. 19 Other functions M7CL Owner's Manual 215
-
 1
1 -
2
-
3
-
4
-
5
-
6
-
7
-
8
-
9
-
10
-
11
-
12
-
13
-
14
-
15
-
16
-
17
-
18
-
19
-
20
-
21
-
22
-
23
-
24
-
25
-
26
-
27
-
28
-
29
-
30
-
31
-
32
-
33
-
34
-
35
-
36
-
37
-
38
-
39
-
40
-
41
-
42
-
43
-
44
-
45
-
46
-
47
-
48
-
49
-
50
-
51
-
52
-
53
-
54
-
55
-
56
-
57
-
58
-
59
-
60
-
61
-
62
-
63
-
64
-
65
-
66
-
67
-
68
-
69
-
70
-
71
-
72
-
73
-
74
-
75
-
76
-
77
-
78
-
79
-
80
-
81
-
82
-
83
-
84
-
85
-
86
-
87
-
88
-
89
-
90
-
91
-
92
-
93
-
94
-
95
-
96
-
97
-
98
-
99
-
100
-
101
-
102
-
103
-
104
-
105
-
106
-
107
-
108
-
109
-
110
-
111
-
112
-
113
-
114
-
115
-
116
-
117
-
118
-
119
-
120
-
121
-
122
-
123
-
124
-
125
-
126
-
127
-
128
-
129
-
130
-
131
-
132
-
133
-
134
-
135
-
136
-
137
-
138
-
139
-
140
-
141
-
142
-
143
-
144
-
145
-
146
-
147
-
148
-
149
-
150
-
151
-
152
-
153
-
154
-
155
-
156
-
157
-
158
-
159
-
160
-
161
-
162
-
163
-
164
-
165
-
166
-
167
-
168
-
169
-
170
-
171
-
172
-
173
-
174
-
175
-
176
-
177
-
178
-
179
-
180
-
181
-
182
-
183
-
184
-
185
-
186
-
187
-
188
-
189
-
190
-
191
-
192
-
193
-
194
-
195
-
196
-
197
-
198
-
199
-
200
-
201
-
202
-
203
-
204
-
205
-
206
-
207
-
208
-
209
-
 210
210 -
 211
211 -
 212
212 -
 213
213 -
 214
214 -
 215
215 -
 216
216 -
 217
217 -
 218
218 -
 219
219 -
 220
220 -
221
-
222
-
223
-
224
-
225
-
226
-
227
-
228
-
229
-
230
-
231
-
232
-
233
-
234
-
235
-
236
-
237
-
238
-
239
-
240
-
241
-
242
-
243
-
244
-
245
-
246
-
247
-
248
-
249
-
250
-
251
-
252
-
253
-
254
-
255
-
256
-
257
-
258
-
259
-
260
-
261
-
262
-
263
-
264
-
265
-
266
-
267
-
268
-
269
-
270
-
271
-
272
-
273
-
274
-
275
-
276
-
277
-
278
-
279
-
280
-
281
-
282
 |
 |
