Yamaha M7CL M7cl V1 Owner's Manual - Page 272
Installing the MBM7CL meter bridge (option), M7CL main unit, MBM7CL
 |
View all Yamaha M7CL manuals
Add to My Manuals
Save this manual to your list of manuals |
Page 272 highlights
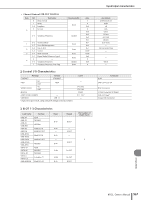
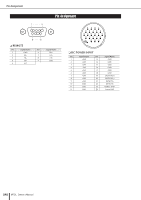
Installing the MBM7CL meter bridge (option) Installing the MBM7CL meter bridge (option) 1. Remove screw A from the rear of the M7CL's touch screen, and remove the connector cover. 2. Remove screws B (two locations). 3. Loosen screws C (two locations) so that they protrude approximately 2 mm. C 2 mm Connector cover 2 mm C B B A M7CL main unit 4. Hook holes D of the MBM7CL's attachment fixture over the M7CL's screws C (two locations, at left and right). 5. Connect the MBM7CL's connector E to the M7CL's connector F. * Orient the connector so that the red cable is at the right when viewed from the rear panel. 6. Insert the two screws B (which you removed in step 2) into holes G of the MBM7CL's attachment fixture, and tighten them. 7. Tighten screws C (two locations) to fasten the MBM7CL to the M7CL. 8. Using screw A which you removed in step 1, fasten the cable cover included with the MBM7CL. This completes the installation procedure. MBM7CL D G C B F Red cable E Cable cover A D C GB Shown as completed CAUTION • Before connecting the MBM7CL meter bridge to the M7CL, you must turn off the power switches of the M7CL and the PW800W. Failure to observe this will cause malfunctions or electric shock. 272 M7CL Owner's Manual
-
 1
1 -
2
-
3
-
4
-
5
-
6
-
7
-
8
-
9
-
10
-
11
-
12
-
13
-
14
-
15
-
16
-
17
-
18
-
19
-
20
-
21
-
22
-
23
-
24
-
25
-
26
-
27
-
28
-
29
-
30
-
31
-
32
-
33
-
34
-
35
-
36
-
37
-
38
-
39
-
40
-
41
-
42
-
43
-
44
-
45
-
46
-
47
-
48
-
49
-
50
-
51
-
52
-
53
-
54
-
55
-
56
-
57
-
58
-
59
-
60
-
61
-
62
-
63
-
64
-
65
-
66
-
67
-
68
-
69
-
70
-
71
-
72
-
73
-
74
-
75
-
76
-
77
-
78
-
79
-
80
-
81
-
82
-
83
-
84
-
85
-
86
-
87
-
88
-
89
-
90
-
91
-
92
-
93
-
94
-
95
-
96
-
97
-
98
-
99
-
100
-
101
-
102
-
103
-
104
-
105
-
106
-
107
-
108
-
109
-
110
-
111
-
112
-
113
-
114
-
115
-
116
-
117
-
118
-
119
-
120
-
121
-
122
-
123
-
124
-
125
-
126
-
127
-
128
-
129
-
130
-
131
-
132
-
133
-
134
-
135
-
136
-
137
-
138
-
139
-
140
-
141
-
142
-
143
-
144
-
145
-
146
-
147
-
148
-
149
-
150
-
151
-
152
-
153
-
154
-
155
-
156
-
157
-
158
-
159
-
160
-
161
-
162
-
163
-
164
-
165
-
166
-
167
-
168
-
169
-
170
-
171
-
172
-
173
-
174
-
175
-
176
-
177
-
178
-
179
-
180
-
181
-
182
-
183
-
184
-
185
-
186
-
187
-
188
-
189
-
190
-
191
-
192
-
193
-
194
-
195
-
196
-
197
-
198
-
199
-
200
-
201
-
202
-
203
-
204
-
205
-
206
-
207
-
208
-
209
-
210
-
211
-
212
-
213
-
214
-
215
-
216
-
217
-
218
-
219
-
220
-
221
-
222
-
223
-
224
-
225
-
226
-
227
-
228
-
229
-
230
-
231
-
232
-
233
-
234
-
235
-
236
-
237
-
238
-
239
-
240
-
241
-
242
-
243
-
244
-
245
-
246
-
247
-
248
-
249
-
250
-
251
-
252
-
253
-
254
-
255
-
256
-
257
-
258
-
259
-
260
-
261
-
262
-
263
-
264
-
265
-
266
-
 267
267 -
 268
268 -
 269
269 -
 270
270 -
 271
271 -
 272
272 -
 273
273 -
 274
274 -
 275
275 -
 276
276 -
 277
277 -
278
-
279
-
280
-
281
-
282
 |
 |
