McAfee MIS09EMB3RAA User Guide - Page 209
Manage Network, Rename network, I want to, Network Name, Manage, Network, Hide this item, Show
 |
UPC - 731944575278
View all McAfee MIS09EMB3RAA manuals
Add to My Manuals
Save this manual to your list of manuals |
Page 209 highlights
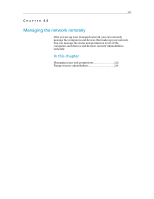
Chapter 43 McAfee Internet Security 207 Rename the network By default, the name of the network includes the name of the first computer that connects to the network and has SecurityCenter installed. If you prefer to use a different name, you can change it. 1 On the Basic or Advanced Menu, click Manage Network. 2 Click Rename network under I want to. 3 Type the name of the network in the Network Name box. 4 Click OK. Note: The Rename network link is only available if there are no items selected on the network map. To clear an item, click the selected item, or click an area of white space on the network map. Show or hide an item on the network map By default, all the computers and devices in your home network appear on the network map. However, if you have hidden items, you can show them again at any time. Only unmanaged items can be hidden; managed computers cannot be hidden. To... On the Basic or Advanced Menu, click Manage Network, and then do this... Hide an item on the Click an item on the network map, and then network map click Hide this item under I want to. In the confirmation dialog box, click Yes. Show hidden items Under I want to, click Show hidden items. on the network map View details for an item You can view detailed information about any item on your network if you select it on the network map. This information includes the item name, its protection status, and other information required to manage the item. 1 Click an item's icon on the network map. 2 Under Details, view the information about the item.
-
 1
1 -
2
-
3
-
4
-
5
-
6
-
7
-
8
-
9
-
10
-
11
-
12
-
13
-
14
-
15
-
16
-
17
-
18
-
19
-
20
-
21
-
22
-
23
-
24
-
25
-
26
-
27
-
28
-
29
-
30
-
31
-
32
-
33
-
34
-
35
-
36
-
37
-
38
-
39
-
40
-
41
-
42
-
43
-
44
-
45
-
46
-
47
-
48
-
49
-
50
-
51
-
52
-
53
-
54
-
55
-
56
-
57
-
58
-
59
-
60
-
61
-
62
-
63
-
64
-
65
-
66
-
67
-
68
-
69
-
70
-
71
-
72
-
73
-
74
-
75
-
76
-
77
-
78
-
79
-
80
-
81
-
82
-
83
-
84
-
85
-
86
-
87
-
88
-
89
-
90
-
91
-
92
-
93
-
94
-
95
-
96
-
97
-
98
-
99
-
100
-
101
-
102
-
103
-
104
-
105
-
106
-
107
-
108
-
109
-
110
-
111
-
112
-
113
-
114
-
115
-
116
-
117
-
118
-
119
-
120
-
121
-
122
-
123
-
124
-
125
-
126
-
127
-
128
-
129
-
130
-
131
-
132
-
133
-
134
-
135
-
136
-
137
-
138
-
139
-
140
-
141
-
142
-
143
-
144
-
145
-
146
-
147
-
148
-
149
-
150
-
151
-
152
-
153
-
154
-
155
-
156
-
157
-
158
-
159
-
160
-
161
-
162
-
163
-
164
-
165
-
166
-
167
-
168
-
169
-
170
-
171
-
172
-
173
-
174
-
175
-
176
-
177
-
178
-
179
-
180
-
181
-
182
-
183
-
184
-
185
-
186
-
187
-
188
-
189
-
190
-
191
-
192
-
193
-
194
-
195
-
196
-
197
-
198
-
199
-
200
-
201
-
202
-
203
-
 204
204 -
 205
205 -
 206
206 -
 207
207 -
 208
208 -
 209
209 -
 210
210 -
 211
211 -
 212
212 -
 213
213 -
 214
214 -
215
-
216
-
217
-
218
-
219
-
220
-
221
-
222
-
223
-
224
-
225
-
226
-
227
-
228
-
229
-
230
-
231
-
232
-
233
-
234
-
235
-
236
-
237
-
238
-
239
-
240
-
241
-
242
-
243
-
244
-
245
-
246
-
247
-
248
-
249
-
250
-
251
-
252
-
253
-
254
-
255
-
256
-
257
-
258
-
259
-
260
-
261
-
262
-
263
-
264
-
265
-
266
-
267
-
268
-
269
-
270
-
271
-
272
-
273
-
274
 |
 |