Samsung T27B750ND User Manual Ver.1.0 (English) - Page 21
Configuring the Basic Settings in Initial Setup, English - 21
 |
View all Samsung T27B750ND manuals
Add to My Manuals
Save this manual to your list of manuals |
Page 21 highlights
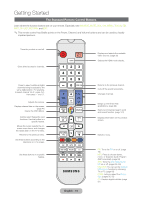
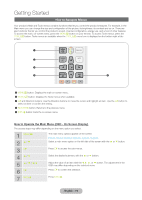
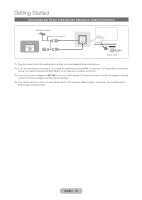
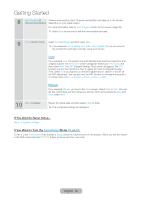
Getting Started Configuring the Basic Settings in Initial Setup When you turn the product on for the first time, a sequence of screens and on-screen prompts will assist you in configuring the product's basic settings. Plug the power cord into a wall outlet, and then press the P button to turn on the product. ✎✎Setup is available only when the Source is set to TV. See "Changing the Input Source" (page 30). ✎✎To return to the previous step in the Setup sequence, select Previous. ✎✎If you are not using a cable box or satellite box, make sure you have connected the product to an antenna or cable connection before you turn on the product. See page 20 for instructions. ✎✎If you want to configure a wired network connection during Setup, make sure you've connected a LAN cable to your product. See page 61 for instructions. If you want to configure a wireless network connection during Setup, make sure your wireless modem or router is on and working. See page 62 for instructions. 1 Menu Language: Select a Language. After you press the P button, the Start screen appears. Select Next to continue. The Menu Language screen appears. Select the menu language you want using your remote, and then select Start. The product will display on-screen menus using the language you select beginning with the next step in the Setup process. 2 Use Mode: Select the On the Use Mode screen, select the Home Use mode using your remote, and then Home Use Mode. select Next. The Network Settings screen appears. ✎✎Store Demo mode is for retail environments only. If you select Store Demo, some functions will not work, and the product will reset all functions to their factory default after a certain period of time. For more information about Store Demo, go to the end of this section. 3 Network Settings: To configuring your network settings, select Next using your remote, and then go Configure the network to 3A - Wireless Network or 3B - Wired Network on the next page. settings If you do not know your network configuration information or want to configure ✎✎To configure the settings later, or do not have a network, select Skip, and then go to 6 - Auto later, select Skip. Program (1) on page 23. You can set up the network connection later To configure network settings later, refer to the Network Connection sections in this manual (pages 61 and 62). using the on- screen Network menu. English - 21
-
 1
1 -
2
-
3
-
4
-
5
-
6
-
7
-
8
-
9
-
10
-
11
-
12
-
13
-
14
-
15
-
 16
16 -
 17
17 -
 18
18 -
 19
19 -
 20
20 -
 21
21 -
 22
22 -
 23
23 -
 24
24 -
 25
25 -
 26
26 -
27
-
28
-
29
-
30
-
31
-
32
-
33
-
34
-
35
-
36
-
37
-
38
-
39
-
40
-
41
-
42
-
43
-
44
-
45
-
46
-
47
-
48
-
49
-
50
-
51
-
52
-
53
-
54
-
55
-
56
-
57
-
58
-
59
-
60
-
61
-
62
-
63
-
64
-
65
-
66
-
67
-
68
-
69
-
70
-
71
-
72
-
73
-
74
-
75
-
76
-
77
-
78
-
79
-
80
-
81
-
82
-
83
-
84
-
85
-
86
-
87
-
88
-
89
-
90
-
91
-
92
-
93
-
94
-
95
-
96
-
97
-
98
-
99
-
100
-
101
-
102
-
103
-
104
-
105
-
106
-
107
-
108
-
109
-
110
-
111
-
112
-
113
-
114
-
115
-
116
-
117
-
118
-
119
-
120
-
121
-
122
-
123
-
124
-
125
-
126
-
127
-
128
-
129
-
130
-
131
-
132
-
133
-
134
-
135
-
136
-
137
-
138
-
139
-
140
-
141
-
142
-
143
-
144
-
145
-
146
-
147
-
148
-
149
-
150
-
151
-
152
-
153
-
154
-
155
-
156
 |
 |
