Yamaha AW4416 Reference Guide - Page 104
Mark Adj.
 |
View all Yamaha AW4416 manuals
Add to My Manuals
Save this manual to your list of manuals |
Page 104 highlights
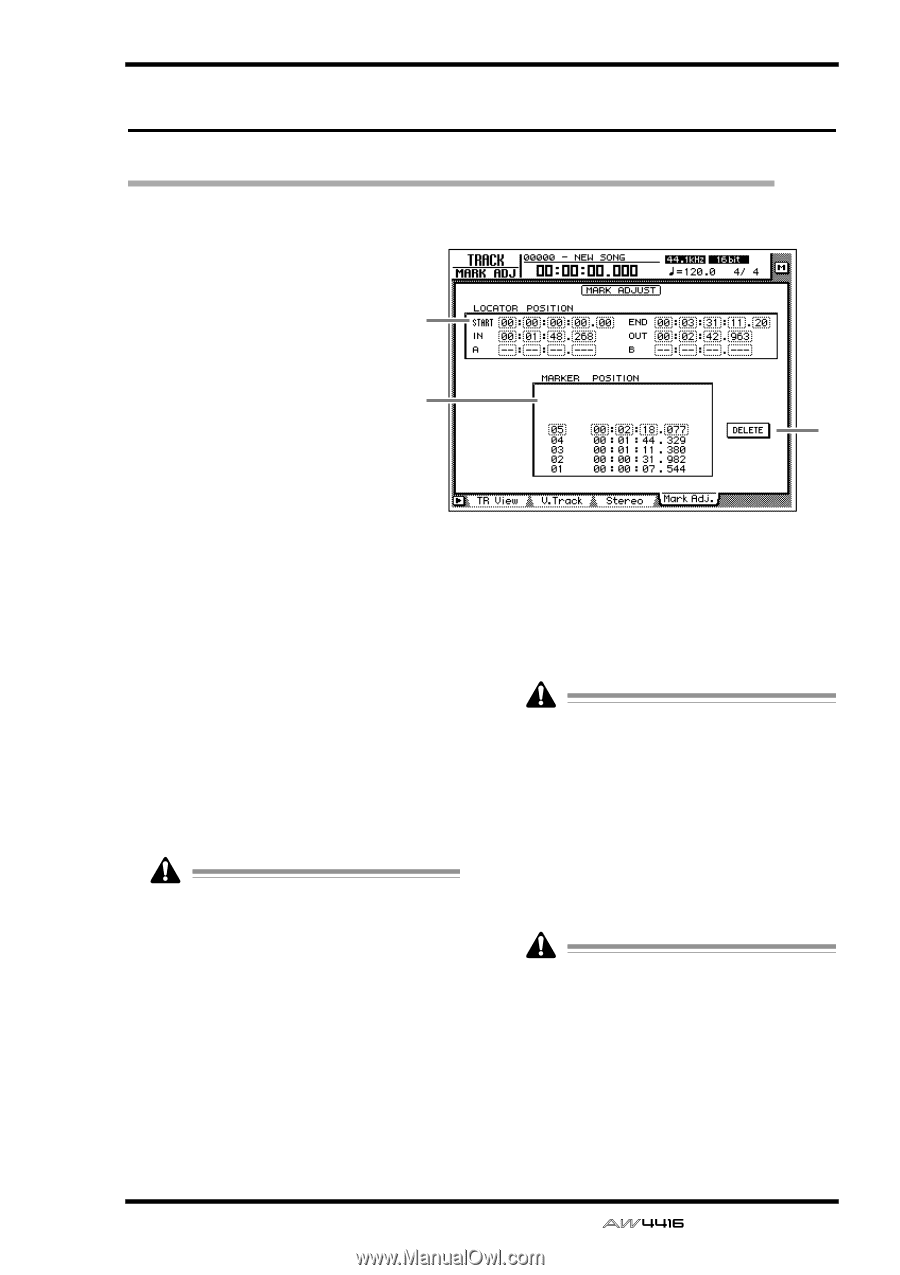
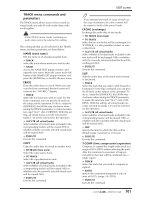
Mark Adj. page TRACK screen Adjust or erase locate points or markers [Function] Adjust the position of markers or locate points such as the IN/OUT points, or erase locate points or markers. [Key operation] 1 • [TRACK] key ¡ [F4] (Mark Adj.) key • Repeatedly press the [TRACK] key 2 until the screen shown at the right appears. 3 [Mouse operation] M button ¡ TRAC button ¡ Mark Adj. tab [Screen functions] A LOCATOR POSITION Display the positions of the various locate points listed below. The position of an existing locate point can be adjusted by moving the cursor to the desired numerical box and rotating the [DATA/JOG] dial. Locate points that have not been set are displayed as "-". q START/END (start point/end point) These locate points normally correspond with the beginning and end of the song. When you create a new song, the Start point will be initially set to absolute time 00:00:00.000. When you record the song, the end of the song will automatically be set as the End point. • The start/end points are always displayed as time code, regardless of the counter display method selected in the SONG screen/Setting page. • If measure display is selected in the SONG screen/Setting page, only beats will be displayed for a location earlier than the start point. q IN/OUT (in point/out point) These locate points can be used as the punchin/out points. The in/out points are automatically set at the beginning and end of the area that was last-recorded, and can also be set individually by using the [SET] key + [IN] key or [SET] key + [OUT] key. q A/B (A point/B point) These locate points can be used as the area for A-B repeat playback. These points can be set individually by using the [SET] key + [A] key or [SET] key + [B] key. The units used for the in/out points and the A/ B points will depend on the counter display method (time/time code/measure). If measure display is selected, "beat" will be the smallest unit by which a locate point can be adjusted. B Marker This area displays a list of markers 1-99. Move the cursor to the MARKER column and select the marker number. Then move the cursor to the POSITION column and adjust the position of the corresponding marker. • When adjusting the position of a marker, it is not possible to move a marker beyond the preceding or following marker. • Marker numbers are automatically assigned in sequence from the beginning of the song. If you delete a marker, the marker numbers will be re-assigned appropriately. 97 - Reference Guide
-
 1
1 -
2
-
3
-
4
-
5
-
6
-
7
-
8
-
9
-
10
-
11
-
12
-
13
-
14
-
15
-
16
-
17
-
18
-
19
-
20
-
21
-
22
-
23
-
24
-
25
-
26
-
27
-
28
-
29
-
30
-
31
-
32
-
33
-
34
-
35
-
36
-
37
-
38
-
39
-
40
-
41
-
42
-
43
-
44
-
45
-
46
-
47
-
48
-
49
-
50
-
51
-
52
-
53
-
54
-
55
-
56
-
57
-
58
-
59
-
60
-
61
-
62
-
63
-
64
-
65
-
66
-
67
-
68
-
69
-
70
-
71
-
72
-
73
-
74
-
75
-
76
-
77
-
78
-
79
-
80
-
81
-
82
-
83
-
84
-
85
-
86
-
87
-
88
-
89
-
90
-
91
-
92
-
93
-
94
-
95
-
96
-
97
-
98
-
 99
99 -
 100
100 -
 101
101 -
 102
102 -
 103
103 -
 104
104 -
 105
105 -
 106
106 -
 107
107 -
 108
108 -
 109
109 -
110
-
111
-
112
-
113
-
114
-
115
-
116
-
117
-
118
-
119
-
120
-
121
-
122
-
123
-
124
-
125
-
126
-
127
-
128
-
129
-
130
-
131
-
132
-
133
-
134
-
135
-
136
-
137
-
138
-
139
-
140
-
141
-
142
-
143
-
144
-
145
-
146
-
147
-
148
-
149
-
150
-
151
-
152
-
153
-
154
-
155
-
156
-
157
-
158
-
159
-
160
-
161
-
162
-
163
-
164
-
165
-
166
-
167
-
168
-
169
-
170
-
171
-
172
-
173
-
174
-
175
-
176
-
177
-
178
-
179
-
180
-
181
-
182
-
183
-
184
-
185
-
186
-
187
-
188
-
189
-
190
-
191
 |
 |