Yamaha AW4416 Reference Guide - Page 124
NEW MIX button, CLR.BUF clear buffer button, AUTOMIX TRANSPORT, Fader Edit Mode= RELATIVE, RET=
 |
View all Yamaha AW4416 manuals
Add to My Manuals
Save this manual to your list of manuals |
Page 124 highlights
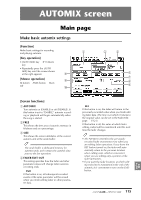
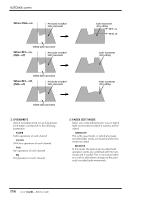
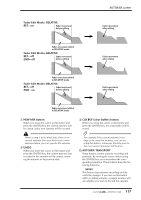
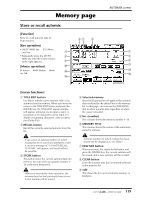
Fader Edit Mode= RELATIVE RET= on Fader movement before editing AUTOMIX screen Fader movement after editing Fader movement edited in RELATIVE mode Fader Edit Mode= RELATIVE RET= off Fader movement END= off before editing Fader movement after editing Fader movement edited in RELATIVE mode Fader Edit Mode= RELATIVE RET= off Fader movement END= on before editing Fader movement after editing Fader movement edited in RELATIVE mode G NEW MIX button When you move the cursor to this button and press the [ENTER] key, the current automix will be erased, and a new automix will be created. When a song is in its initial state, there is no current automix. You must first create a new automix before you can operate the automix. H UNDO When you move the cursor to this button and press the [ENTER] key, the content that was lastrecorded in the automix will be erased, returning the automix to its previous state. I CLR.BUF (clear buffer) button When you move the cursor to this button and press the [ENTER] key, the undo buffer will be erased. Tip! For example if the current automix is too large to be stored in memory, you can try using this button. (However, the data prior to the most recent operation will be lost.) J AUTOMIX TRANSPORT These buttons control automix recording and playback. By moving the cursor and pressing the [ENTER] key you can perform the corresponding operation. These buttons have the following functions. q ABORT This button stops automix recording and discards the changes. If you turn on this button while recording automix, a popup window will ask whether you wish to discard the automix. 117 - Reference Guide
-
 1
1 -
2
-
3
-
4
-
5
-
6
-
7
-
8
-
9
-
10
-
11
-
12
-
13
-
14
-
15
-
16
-
17
-
18
-
19
-
20
-
21
-
22
-
23
-
24
-
25
-
26
-
27
-
28
-
29
-
30
-
31
-
32
-
33
-
34
-
35
-
36
-
37
-
38
-
39
-
40
-
41
-
42
-
43
-
44
-
45
-
46
-
47
-
48
-
49
-
50
-
51
-
52
-
53
-
54
-
55
-
56
-
57
-
58
-
59
-
60
-
61
-
62
-
63
-
64
-
65
-
66
-
67
-
68
-
69
-
70
-
71
-
72
-
73
-
74
-
75
-
76
-
77
-
78
-
79
-
80
-
81
-
82
-
83
-
84
-
85
-
86
-
87
-
88
-
89
-
90
-
91
-
92
-
93
-
94
-
95
-
96
-
97
-
98
-
99
-
100
-
101
-
102
-
103
-
104
-
105
-
106
-
107
-
108
-
109
-
110
-
111
-
112
-
113
-
114
-
115
-
116
-
117
-
118
-
 119
119 -
 120
120 -
 121
121 -
 122
122 -
 123
123 -
 124
124 -
 125
125 -
 126
126 -
 127
127 -
 128
128 -
 129
129 -
130
-
131
-
132
-
133
-
134
-
135
-
136
-
137
-
138
-
139
-
140
-
141
-
142
-
143
-
144
-
145
-
146
-
147
-
148
-
149
-
150
-
151
-
152
-
153
-
154
-
155
-
156
-
157
-
158
-
159
-
160
-
161
-
162
-
163
-
164
-
165
-
166
-
167
-
168
-
169
-
170
-
171
-
172
-
173
-
174
-
175
-
176
-
177
-
178
-
179
-
180
-
181
-
182
-
183
-
184
-
185
-
186
-
187
-
188
-
189
-
190
-
191
 |
 |
