Yamaha AW4416 Reference Guide - Page 89
CD Import
 |
View all Yamaha AW4416 manuals
Add to My Manuals
Save this manual to your list of manuals |
Page 89 highlights
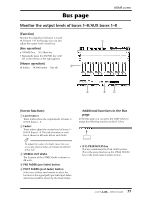
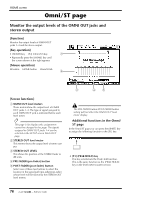
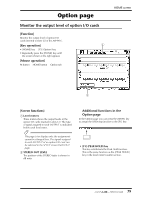
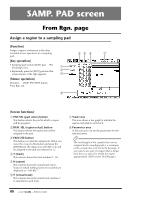
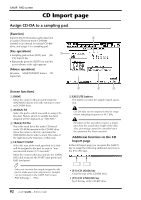
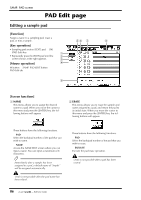
SAMP. PAD screen CD Import page Assign CD-DA to a sampling pad [Function] Import CD-DA (CD audio) audio data from 2 an audio CD/mixed-mode CD-ROM inserted in an internal or external CD-RW drive, and assign it to a sampling pad. [Key operation] • Sampling pad section [EDIT] pad ¡ [F2] 1 (CD Import) key • Repeatedly press the [EDIT] key until the screen shown at the right appears. [Mouse operation] M button ¡ SAMP.PAD EDIT button ¡ CD Import tab [Screen functions] A DRIVE Move the cursor to this area and rotate the [DATA/JOG] dial to select the internal or external CD-RW drive. B ASSIGN TO Select the pad to which you wish to assign CDDA data. Pads to which no sample has been assigned will be displayed as "-NO ASN-". C TRACK/TOTAL This is the track list of the audio CD/mixedmode CD-ROM inserted in the CD-RW drive. Move the cursor to this list, and rotate the [DATA/JOG] dial to select a track. The value at the right shows the total time of that track. D EXTRACT POINT Select the area of the track specified in 3 that will be assigned to the pad, in units of "minutes:seconds:frames (1/75 seconds)." Move the cursor to this area and use the [DATA/ JOG] dial to specify the START (start point) and END (end point). Tip! Later, you can trim the sample assigned to the pad to make even finer adjustments. Samples can be trimmed in the SAMP. PAD screen PAD Edit page (¡ P.86). 3 4 5 E EXECUTE button This button executes the sample import operation. CD-DA data can be imported only for songs whose sampling frequency is 44.1 kHz. Execution of this operation requires a longer time than the actual time length of the data. Also, processing cannot be cancelled once the operation has been executed. s Additional functions in the CD Import page In the CD Import page you can press the [SHIFT] key to assign the following additional functions to the [F1]-[F2] keys. F1 F2 • [F1] (CD LOAD) key Close the tray of the CD-RW drive. • [F2] (CD UNLOAD) key Eject the tray of the CD-RW drive. 82 - Reference Guide
-
 1
1 -
2
-
3
-
4
-
5
-
6
-
7
-
8
-
9
-
10
-
11
-
12
-
13
-
14
-
15
-
16
-
17
-
18
-
19
-
20
-
21
-
22
-
23
-
24
-
25
-
26
-
27
-
28
-
29
-
30
-
31
-
32
-
33
-
34
-
35
-
36
-
37
-
38
-
39
-
40
-
41
-
42
-
43
-
44
-
45
-
46
-
47
-
48
-
49
-
50
-
51
-
52
-
53
-
54
-
55
-
56
-
57
-
58
-
59
-
60
-
61
-
62
-
63
-
64
-
65
-
66
-
67
-
68
-
69
-
70
-
71
-
72
-
73
-
74
-
75
-
76
-
77
-
78
-
79
-
80
-
81
-
82
-
83
-
 84
84 -
 85
85 -
 86
86 -
 87
87 -
 88
88 -
 89
89 -
 90
90 -
 91
91 -
 92
92 -
 93
93 -
 94
94 -
95
-
96
-
97
-
98
-
99
-
100
-
101
-
102
-
103
-
104
-
105
-
106
-
107
-
108
-
109
-
110
-
111
-
112
-
113
-
114
-
115
-
116
-
117
-
118
-
119
-
120
-
121
-
122
-
123
-
124
-
125
-
126
-
127
-
128
-
129
-
130
-
131
-
132
-
133
-
134
-
135
-
136
-
137
-
138
-
139
-
140
-
141
-
142
-
143
-
144
-
145
-
146
-
147
-
148
-
149
-
150
-
151
-
152
-
153
-
154
-
155
-
156
-
157
-
158
-
159
-
160
-
161
-
162
-
163
-
164
-
165
-
166
-
167
-
168
-
169
-
170
-
171
-
172
-
173
-
174
-
175
-
176
-
177
-
178
-
179
-
180
-
181
-
182
-
183
-
184
-
185
-
186
-
187
-
188
-
189
-
190
-
191
 |
 |
