Yamaha AW4416 Reference Guide - Page 106
EDIT screen, TR Edit
 |
View all Yamaha AW4416 manuals
Add to My Manuals
Save this manual to your list of manuals |
Page 106 highlights
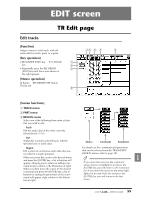
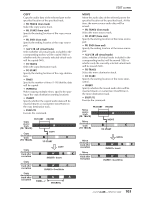
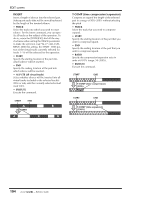
EDIT screen TR Edit page Edit tracks [Function] Assign a name to each track, and edit audio data by tracks, parts, or regions. [Key operation] • RECORDER [EDIT] key ¡ [F1] (TR Edit) 1 key 2 • Repeatedly press the RECORDER 3 [EDIT] key until the screen shown at the right appears. [Mouse operation] M button ¡ RECORDER EDIT button ¡ TR Edit tab 8 45 6 7 9 [Screen functions] A TRACK menu B PART menu C REGION menu Select one of the following three units of data that you wish to edit. q Track Edit the audio data of the entire currently selected track (1-16). q Part Within the currently selected track, edit the specified area of audio data. q Region Edit a piece of continuous audio data that was recorded in a single operation. When you move the cursor to the desired menu and press the [ENTER] key, a list of buttons will appear, allowing you to select an editing command (center column in the illustration at right). When you then move the cursor to the desired command and press the [ENTER] key, a list of buttons for setting the parameters of that command will appear (right column in the illustration at right). Menus Commands Parameters For details on the commands and parameters that can be selected from the TRACK/PART/ REGION menus, refer to page 101. Tip! If you move the cursor to the command whose button is highlighted and press the [ENTER] key, you will return to the command list. If you move the cursor to the menu highlighted at the top of the list and press the [ENTER] key, you will return to the first menu. 99 - Reference Guide EDIT
-
 1
1 -
2
-
3
-
4
-
5
-
6
-
7
-
8
-
9
-
10
-
11
-
12
-
13
-
14
-
15
-
16
-
17
-
18
-
19
-
20
-
21
-
22
-
23
-
24
-
25
-
26
-
27
-
28
-
29
-
30
-
31
-
32
-
33
-
34
-
35
-
36
-
37
-
38
-
39
-
40
-
41
-
42
-
43
-
44
-
45
-
46
-
47
-
48
-
49
-
50
-
51
-
52
-
53
-
54
-
55
-
56
-
57
-
58
-
59
-
60
-
61
-
62
-
63
-
64
-
65
-
66
-
67
-
68
-
69
-
70
-
71
-
72
-
73
-
74
-
75
-
76
-
77
-
78
-
79
-
80
-
81
-
82
-
83
-
84
-
85
-
86
-
87
-
88
-
89
-
90
-
91
-
92
-
93
-
94
-
95
-
96
-
97
-
98
-
99
-
100
-
 101
101 -
 102
102 -
 103
103 -
 104
104 -
 105
105 -
 106
106 -
 107
107 -
 108
108 -
 109
109 -
 110
110 -
 111
111 -
112
-
113
-
114
-
115
-
116
-
117
-
118
-
119
-
120
-
121
-
122
-
123
-
124
-
125
-
126
-
127
-
128
-
129
-
130
-
131
-
132
-
133
-
134
-
135
-
136
-
137
-
138
-
139
-
140
-
141
-
142
-
143
-
144
-
145
-
146
-
147
-
148
-
149
-
150
-
151
-
152
-
153
-
154
-
155
-
156
-
157
-
158
-
159
-
160
-
161
-
162
-
163
-
164
-
165
-
166
-
167
-
168
-
169
-
170
-
171
-
172
-
173
-
174
-
175
-
176
-
177
-
178
-
179
-
180
-
181
-
182
-
183
-
184
-
185
-
186
-
187
-
188
-
189
-
190
-
191
 |
 |
