Yamaha AW4416 Reference Guide - Page 7
How to read the reference guide
 |
View all Yamaha AW4416 manuals
Add to My Manuals
Save this manual to your list of manuals |
Page 7 highlights
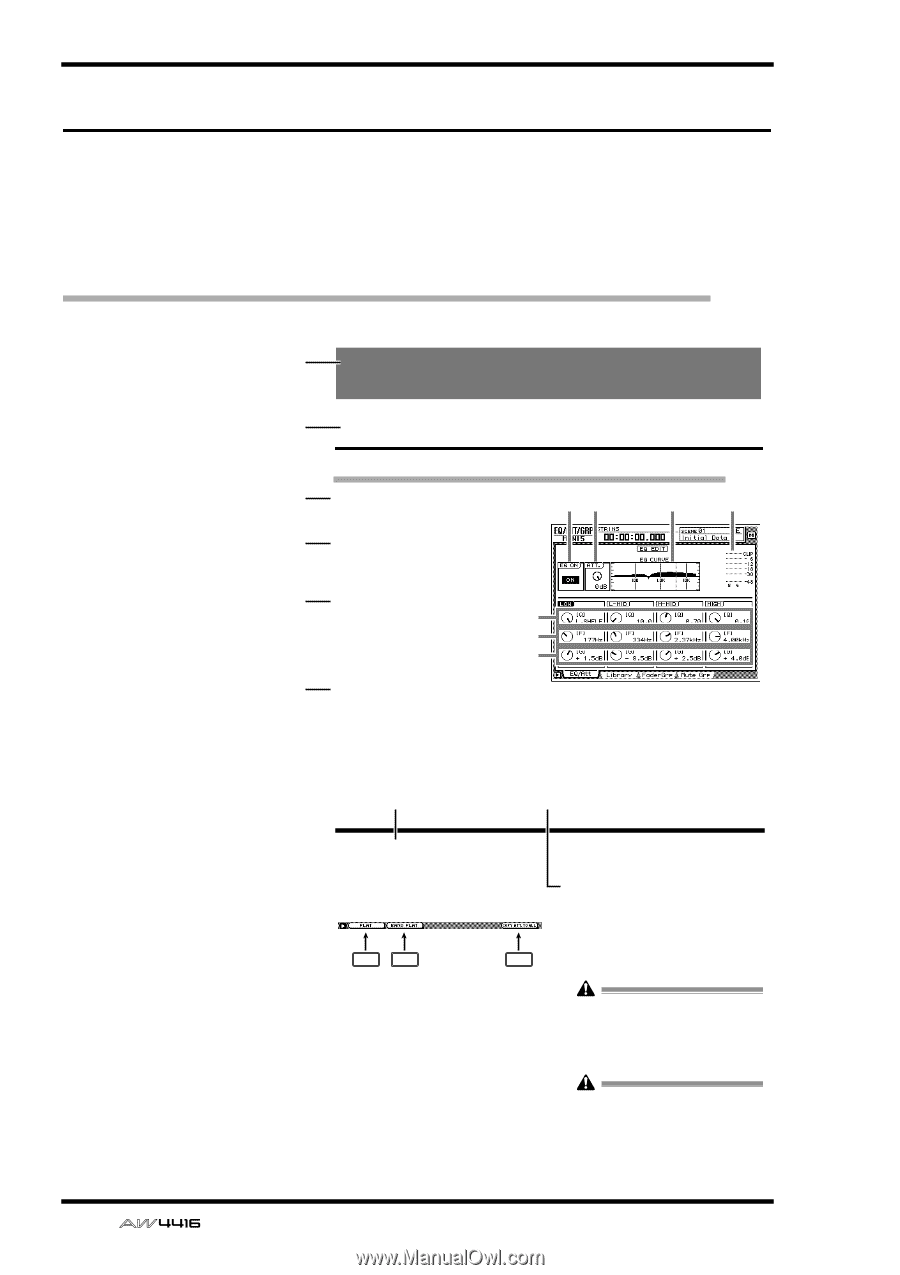
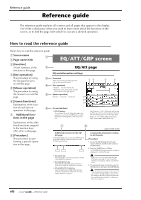
Reference guide Reference guide The reference guide explains all screens and all pages that appear in the display. Use it like a dictionary when you wish to learn more about the functions in the screen, or to find the page from which to execute a desired operation. How to read the reference guide Here's how to read the reference guide. A Screen name 1 B Page name/title EQ/ATT/GRP screen C [Function] A brief summary of the functions of this page. D [Key operation] The procedure for using the top panel keys to access this page. E [Mouse operation] The procedure for using the mouse to access this page. F [Screen functions] Explanations of the function of each item or operation in this page. G s Additional functions in the page 2 EQ/Att page EQ and attenuation settings 3 [Function] Make four-band EQ and attenuation settings for the selected channel. 4 [Key operation] • [EQ] key ¡ [F1] key (EQ/Att) key • Repeatedly press the [EQ] key until the screen shown at the right appears. 5 [Mouse operation] M button ¡ EQ button ¡ EQ/Att tab 12 5 6 7 3 4 6 [Screen functions] A EQ ON button This switches EQ on/off. When this page is displayed, you can use the [ENTER] key to switch this button on/off regardless of the cursor location. the EQ type to H.SHELF (shelving), and turning it all the way in the counter-clockwise direction will switch the EQ type to LPF (low pass filter). Range: 10-0.10, HPF/L.SHELF (LOW band only), LPF/H.SHELF (HIGH band only) Explanations of the additional functions assigned to the function keys ([F1]-[F5]) in this page. H [Procedure] The procedure for performing a specific operation in this page. 7 8 EQ/ATT/GRP screen s Additional functions in the EQ/ Att page In the EQ/Att page you can press the [SHIFT] key to assign the following additional functions to the [F1]-[F2] and [F5] keys. F1 F2 F5 q Copying the attenuation setting to all channels [Procedure] 1. Access the EQ/Att page for the copy source channel, and move the cursor to the ATT. knob. 2. Press the [SHIFT] key + [F5] key. A CONFIRMATION popup window will appear, asking you to confirm the copy. • [F1] (FLAT) key Reset all bands to a boost/cut amount of 0.0 dB (off if HPF/LPF is selected). • [F2] (BAND FLAT) key Reset only the selected band to a boost/cut amount of 0.0 dB (off if HPF/LPF is selected). • [F5] (COPY ATT. TO ALL) key Copy the attenuation setting of the selected channel to all channels. (However, the stereo output channel is excepted.) If the cursor is at a location other than the ATT. knob, a message of "Can't Copy This Parameter" will appear, and the copy will not occur. 3. To execute the copy, move the cursor to the OK button and press the [ENTER] key. Only the attenuation setting will be copied. If you wish to copy EQ settings, you must store the settings in the library and recall them into the copy destination channel. For the procedure refer to page 47. viii - Reference Guide
-
 1
1 -
 2
2 -
 3
3 -
 4
4 -
 5
5 -
 6
6 -
 7
7 -
 8
8 -
 9
9 -
 10
10 -
 11
11 -
 12
12 -
13
-
14
-
15
-
16
-
17
-
18
-
19
-
20
-
21
-
22
-
23
-
24
-
25
-
26
-
27
-
28
-
29
-
30
-
31
-
32
-
33
-
34
-
35
-
36
-
37
-
38
-
39
-
40
-
41
-
42
-
43
-
44
-
45
-
46
-
47
-
48
-
49
-
50
-
51
-
52
-
53
-
54
-
55
-
56
-
57
-
58
-
59
-
60
-
61
-
62
-
63
-
64
-
65
-
66
-
67
-
68
-
69
-
70
-
71
-
72
-
73
-
74
-
75
-
76
-
77
-
78
-
79
-
80
-
81
-
82
-
83
-
84
-
85
-
86
-
87
-
88
-
89
-
90
-
91
-
92
-
93
-
94
-
95
-
96
-
97
-
98
-
99
-
100
-
101
-
102
-
103
-
104
-
105
-
106
-
107
-
108
-
109
-
110
-
111
-
112
-
113
-
114
-
115
-
116
-
117
-
118
-
119
-
120
-
121
-
122
-
123
-
124
-
125
-
126
-
127
-
128
-
129
-
130
-
131
-
132
-
133
-
134
-
135
-
136
-
137
-
138
-
139
-
140
-
141
-
142
-
143
-
144
-
145
-
146
-
147
-
148
-
149
-
150
-
151
-
152
-
153
-
154
-
155
-
156
-
157
-
158
-
159
-
160
-
161
-
162
-
163
-
164
-
165
-
166
-
167
-
168
-
169
-
170
-
171
-
172
-
173
-
174
-
175
-
176
-
177
-
178
-
179
-
180
-
181
-
182
-
183
-
184
-
185
-
186
-
187
-
188
-
189
-
190
-
191
 |
 |