Yamaha AW4416 Reference Guide - Page 128
Fader Edit
 |
View all Yamaha AW4416 manuals
Add to My Manuals
Save this manual to your list of manuals |
Page 128 highlights
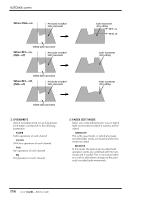
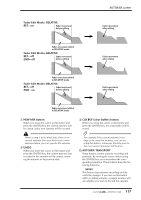
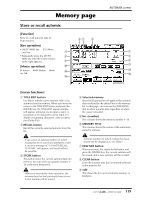
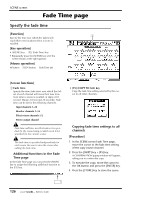
Fader Edit page View fader events as a bar graph [Function] View a bar graph representation of the fader operation events recorded in the automix. [Key operation] • [AUTO MIX] key ¡ [F3] (Fader Edit) key • Repeatedly press the [AUTO 1 MIX] key until the screen shown at the right appears. 2 [Mouse operation] M button ¡ AMIX button ¡ Fader 4 Edit tab AUTOMIX screen 3 [Screen functions] A Bar graph This area shows the fader position of each channel as a bar graph. (Use the keys of the MIXING LAYER section to select the channels that are displayed.) For the fader being edited, both the previously-recorded position and the edited position are displayed, as shown in the following diagram. At this time, the arrow displayed beside the bar graph indicates the direction in which you can move the fader to return it to the previous position. Previously-recorded fader position Current fader position which the faders will return to their original values after fader editing is ended. C FADER EDIT MODE D AUTOMIX TRANSPORT These are the same functions as in the Main page. Refer to the explanation on page 115. s Additional functions in the Fader Edit page In the Fader Edit page you can press the [SHIFT] key to assign the following functions to the [F1]- [F5] keys. F1 F2 F3 F4 F5 Current fader position (1) If the fader is lower than previously recorded Previously-recorded • [F1] (ABORT) key fader position • [F2] (STOP) key (2) If the fader is higher than previously recorded • [F3] (PLAY) key B FADER EDIT OUT These are the same functions as the END/RET buttons of the Main page. Refer to the explanation on page 115. If the RET button is on, the knob located at the right sets the time over • [F4] (REC) key • [F5] (AUTO REC) key These are identical to the additional functions of the Main page. 121 - Reference Guide
-
 1
1 -
2
-
3
-
4
-
5
-
6
-
7
-
8
-
9
-
10
-
11
-
12
-
13
-
14
-
15
-
16
-
17
-
18
-
19
-
20
-
21
-
22
-
23
-
24
-
25
-
26
-
27
-
28
-
29
-
30
-
31
-
32
-
33
-
34
-
35
-
36
-
37
-
38
-
39
-
40
-
41
-
42
-
43
-
44
-
45
-
46
-
47
-
48
-
49
-
50
-
51
-
52
-
53
-
54
-
55
-
56
-
57
-
58
-
59
-
60
-
61
-
62
-
63
-
64
-
65
-
66
-
67
-
68
-
69
-
70
-
71
-
72
-
73
-
74
-
75
-
76
-
77
-
78
-
79
-
80
-
81
-
82
-
83
-
84
-
85
-
86
-
87
-
88
-
89
-
90
-
91
-
92
-
93
-
94
-
95
-
96
-
97
-
98
-
99
-
100
-
101
-
102
-
103
-
104
-
105
-
106
-
107
-
108
-
109
-
110
-
111
-
112
-
113
-
114
-
115
-
116
-
117
-
118
-
119
-
120
-
121
-
122
-
 123
123 -
 124
124 -
 125
125 -
 126
126 -
 127
127 -
 128
128 -
 129
129 -
 130
130 -
 131
131 -
 132
132 -
 133
133 -
134
-
135
-
136
-
137
-
138
-
139
-
140
-
141
-
142
-
143
-
144
-
145
-
146
-
147
-
148
-
149
-
150
-
151
-
152
-
153
-
154
-
155
-
156
-
157
-
158
-
159
-
160
-
161
-
162
-
163
-
164
-
165
-
166
-
167
-
168
-
169
-
170
-
171
-
172
-
173
-
174
-
175
-
176
-
177
-
178
-
179
-
180
-
181
-
182
-
183
-
184
-
185
-
186
-
187
-
188
-
189
-
190
-
191
 |
 |
