Dell Latitude CPi User Guide - Page 117
Number of Times to Repeat Tests, Output Device for Status Messages
 |
View all Dell Latitude CPi manuals
Add to My Manuals
Save this manual to your list of manuals |
Page 117 highlights
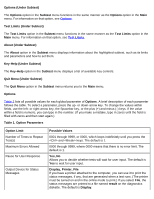
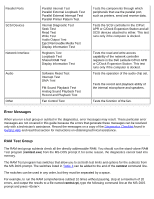
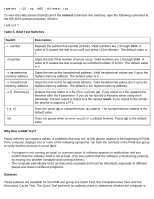
Output Device for Error Messages Display, Printer, File If you have a printer attached to the computer, you can use it to print the error messages, if any, that are generated when a test runs. (The printer must be turned on and in the online mode to print.) If you select File, the error messages are printed to a file named result on the diagnostics diskette. (Make sure the diskette is not write-protected.) The default is Display. Number of Times to Repeat Test(s) This parameter specifies the number of times the tests run when you select Run. To change the default, type in the desired value. If you type 0 (zero), the test is run until you press . Maximum Errors Allowed This parameter specifies the maximum number of errors that can occur before testing is suspended. The error count begins from zero each time you run a subtest or test group individually or each time you select All to run all of them. To change the default, type in the desired value. If you type 0 (zero), testing continues, regardless of the number of errors found, until you press . Pause for User Response If this parameter is set to Yes, the diagnostics pauses when one of the following occurs: Your interaction is needed to verify screens and functions or to insert a diskette The maximum error limit is reached To continue testing, press any key. If this parameter is set to No, the diagnostics ignores subtests that require your interaction; certain subtests can run only if this option is set to Yes because they require user interaction. Set this parameter to No when you want to bypass subtests that require user interaction, such as when you run the diagnostics overnight. Output Device for Status Messages Ordinarily, all status messages appear only on the display. This parameter allows you to direct status messages to either a printer or a file, in addition to the display. Use the right-arrow key to select the option you want. If you choose the Printer option, status messages print as they occur. If you choose the File option, status messages are written to a file named result. This file is automatically created on the diagnostics diskette when you run the diagnostics. If the result file already exists on the diskette, new status messages are added to it. The result file is an ordinary American Standard Code for Information Interchange (ASCII) text file. You can access the result file through Windows® Notepad by performing the following steps: 1. Select Quit Menu to exit the diagnostics and return to the MS-DOS prompt. 2. Remove the Dell Diagnostics Diskette from the diskette drive. 3. Reboot the computer. 4. If necessary, start your operating system. 5. Insert the Dell Diagnostics Diskette into the diskette drive.
-
 1
1 -
2
-
3
-
4
-
5
-
6
-
7
-
8
-
9
-
10
-
11
-
12
-
13
-
14
-
15
-
16
-
17
-
18
-
19
-
20
-
21
-
22
-
23
-
24
-
25
-
26
-
27
-
28
-
29
-
30
-
31
-
32
-
33
-
34
-
35
-
36
-
37
-
38
-
39
-
40
-
41
-
42
-
43
-
44
-
45
-
46
-
47
-
48
-
49
-
50
-
51
-
52
-
53
-
54
-
55
-
56
-
57
-
58
-
59
-
60
-
61
-
62
-
63
-
64
-
65
-
66
-
67
-
68
-
69
-
70
-
71
-
72
-
73
-
74
-
75
-
76
-
77
-
78
-
79
-
80
-
81
-
82
-
83
-
84
-
85
-
86
-
87
-
88
-
89
-
90
-
91
-
92
-
93
-
94
-
95
-
96
-
97
-
98
-
99
-
100
-
101
-
102
-
103
-
104
-
105
-
106
-
107
-
108
-
109
-
110
-
111
-
 112
112 -
 113
113 -
 114
114 -
 115
115 -
 116
116 -
 117
117 -
 118
118 -
 119
119 -
 120
120 -
 121
121 -
 122
122 -
123
-
124
-
125
-
126
-
127
-
128
-
129
-
130
-
131
-
132
-
133
-
134
-
135
-
136
-
137
-
138
-
139
-
140
-
141
-
142
-
143
-
144
-
145
-
146
-
147
-
148
-
149
-
150
-
151
-
152
-
153
-
154
-
155
-
156
-
157
-
158
-
159
-
160
-
161
-
162
-
163
-
164
-
165
-
166
-
167
-
168
-
169
-
170
-
171
-
172
-
173
-
174
-
175
-
176
-
177
-
178
-
179
-
180
-
181
-
182
-
183
-
184
-
185
-
186
-
187
-
188
-
189
-
190
-
191
-
192
-
193
-
194
-
195
-
196
-
197
-
198
-
199
-
200
-
201
-
202
-
203
-
204
-
205
-
206
-
207
-
208
 |
 |