Dell Latitude CPi User Guide - Page 18
System Memory, Start, Settings, Control Panel, System, General, RAM test group
 |
View all Dell Latitude CPi manuals
Add to My Manuals
Save this manual to your list of manuals |
Page 18 highlights
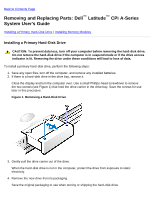
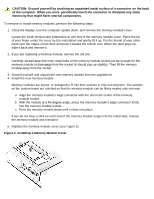
a. Set the memory module cover loosely over the opening, making sure that the plastic tabs on the bottom of the cover catch in the slots on either side of the opening. b. Slide the cover closed until it clicks into place. 6. Reconnect your computer and peripherals to AC power and turn them on. As the computer boots, it detects the presence of additional memory and automatically updates the system configuration information. 7. In one of the following ways, verify that the System Memory option reflects the newly installed memory: Click the Start button, point to Settings, click Control Panel, and click the System icon. The amount of memory installed in the computer is displayed in the lower-right corner of the General tab window. In the System Setup program, the System Memory option appears in the lower-right corner of pages 1, 2, and 4. If the total is incorrect, the memory module(s) may not be installed properly. Repeat preparatory steps 1 through 5 and removal and installation steps 1 through 8 until the memory total is correct. 8. Run the RAM test group of the Dell Diagnostics to confirm that all installed memory modules are operating correctly. 9. Use the Suspend-to-Disk utility to update the S2D partition on your hard-disk drive. The S2D partition stores system data while the computer is in suspend-to-disk mode. Back to Contents Page
-
 1
1 -
2
-
3
-
4
-
5
-
6
-
7
-
8
-
9
-
10
-
11
-
12
-
 13
13 -
 14
14 -
 15
15 -
 16
16 -
 17
17 -
 18
18 -
 19
19 -
 20
20 -
 21
21 -
 22
22 -
 23
23 -
24
-
25
-
26
-
27
-
28
-
29
-
30
-
31
-
32
-
33
-
34
-
35
-
36
-
37
-
38
-
39
-
40
-
41
-
42
-
43
-
44
-
45
-
46
-
47
-
48
-
49
-
50
-
51
-
52
-
53
-
54
-
55
-
56
-
57
-
58
-
59
-
60
-
61
-
62
-
63
-
64
-
65
-
66
-
67
-
68
-
69
-
70
-
71
-
72
-
73
-
74
-
75
-
76
-
77
-
78
-
79
-
80
-
81
-
82
-
83
-
84
-
85
-
86
-
87
-
88
-
89
-
90
-
91
-
92
-
93
-
94
-
95
-
96
-
97
-
98
-
99
-
100
-
101
-
102
-
103
-
104
-
105
-
106
-
107
-
108
-
109
-
110
-
111
-
112
-
113
-
114
-
115
-
116
-
117
-
118
-
119
-
120
-
121
-
122
-
123
-
124
-
125
-
126
-
127
-
128
-
129
-
130
-
131
-
132
-
133
-
134
-
135
-
136
-
137
-
138
-
139
-
140
-
141
-
142
-
143
-
144
-
145
-
146
-
147
-
148
-
149
-
150
-
151
-
152
-
153
-
154
-
155
-
156
-
157
-
158
-
159
-
160
-
161
-
162
-
163
-
164
-
165
-
166
-
167
-
168
-
169
-
170
-
171
-
172
-
173
-
174
-
175
-
176
-
177
-
178
-
179
-
180
-
181
-
182
-
183
-
184
-
185
-
186
-
187
-
188
-
189
-
190
-
191
-
192
-
193
-
194
-
195
-
196
-
197
-
198
-
199
-
200
-
201
-
202
-
203
-
204
-
205
-
206
-
207
-
208
 |
 |