Dell Latitude CPi User Guide - Page 77
Touch Pad: Dell Latitude CPi A-Series System User's Guide, Using the Touch Pad
 |
View all Dell Latitude CPi manuals
Add to My Manuals
Save this manual to your list of manuals |
Page 77 highlights
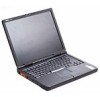
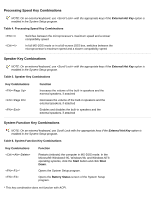
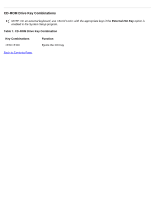
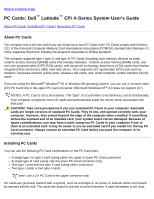
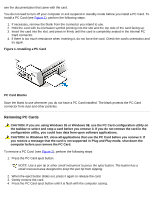
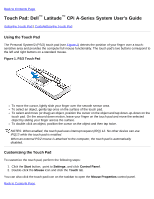
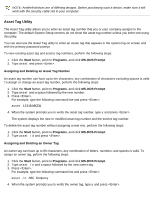
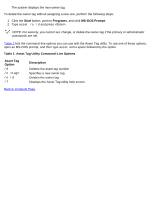
Back to Contents Page Touch Pad: Dell™ Latitude™ CPi A-Series System User's Guide Using the Touch Pad | Customizing the Touch Pad Using the Touch Pad The Personal System/2 (PS/2) touch pad (see Figure 1) detects the position of your finger over a touchsensitive area and provides the computer full mouse functionality. The touch pad's two buttons correspond to the left and right buttons on a standard mouse. Figure 1. PS/2 Touch Pad To move the cursor, lightly slide your finger over the smooth sensor area. To select an object, gently tap once on the surface of the touch pad. To select and move (or drag) an object, position the cursor on the object and tap down-up-down on the touch pad. On the second down motion, leave your finger on the touch pad and move the selected object by sliding your finger across the surface. To double-click an object, position the cursor on the object and then tap twice. NOTES: When enabled, the touch pad uses interrupt request (IRQ) 12. No other device can use IRQ12 while the touch pad is enabled. When an external PS/2 mouse is attached to the computer, the touch pad is automatically disabled. Customizing the Touch Pad To customize the touch pad, perform the following steps: 1. Click the Start button, point to Settings, and click Control Panel. 2. Double-click the Mouse icon and click the Touch tab. You can also click the touch pad icon on the taskbar to open the Mouse Properties control panel. Back to Contents Page
-
 1
1 -
2
-
3
-
4
-
5
-
6
-
7
-
8
-
9
-
10
-
11
-
12
-
13
-
14
-
15
-
16
-
17
-
18
-
19
-
20
-
21
-
22
-
23
-
24
-
25
-
26
-
27
-
28
-
29
-
30
-
31
-
32
-
33
-
34
-
35
-
36
-
37
-
38
-
39
-
40
-
41
-
42
-
43
-
44
-
45
-
46
-
47
-
48
-
49
-
50
-
51
-
52
-
53
-
54
-
55
-
56
-
57
-
58
-
59
-
60
-
61
-
62
-
63
-
64
-
65
-
66
-
67
-
68
-
69
-
70
-
71
-
 72
72 -
 73
73 -
 74
74 -
 75
75 -
 76
76 -
 77
77 -
 78
78 -
 79
79 -
 80
80 -
 81
81 -
 82
82 -
83
-
84
-
85
-
86
-
87
-
88
-
89
-
90
-
91
-
92
-
93
-
94
-
95
-
96
-
97
-
98
-
99
-
100
-
101
-
102
-
103
-
104
-
105
-
106
-
107
-
108
-
109
-
110
-
111
-
112
-
113
-
114
-
115
-
116
-
117
-
118
-
119
-
120
-
121
-
122
-
123
-
124
-
125
-
126
-
127
-
128
-
129
-
130
-
131
-
132
-
133
-
134
-
135
-
136
-
137
-
138
-
139
-
140
-
141
-
142
-
143
-
144
-
145
-
146
-
147
-
148
-
149
-
150
-
151
-
152
-
153
-
154
-
155
-
156
-
157
-
158
-
159
-
160
-
161
-
162
-
163
-
164
-
165
-
166
-
167
-
168
-
169
-
170
-
171
-
172
-
173
-
174
-
175
-
176
-
177
-
178
-
179
-
180
-
181
-
182
-
183
-
184
-
185
-
186
-
187
-
188
-
189
-
190
-
191
-
192
-
193
-
194
-
195
-
196
-
197
-
198
-
199
-
200
-
201
-
202
-
203
-
204
-
205
-
206
-
207
-
208
 |
 |
