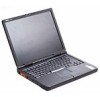
Dell Latitude CPi User Guide - Page 15
Removing and Replacing Parts: Dell Latitude CPi A-Series System User's Guide - hard drive removal
 |
View all Dell Latitude CPi manuals
Add to My Manuals
Save this manual to your list of manuals |
Page 15 highlights
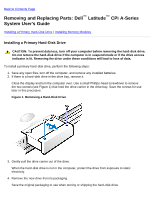
Back to Contents Page Removing and Replacing Parts: Dell™ Latitude™ CPi A-Series System User's Guide Installing a Primary Hard-Disk Drive | Installing Memory Modules Installing a Primary Hard-Disk Drive CAUTION: To prevent data loss, turn off your computer before removing the hard-disk drive. Do not remove the hard-disk drive if the computer is in suspend mode or if the drive access indicator is lit. Removing the drive under these conditions will lead to loss of data. To install a primary hard-disk drive, perform the following steps: 1. Save any open files, turn off the computer, and remove any installed batteries. 2. If there is a hard-disk drive in the drive bay, remove it. Close the display and turn the computer over. Use a small Phillips-head screwdriver to remove the two screws (see Figure 1) that hold the drive carrier in the drive bay. Save the screws for use later in this procedure. Figure 1. Removing a Hard-Disk Drive 3. Gently pull the drive carrier out of the drive. When the hard-disk drive is not in the computer, protect the drive from exposure to static electricity. 4. Remove the new drive from its packaging. Save the original packaging to use when storing or shipping the hard-disk drive.
-
 1
1 -
2
-
3
-
4
-
5
-
6
-
7
-
8
-
9
-
 10
10 -
 11
11 -
 12
12 -
 13
13 -
 14
14 -
 15
15 -
 16
16 -
 17
17 -
 18
18 -
 19
19 -
 20
20 -
21
-
22
-
23
-
24
-
25
-
26
-
27
-
28
-
29
-
30
-
31
-
32
-
33
-
34
-
35
-
36
-
37
-
38
-
39
-
40
-
41
-
42
-
43
-
44
-
45
-
46
-
47
-
48
-
49
-
50
-
51
-
52
-
53
-
54
-
55
-
56
-
57
-
58
-
59
-
60
-
61
-
62
-
63
-
64
-
65
-
66
-
67
-
68
-
69
-
70
-
71
-
72
-
73
-
74
-
75
-
76
-
77
-
78
-
79
-
80
-
81
-
82
-
83
-
84
-
85
-
86
-
87
-
88
-
89
-
90
-
91
-
92
-
93
-
94
-
95
-
96
-
97
-
98
-
99
-
100
-
101
-
102
-
103
-
104
-
105
-
106
-
107
-
108
-
109
-
110
-
111
-
112
-
113
-
114
-
115
-
116
-
117
-
118
-
119
-
120
-
121
-
122
-
123
-
124
-
125
-
126
-
127
-
128
-
129
-
130
-
131
-
132
-
133
-
134
-
135
-
136
-
137
-
138
-
139
-
140
-
141
-
142
-
143
-
144
-
145
-
146
-
147
-
148
-
149
-
150
-
151
-
152
-
153
-
154
-
155
-
156
-
157
-
158
-
159
-
160
-
161
-
162
-
163
-
164
-
165
-
166
-
167
-
168
-
169
-
170
-
171
-
172
-
173
-
174
-
175
-
176
-
177
-
178
-
179
-
180
-
181
-
182
-
183
-
184
-
185
-
186
-
187
-
188
-
189
-
190
-
191
-
192
-
193
-
194
-
195
-
196
-
197
-
198
-
199
-
200
-
201
-
202
-
203
-
204
-
205
-
206
-
207
-
208
 |
 |
