Dell Latitude CPi User Guide - Page 75
Removing PC Cards, Installing a PC Card
 |
View all Dell Latitude CPi manuals
Add to My Manuals
Save this manual to your list of manuals |
Page 75 highlights
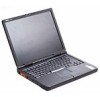
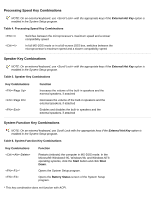
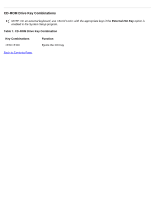
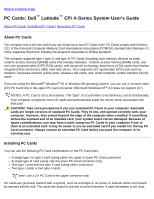
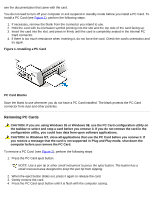
see the documentation that came with the card. You do not need to turn off your computer or exit suspend or standby mode before you install a PC Card. To install a PC Card (see Figure 1), perform the following steps: 1. If necessary, remove the blank from the connector you intend to use. 2. Hold the card with its orientation symbol pointing into the slot and the top side of the card facing up. 3. Insert the card into the slot, and press in firmly until the card is completely seated in the internal PC Card connector. 4. If there is too much resistance when inserting it, do not force the card. Check the card's orientation and try again. Figure 1. Installing a PC Card PC Card Blanks Save the blank to use whenever you do not have a PC Card installed. The blank protects the PC Card connector from dust and other particles. Removing PC Cards CAUTION: If you are using Windows 95 or Windows 98, use the PC Card configuration utility on the taskbar to select and stop a card before you remove it. If you do not remove the card in the configuration utility, you could lose data from open software applications. CAUTION: In Windows NT, close all applications that use the PC Card before you remove it. If you receive a message that the card is not supported in Plug and Play mode, shut down the computer before you remove the PC Card. To remove a PC Card (see Figure 2), perform the following steps: 1. Press the PC Card eject button. NOTE: Use a pen tip or other small instrument to press the eject button. The button has a small recessed area designed to keep the pen tip from slipping. 2. When the eject button slides out, press it again to release the card. 3. Gently remove the card. 4. Press the PC Card eject button until it is flush with the computer casing.
-
 1
1 -
2
-
3
-
4
-
5
-
6
-
7
-
8
-
9
-
10
-
11
-
12
-
13
-
14
-
15
-
16
-
17
-
18
-
19
-
20
-
21
-
22
-
23
-
24
-
25
-
26
-
27
-
28
-
29
-
30
-
31
-
32
-
33
-
34
-
35
-
36
-
37
-
38
-
39
-
40
-
41
-
42
-
43
-
44
-
45
-
46
-
47
-
48
-
49
-
50
-
51
-
52
-
53
-
54
-
55
-
56
-
57
-
58
-
59
-
60
-
61
-
62
-
63
-
64
-
65
-
66
-
67
-
68
-
69
-
 70
70 -
 71
71 -
 72
72 -
 73
73 -
 74
74 -
 75
75 -
 76
76 -
 77
77 -
 78
78 -
 79
79 -
 80
80 -
81
-
82
-
83
-
84
-
85
-
86
-
87
-
88
-
89
-
90
-
91
-
92
-
93
-
94
-
95
-
96
-
97
-
98
-
99
-
100
-
101
-
102
-
103
-
104
-
105
-
106
-
107
-
108
-
109
-
110
-
111
-
112
-
113
-
114
-
115
-
116
-
117
-
118
-
119
-
120
-
121
-
122
-
123
-
124
-
125
-
126
-
127
-
128
-
129
-
130
-
131
-
132
-
133
-
134
-
135
-
136
-
137
-
138
-
139
-
140
-
141
-
142
-
143
-
144
-
145
-
146
-
147
-
148
-
149
-
150
-
151
-
152
-
153
-
154
-
155
-
156
-
157
-
158
-
159
-
160
-
161
-
162
-
163
-
164
-
165
-
166
-
167
-
168
-
169
-
170
-
171
-
172
-
173
-
174
-
175
-
176
-
177
-
178
-
179
-
180
-
181
-
182
-
183
-
184
-
185
-
186
-
187
-
188
-
189
-
190
-
191
-
192
-
193
-
194
-
195
-
196
-
197
-
198
-
199
-
200
-
201
-
202
-
203
-
204
-
205
-
206
-
207
-
208
 |
 |