Dell Latitude CPi User Guide - Page 119
Tests in the Dell Diagnostics, Table 2. Dell Diagnostics Tests
 |
View all Dell Latitude CPi manuals
Add to My Manuals
Save this manual to your list of manuals |
Page 119 highlights
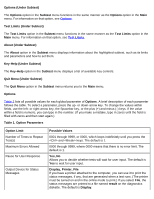
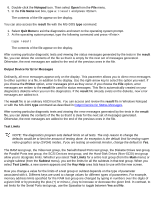
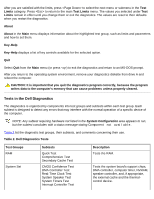
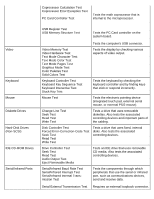
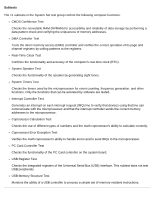
After you are satisfied with the limits, press to select the next menu or submenu in the Test Limits category. Press to return to the main Test Limits menu. The values you selected under Test Limits remain in effect until you change them or exit the diagnostics. The values are reset to their defaults when you restart the diagnostics. About About in the Main menu displays information about the highlighted test group, such as limits and parameters and how to set them. Key-Help Key-Help displays a list of key controls available for the selected option. Quit Select Quit from the Main menu (or press ) to exit the diagnostics and return to an MS-DOS prompt. After you return to the operating system environment, remove your diagnostics diskette from drive A and reboot the computer. CAUTION: It is important that you quit the diagnostics program correctly, because the program writes data to the computer's memory that can cause problems unless properly cleared. Tests in the Dell Diagnostics The diagnostics is organized by components into test groups and subtests within each test group. Each subtest is designed to detect any errors that may interfere with the normal operation of a specific device of the computer. NOTE: Any subtest requiring hardware not listed in the System Configuration area appears to run, but the subtest concludes with a status message stating Component not available. Table 2 list the diagnostic test groups, their subtests, and comments concerning their use. Table 2. Dell Diagnostics Tests Test Groups RAM System Set Subtests Quick Test Comprehensive Test Secondary Cache Test CMOS Confidence Test DMA Controller Test Real-Time Clock Test System Speaker Test System Timers Test Interrupt Controller Test Description Tests the RAM. Tests the system board's support chips, DMA controller, computer timer, NVRAM, speaker controller, and, if appropriate, the external cache and the thermalcontrol device.
-
 1
1 -
2
-
3
-
4
-
5
-
6
-
7
-
8
-
9
-
10
-
11
-
12
-
13
-
14
-
15
-
16
-
17
-
18
-
19
-
20
-
21
-
22
-
23
-
24
-
25
-
26
-
27
-
28
-
29
-
30
-
31
-
32
-
33
-
34
-
35
-
36
-
37
-
38
-
39
-
40
-
41
-
42
-
43
-
44
-
45
-
46
-
47
-
48
-
49
-
50
-
51
-
52
-
53
-
54
-
55
-
56
-
57
-
58
-
59
-
60
-
61
-
62
-
63
-
64
-
65
-
66
-
67
-
68
-
69
-
70
-
71
-
72
-
73
-
74
-
75
-
76
-
77
-
78
-
79
-
80
-
81
-
82
-
83
-
84
-
85
-
86
-
87
-
88
-
89
-
90
-
91
-
92
-
93
-
94
-
95
-
96
-
97
-
98
-
99
-
100
-
101
-
102
-
103
-
104
-
105
-
106
-
107
-
108
-
109
-
110
-
111
-
112
-
113
-
 114
114 -
 115
115 -
 116
116 -
 117
117 -
 118
118 -
 119
119 -
 120
120 -
 121
121 -
 122
122 -
 123
123 -
 124
124 -
125
-
126
-
127
-
128
-
129
-
130
-
131
-
132
-
133
-
134
-
135
-
136
-
137
-
138
-
139
-
140
-
141
-
142
-
143
-
144
-
145
-
146
-
147
-
148
-
149
-
150
-
151
-
152
-
153
-
154
-
155
-
156
-
157
-
158
-
159
-
160
-
161
-
162
-
163
-
164
-
165
-
166
-
167
-
168
-
169
-
170
-
171
-
172
-
173
-
174
-
175
-
176
-
177
-
178
-
179
-
180
-
181
-
182
-
183
-
184
-
185
-
186
-
187
-
188
-
189
-
190
-
191
-
192
-
193
-
194
-
195
-
196
-
197
-
198
-
199
-
200
-
201
-
202
-
203
-
204
-
205
-
206
-
207
-
208
 |
 |