Dell Latitude CPi User Guide - Page 17
Installing a Memory Module Cover - memory upgrade
 |
View all Dell Latitude CPi manuals
Add to My Manuals
Save this manual to your list of manuals |
Page 17 highlights
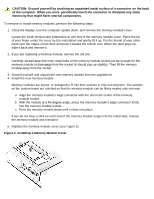
CAUTION: Ground yourself by touching an unpainted metal surface of a connector on the back of the computer. While you work, periodically touch the connector to dissipate any static electricity that might harm internal components. To remove or install memory modules, perform the following steps: 1. Close the display, turn the computer upside down, and remove the memory module cover. Locate the small semicircular indentation at one end of the memory module cover. Place the tip of your finger under the cover by the indentation and gently lift it up. Put the thumb of your other hand over the ridges on the door and push it toward the unlock icon. When the door pops up, slide it back and remove it. 2. If you are replacing a memory module, remove the old one. Carefully spread apart the inner metal tabs of the memory module socket just far enough for the memory module to disengage from the socket (it should pop up slightly). Then lift the memory module away from the socket. 3. Ground yourself and unpack the new memory module from the upgrade kit. 4. Install the new memory module. Memory modules are keyed, or designed to fit into their sockets in only one direction. The sockets on the system board are notched so that the memory module can be firmly seated only one way. a. Align the memory module's edge connector with the slot in the center of the memory module socket. b. With the module at a 45-degree angle, press the memory module's edge connector firmly into the memory module socket. c. Pivot the memory module down until it clicks into place. If you do not hear a click as each end of the memory module snaps into the metal tabs, remove the memory module and reinstall it. 5. Replace the memory module cover (see Figure 2). Figure 2. Installing a Memory Module Cover
-
 1
1 -
2
-
3
-
4
-
5
-
6
-
7
-
8
-
9
-
10
-
11
-
 12
12 -
 13
13 -
 14
14 -
 15
15 -
 16
16 -
 17
17 -
 18
18 -
 19
19 -
 20
20 -
 21
21 -
 22
22 -
23
-
24
-
25
-
26
-
27
-
28
-
29
-
30
-
31
-
32
-
33
-
34
-
35
-
36
-
37
-
38
-
39
-
40
-
41
-
42
-
43
-
44
-
45
-
46
-
47
-
48
-
49
-
50
-
51
-
52
-
53
-
54
-
55
-
56
-
57
-
58
-
59
-
60
-
61
-
62
-
63
-
64
-
65
-
66
-
67
-
68
-
69
-
70
-
71
-
72
-
73
-
74
-
75
-
76
-
77
-
78
-
79
-
80
-
81
-
82
-
83
-
84
-
85
-
86
-
87
-
88
-
89
-
90
-
91
-
92
-
93
-
94
-
95
-
96
-
97
-
98
-
99
-
100
-
101
-
102
-
103
-
104
-
105
-
106
-
107
-
108
-
109
-
110
-
111
-
112
-
113
-
114
-
115
-
116
-
117
-
118
-
119
-
120
-
121
-
122
-
123
-
124
-
125
-
126
-
127
-
128
-
129
-
130
-
131
-
132
-
133
-
134
-
135
-
136
-
137
-
138
-
139
-
140
-
141
-
142
-
143
-
144
-
145
-
146
-
147
-
148
-
149
-
150
-
151
-
152
-
153
-
154
-
155
-
156
-
157
-
158
-
159
-
160
-
161
-
162
-
163
-
164
-
165
-
166
-
167
-
168
-
169
-
170
-
171
-
172
-
173
-
174
-
175
-
176
-
177
-
178
-
179
-
180
-
181
-
182
-
183
-
184
-
185
-
186
-
187
-
188
-
189
-
190
-
191
-
192
-
193
-
194
-
195
-
196
-
197
-
198
-
199
-
200
-
201
-
202
-
203
-
204
-
205
-
206
-
207
-
208
 |
 |