Dell Latitude CPi User Guide - Page 69
Diskette Drive: Dell Latitude CPi A-Series System User's Guide
 |
View all Dell Latitude CPi manuals
Add to My Manuals
Save this manual to your list of manuals |
Page 69 highlights
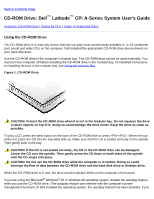
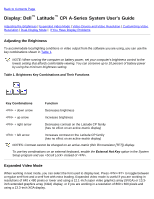
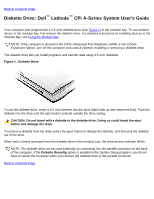
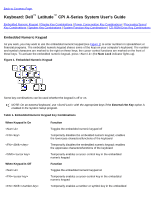
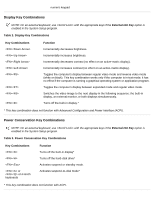
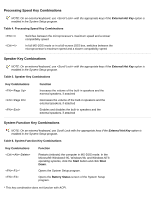
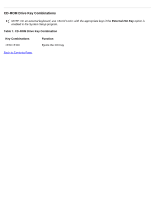
Back to Contents Page Diskette Drive: Dell™ Latitude™ CPi A-Series System User's Guide Your computer was shipped with a 3.5-inch diskette drive (see Figure 1) in the modular bay. To use another device in the modular bay, first remove the diskette drive. For detailed instructions on installing devices in the modular bay, see Using the Modular Bay. NOTE: If the computer is docked to the C/Port Advanced Port Replicator (APR) or the C/Dock Expansion Station, turn off the computer and undock it before installing or removing a diskette drive. The diskette drive lets you install programs and transfer data using 3.5-inch diskettes. Figure 1. Diskette Drive To use the diskette drive, insert a 3.5-inch diskette into the drive (label side up and metal end first). Push the diskette into the drive until the eject button extends outside the drive casing. CAUTION: Do not travel with a diskette in the diskette drive. Doing so could break the eject button and damage the drive. To remove a diskette from the drive, press the eject button to release the diskette, and then pull the diskette out of the drive. When data is being accessed from the diskette drive in the modular bay, the drive access indicator blinks. NOTE: The diskette drive can be used externally by connecting it to the parallel connector on the back of the computer. If the Diskette Reconfig option is enabled in the System Setup program, you do not have to reboot the computer when you connect the diskette drive to the parallel connector. Back to Contents Page
-
 1
1 -
2
-
3
-
4
-
5
-
6
-
7
-
8
-
9
-
10
-
11
-
12
-
13
-
14
-
15
-
16
-
17
-
18
-
19
-
20
-
21
-
22
-
23
-
24
-
25
-
26
-
27
-
28
-
29
-
30
-
31
-
32
-
33
-
34
-
35
-
36
-
37
-
38
-
39
-
40
-
41
-
42
-
43
-
44
-
45
-
46
-
47
-
48
-
49
-
50
-
51
-
52
-
53
-
54
-
55
-
56
-
57
-
58
-
59
-
60
-
61
-
62
-
63
-
 64
64 -
 65
65 -
 66
66 -
 67
67 -
 68
68 -
 69
69 -
 70
70 -
 71
71 -
 72
72 -
 73
73 -
 74
74 -
75
-
76
-
77
-
78
-
79
-
80
-
81
-
82
-
83
-
84
-
85
-
86
-
87
-
88
-
89
-
90
-
91
-
92
-
93
-
94
-
95
-
96
-
97
-
98
-
99
-
100
-
101
-
102
-
103
-
104
-
105
-
106
-
107
-
108
-
109
-
110
-
111
-
112
-
113
-
114
-
115
-
116
-
117
-
118
-
119
-
120
-
121
-
122
-
123
-
124
-
125
-
126
-
127
-
128
-
129
-
130
-
131
-
132
-
133
-
134
-
135
-
136
-
137
-
138
-
139
-
140
-
141
-
142
-
143
-
144
-
145
-
146
-
147
-
148
-
149
-
150
-
151
-
152
-
153
-
154
-
155
-
156
-
157
-
158
-
159
-
160
-
161
-
162
-
163
-
164
-
165
-
166
-
167
-
168
-
169
-
170
-
171
-
172
-
173
-
174
-
175
-
176
-
177
-
178
-
179
-
180
-
181
-
182
-
183
-
184
-
185
-
186
-
187
-
188
-
189
-
190
-
191
-
192
-
193
-
194
-
195
-
196
-
197
-
198
-
199
-
200
-
201
-
202
-
203
-
204
-
205
-
206
-
207
-
208
 |
 |