Samsung CLX-8380ND User Manual (user Manual) (ver.5.00) (English) - Page 101
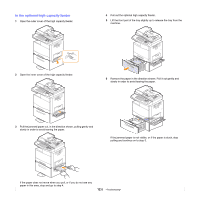
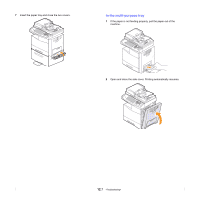
In the optional tray, Lift the front part of the tray slightly up to release the tray from
 |
View all Samsung CLX-8380ND manuals
Add to My Manuals
Save this manual to your list of manuals |
Page 101 highlights
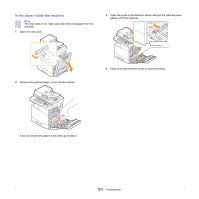
In the optional tray Note This part explains the method of removing the jammed paper in the optional tray 2. Please refer to the next method for other optional trays, since the method is same as the tray 2 1 Open the outer cover in tray 2. 4 Lift the front part of the tray slightly up to release the tray from the machine. 2 Open the inner cover of tray 2. If the paper does not move when you pull, or if you do not see the paper in this area, stop and go to step 3. 5 Remove the paper in the direction shown. To avoid tearing the paper, pull it out gently and slowly. 3 Pull the jammed paper out in the direction shown. To avoid tearing the paper, pull it out gently and slowly. 6 Insert the paper tray and close the two covers. If the paper does not move when you pull, or if you do not see any paper in this area, stop and go to step 4. 12.5
-
 1
1 -
2
-
3
-
4
-
5
-
6
-
7
-
8
-
9
-
10
-
11
-
12
-
13
-
14
-
15
-
16
-
17
-
18
-
19
-
20
-
21
-
22
-
23
-
24
-
25
-
26
-
27
-
28
-
29
-
30
-
31
-
32
-
33
-
34
-
35
-
36
-
37
-
38
-
39
-
40
-
41
-
42
-
43
-
44
-
45
-
46
-
47
-
48
-
49
-
50
-
51
-
52
-
53
-
54
-
55
-
56
-
57
-
58
-
59
-
60
-
61
-
62
-
63
-
64
-
65
-
66
-
67
-
68
-
69
-
70
-
71
-
72
-
73
-
74
-
75
-
76
-
77
-
78
-
79
-
80
-
81
-
82
-
83
-
84
-
85
-
86
-
87
-
88
-
89
-
90
-
91
-
92
-
93
-
94
-
95
-
 96
96 -
 97
97 -
 98
98 -
 99
99 -
 100
100 -
 101
101 -
 102
102 -
 103
103 -
 104
104 -
 105
105 -
 106
106 -
107
-
108
-
109
-
110
-
111
-
112
-
113
-
114
-
115
-
116
-
117
-
118
-
119
-
120
-
121
-
122
-
123
-
124
-
125
-
126
-
127
-
128
-
129
-
130
-
131
-
132
-
133
-
134
-
135
-
136
-
137
-
138
-
139
-
140
-
141
-
142
-
143
-
144
-
145
-
146
-
147
-
148
-
149
-
150
-
151
-
152
-
153
-
154
-
155
-
156
-
157
-
158
-
159
-
160
-
161
-
162
-
163
-
164
-
165
-
166
-
167
-
168
-
169
-
170
-
171
-
172
-
173
-
174
-
175
-
176
-
177
-
178
-
179
-
180
-
181
-
182
-
183
-
184
-
185
-
186
-
187
 |
 |