Samsung CLX-8380ND User Manual (user Manual) (ver.5.00) (English) - Page 69
Entering email addresses by the keyboard, Scanning originals and sending via NetScan
 |
View all Samsung CLX-8380ND manuals
Add to My Manuals
Save this manual to your list of manuals |
Page 69 highlights
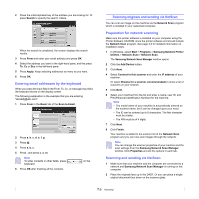
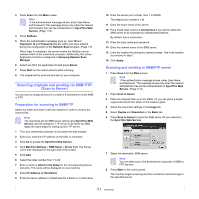
2 Press the initial alphabet key of the address you are looking for. Or press Search to specify the search criteria. When the search is completed, the screen displays the search results. 3 Press From and enter your email address and press OK. 4 Select the address you want in the right-hand pane, and the press To, Cc or Bcc in the left-hand pane. 5 Press Apply. Keep selecting addresses as many as you want. 6 Press OK. Entering email addresses by the keyboard When you press the input field in the From, To, Cc, or message input field, the keyboard shows on the display screen. The following explanation is the example that you are entering "[email protected]". 1 Press From in the Basic tab of the Scan to Email. 2 Press a, b, c, d, e, f, g. 3 Press @. 4 Press a, b, c. 5 Press . and press c, o, m. Note To enter contents in other fields, press keyboard. 6 Press OK after finishing all the contents. on the Scanning originals and sending via NetScan You can scan an image on the machine via the Network Scan program which is installed in your networked computer. Preparation for network scanning Make sure the printer software is installed on your computer using the Printer Software CD-ROM, since the printer software and should include the Network Scan program. See page 3.2 for detailed information on installation steps. 1 In Windows, select Start > Programs > Samsung Network Printer Utilities > Network Scan > Network Scan. The Samsung Network Scan Manager window opens. 2 Click the Add Device button. 3 Click Next. 4 Select Connect to this scanner and enter the IP address of your machine. Or select Browse for a scanner. (recommended) to show a list of scanners on your network. 5 Click Next. 6 Select your machine from the list and enter a name, user ID, and PIN (Personal Identification Number) for the machine. Note • The model name of your machine is automatically entered as the scanner name, but it can be changed upon your need. • The ID can be entered up to 8 characters. The first character must be a letter. • The PIN must be of 4 digits. 7 Click Next. 8 Click Finish. Your machine is added to the scanner list of the Network Scan program and you can now scan images through the network. Note You can change the scanner properties of your machine and the scan settings from the Samsung Network Scan Manager window. Click Properties and set the options in each tab. Scanning and sending via NetScan 1 Make sure that your machine and the computer are connected to a network and Samsung Network Scan Manager is running on the computer. 2 Place the originals face up in the DADF. Or you can place a single original document face down on the scanner glass. 7.6
-
 1
1 -
2
-
3
-
4
-
5
-
6
-
7
-
8
-
9
-
10
-
11
-
12
-
13
-
14
-
15
-
16
-
17
-
18
-
19
-
20
-
21
-
22
-
23
-
24
-
25
-
26
-
27
-
28
-
29
-
30
-
31
-
32
-
33
-
34
-
35
-
36
-
37
-
38
-
39
-
40
-
41
-
42
-
43
-
44
-
45
-
46
-
47
-
48
-
49
-
50
-
51
-
52
-
53
-
54
-
55
-
56
-
57
-
58
-
59
-
60
-
61
-
62
-
63
-
 64
64 -
 65
65 -
 66
66 -
 67
67 -
 68
68 -
 69
69 -
 70
70 -
 71
71 -
 72
72 -
 73
73 -
 74
74 -
75
-
76
-
77
-
78
-
79
-
80
-
81
-
82
-
83
-
84
-
85
-
86
-
87
-
88
-
89
-
90
-
91
-
92
-
93
-
94
-
95
-
96
-
97
-
98
-
99
-
100
-
101
-
102
-
103
-
104
-
105
-
106
-
107
-
108
-
109
-
110
-
111
-
112
-
113
-
114
-
115
-
116
-
117
-
118
-
119
-
120
-
121
-
122
-
123
-
124
-
125
-
126
-
127
-
128
-
129
-
130
-
131
-
132
-
133
-
134
-
135
-
136
-
137
-
138
-
139
-
140
-
141
-
142
-
143
-
144
-
145
-
146
-
147
-
148
-
149
-
150
-
151
-
152
-
153
-
154
-
155
-
156
-
157
-
158
-
159
-
160
-
161
-
162
-
163
-
164
-
165
-
166
-
167
-
168
-
169
-
170
-
171
-
172
-
173
-
174
-
175
-
176
-
177
-
178
-
179
-
180
-
181
-
182
-
183
-
184
-
185
-
186
-
187
 |
 |
