Samsung CLX-8380ND User Manual (user Manual) (ver.5.00) (English) - Page 53
Advanced tab, Image tab, Sending a fax, Setting the fax header
 |
View all Samsung CLX-8380ND manuals
Add to My Manuals
Save this manual to your list of manuals |
Page 53 highlights
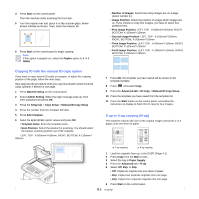
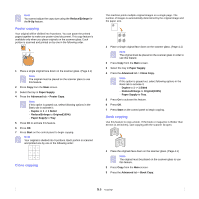
• Address: Picks up the frequently used fax numbers directly from your machine or from SyncThru Web Service. (Page 6.7) • Duplex: Selects whether the machine send faxes one side of the original, both sides of the original. • Resolution: Adjusts the resolution options. Advanced tab • Original Size: Selects the size of the original document. Press OK to update current setting. • Delay Send: Sets the machine to send a fax at a later time without your intervention. (Page 6.3) • Priority Send: Sends an urgent fax before reserved operations. (Page 6.4) • Polling: Used when the receiver requests the document to be faxed remotely at sender's absence or vice versa. In order to use the polling function, the originals must be previously stored in the machine. (Page 6.8) • Mailbox: Used to store a received fax or originals in the machine memory which are ready to be polled. You can use a mailbox on the same machine you are using, or the one on a remote machine. Each mailbox has a corresponding mailbox number, name and password. (Page 6.9) • Back: Returns to the Basic tab. Image tab Sending a fax This part explains how to send a fax, and the special methods of transmission. Note When you place the originals, you can use either the DADF or the scanner glass. (Page 4.1) If the originals are placed on both the DADF and the scanner glass, the machine will read the originals on the DADF first, which has higher priority in scanning. Setting the fax header In some countries, you are required by law to indicate your fax number on any fax you send. 1 Press Machine Setup on the control panel. 2 Press Admin Setting. When the login message pops up, enter password and press OK. (Page 3.5) 3 Press the Setup tab > Fax Setup > Machine ID & Fax No. 4 Touch the input area to enter the machine name and your fax number. 5 Press OK. Sending a fax 1 Press Fax from the Main screen. 2 Place the originals face up in the DADF. • Original Type: Enhances the fax quality based on the type of the original document being scanned. (Page 6.6) • Darkness: Adjusts the level of lightness or darkness of the fax. (Page 6.6) • Erase Background: Reduces dark backgrounds or paper patterns as in newspaper originals. (Page 6.6) • Color Mode: Selects whether the user sends the fax in mono or color. (Page 6.6) • Back: Returns to the Basic tab. 3 Adjust the document settings in the Image tab. 4 Select Duplex and Resolution options in the Basic tab. Note If the originals are printed on both sides of the paper, select 2 Sided with left/right arrows in the Duplex feature. 5 When the cursor is blinking in the input line, enter the fax number using the number keypad on the control panel. Or use Address on 6.2
-
 1
1 -
2
-
3
-
4
-
5
-
6
-
7
-
8
-
9
-
10
-
11
-
12
-
13
-
14
-
15
-
16
-
17
-
18
-
19
-
20
-
21
-
22
-
23
-
24
-
25
-
26
-
27
-
28
-
29
-
30
-
31
-
32
-
33
-
34
-
35
-
36
-
37
-
38
-
39
-
40
-
41
-
42
-
43
-
44
-
45
-
46
-
47
-
 48
48 -
 49
49 -
 50
50 -
 51
51 -
 52
52 -
 53
53 -
 54
54 -
 55
55 -
 56
56 -
 57
57 -
 58
58 -
59
-
60
-
61
-
62
-
63
-
64
-
65
-
66
-
67
-
68
-
69
-
70
-
71
-
72
-
73
-
74
-
75
-
76
-
77
-
78
-
79
-
80
-
81
-
82
-
83
-
84
-
85
-
86
-
87
-
88
-
89
-
90
-
91
-
92
-
93
-
94
-
95
-
96
-
97
-
98
-
99
-
100
-
101
-
102
-
103
-
104
-
105
-
106
-
107
-
108
-
109
-
110
-
111
-
112
-
113
-
114
-
115
-
116
-
117
-
118
-
119
-
120
-
121
-
122
-
123
-
124
-
125
-
126
-
127
-
128
-
129
-
130
-
131
-
132
-
133
-
134
-
135
-
136
-
137
-
138
-
139
-
140
-
141
-
142
-
143
-
144
-
145
-
146
-
147
-
148
-
149
-
150
-
151
-
152
-
153
-
154
-
155
-
156
-
157
-
158
-
159
-
160
-
161
-
162
-
163
-
164
-
165
-
166
-
167
-
168
-
169
-
170
-
171
-
172
-
173
-
174
-
175
-
176
-
177
-
178
-
179
-
180
-
181
-
182
-
183
-
184
-
185
-
186
-
187
 |
 |