Samsung CLX-8380ND User Manual (user Manual) (ver.5.00) (English) - Page 44
Copying, Understanding the Copy screen, Basic tab, Advanced tab, Image tab
 |
View all Samsung CLX-8380ND manuals
Add to My Manuals
Save this manual to your list of manuals |
Page 44 highlights
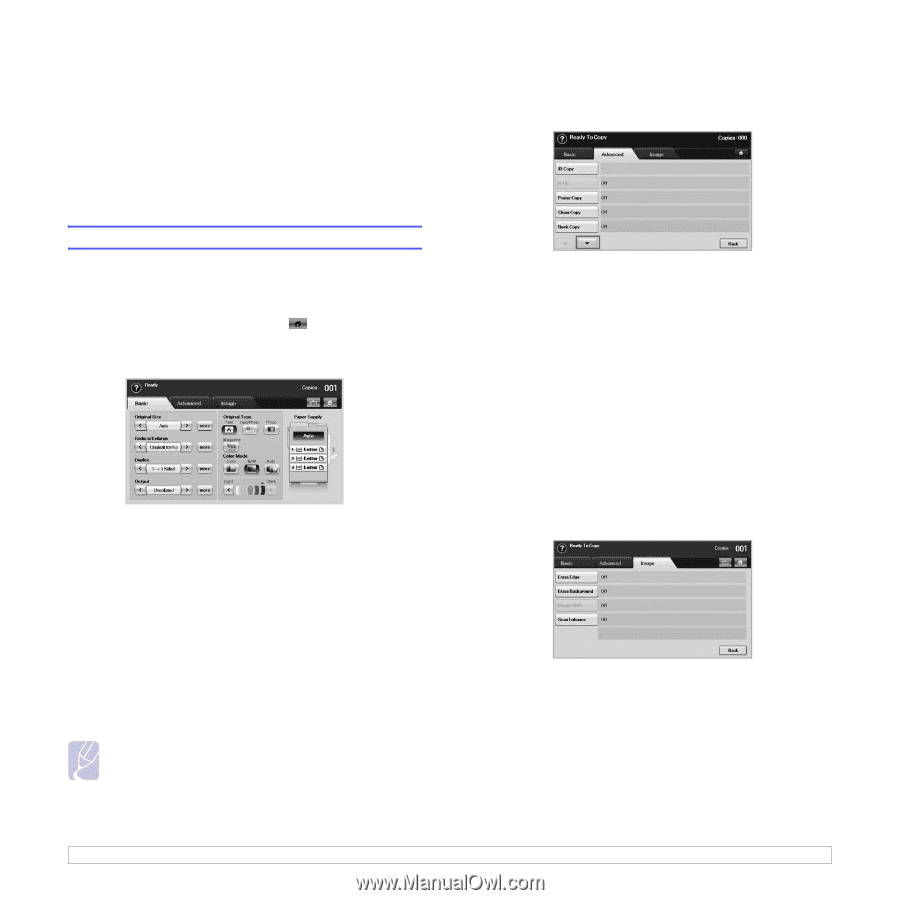
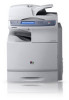
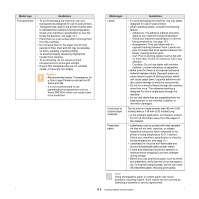
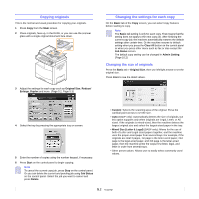
5 Copying This chapter gives you information about using your machine as a copy machine. This chapter includes: • Understanding the Copy screen • Copying originals • Changing the settings for each copy • Using special copy features Understanding the Copy screen When you press Copy on the Main screen, the Ready To Copy screen appears which has several tabs and lots of copying options. All the options are grouped by features so that you can configure your selections easily. If the screen displays an other menu, press ( ) to go to the Main screen. Basic tab • Original Size: Selects the size of the originals. (Page 5.2) • Reduce/Enlarge: Reduces or enlarges the size of a copied image. (Page 5.3) • Duplex: Sets the machine to print copies on both sides of the paper. (Page 5.3) • Output: Selects Collated or Uncollated copy options. If you install the optional stacker & stapler, then the staple related option appears. (Page 5.4) • Text, Text/Photo, Photo, Magazine: Improves the copy quality by selecting the document type for the current copy job. (Page 5.4) • Color, B/W, Auto: You can switch this mode among color, back/ white and automatic mode. Select whether the user print copies in mono or color. If you select the Auto mode, the machine detects the original document and decide the output is colored or not. In this case, the copying speed will be reduced. Note • When Auto mode is used, there maybe some orginals for which the mode is not correctly switched between in color and black/white. In this case, select Color or B/W manually as appropriate to the original. • Light, Dark: Adjusts the brightness level to make a copy that is easier to read, when the original contains faint markings and dark images. (Page 5.4) • Paper Supply: Selects the paper supply tray. Advanced tab • ID Copy: Prints 2-sided originals on one sheet of paper. This feature is helpful for copying a small-sized item, such as a business card. (Page 5.4) • N-Up: Prints 2 or 4 original images, reduced to fit onto one sheet of paper. (Page 5.5) • Poster Copy: Prints a large image into divided 9 pages. (Page 5.6) • Clone Copy: Prints multiple image copies from the original document on a single page. (Page 5.6) • Book Copy: Allows you to copy an entire book. (Page 5.6) • Booklet: Creates booklets from a sequential set of either 1-sided or 2-sided originals. (Page 5.7) • Covers: Automatically adds covers to your copied set using stock taken from a different tray. (Page 5.7) • Transparencies: Adds a blank or printed divider between transparencies within a set. (Page 5.7) Image tab • Erase Edge: Allows you to erase punch holes, staple marks, and fold creases along any of the four documents edges. (Page 5.7) • Erase Background: Prints an image with no background. (Page 5.8) • Margin Shift: Creates a binding edge for the document. (Page 5.8) • Scan Enhance: Use this feature for the better quality of copyoutput. (Page 5.8) 5.1
-
 1
1 -
2
-
3
-
4
-
5
-
6
-
7
-
8
-
9
-
10
-
11
-
12
-
13
-
14
-
15
-
16
-
17
-
18
-
19
-
20
-
21
-
22
-
23
-
24
-
25
-
26
-
27
-
28
-
29
-
30
-
31
-
32
-
33
-
34
-
35
-
36
-
37
-
38
-
 39
39 -
 40
40 -
 41
41 -
 42
42 -
 43
43 -
 44
44 -
 45
45 -
 46
46 -
 47
47 -
 48
48 -
 49
49 -
50
-
51
-
52
-
53
-
54
-
55
-
56
-
57
-
58
-
59
-
60
-
61
-
62
-
63
-
64
-
65
-
66
-
67
-
68
-
69
-
70
-
71
-
72
-
73
-
74
-
75
-
76
-
77
-
78
-
79
-
80
-
81
-
82
-
83
-
84
-
85
-
86
-
87
-
88
-
89
-
90
-
91
-
92
-
93
-
94
-
95
-
96
-
97
-
98
-
99
-
100
-
101
-
102
-
103
-
104
-
105
-
106
-
107
-
108
-
109
-
110
-
111
-
112
-
113
-
114
-
115
-
116
-
117
-
118
-
119
-
120
-
121
-
122
-
123
-
124
-
125
-
126
-
127
-
128
-
129
-
130
-
131
-
132
-
133
-
134
-
135
-
136
-
137
-
138
-
139
-
140
-
141
-
142
-
143
-
144
-
145
-
146
-
147
-
148
-
149
-
150
-
151
-
152
-
153
-
154
-
155
-
156
-
157
-
158
-
159
-
160
-
161
-
162
-
163
-
164
-
165
-
166
-
167
-
168
-
169
-
170
-
171
-
172
-
173
-
174
-
175
-
176
-
177
-
178
-
179
-
180
-
181
-
182
-
183
-
184
-
185
-
186
-
187
 |
 |