Samsung CLX-8380ND User Manual (user Manual) (ver.5.00) (English) - Page 22
Introducing the touch screen and useful buttons, Touch screen, Machine Setup button, Job Status button - toners
 |
View all Samsung CLX-8380ND manuals
Add to My Manuals
Save this manual to your list of manuals |
Page 22 highlights
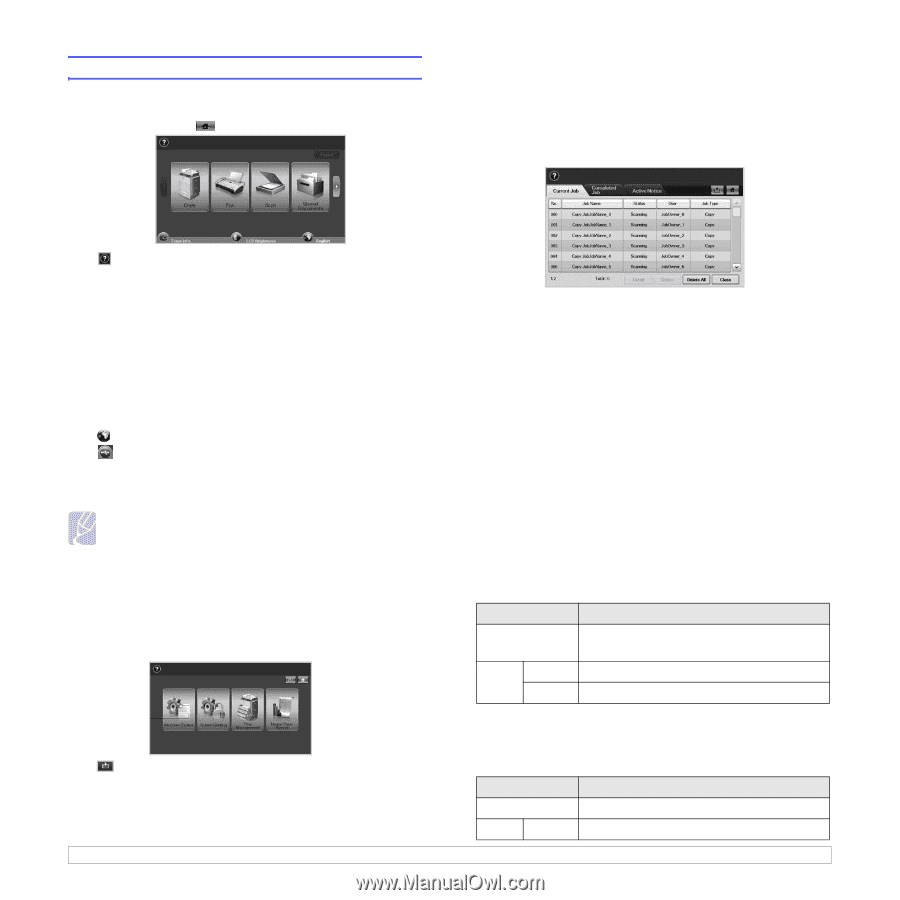
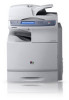
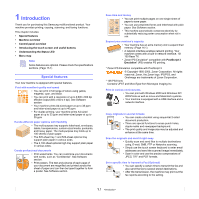
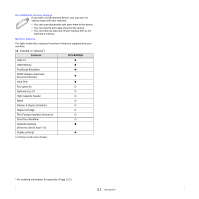
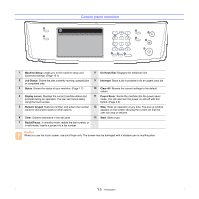
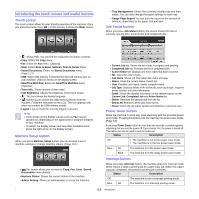
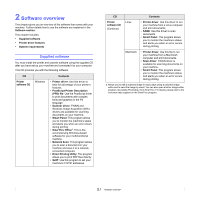
Introducing the touch screen and useful buttons Touch screen The touch screen allows for user-friendly operation of the machine. Once you press the home icon ( ) on the screen, it shows the Main screen. • Tray Management: Shows the currently installed tray and their status. You can also change the paper settings for each tray. • Usage Page Report:You can print the report on the amount of printouts depending on the paper size and type. Job Status button When you press Job Status button, the screen shows the lists of currently running jobs, queued jobs and completed jobs. • : Shows Help. You can find the explanation by feature contents. • Copy: Enters the Copy menu. • Fax: Enters the Fax menu. (Optional) • Scan: Enters Scan to Email, NetScan, Scan to Server menu. • Stored Documents: Enters the Stored Documents menu. (Page 11.2) • USB: When USB memory is inserted into the USB memory port on your machine, USB icon shows on the display screen. • SmarThru Workflow: Enters the SmarThru Workflow menu. (Optional) • Toner Info.: Shows amount of toner used. • LCD Brightness: Adjusts the brightness of the touch screen. • : You can change the display language. • : Guides you to remove the USB memory devices from the machine. Follow the instruction on the LCD. This icon appears only when you connect an USB memory module. • Logout: Logs out from the currently logged in account. Note • Icons shown on the display screen such as Fax may be grayed out, depending on the optional kit or program installed in your machine. • To switch the display screen and see other available icons, press the right arrow on the display screen. Machine Setup button When you press Machine Setup button, you can browse current machine settings or change machine values. (Page 10.1) • Current Job tab: Shows the list of jobs in progress and pending. • Completed Job tab: Provides the list of completed jobs. • Active Notice tab: Displays any error codes that have occurred. • No.: Gives the order of jobs. • Job Name: Shows job information like name and type. • Status: Gives the current status of each job. • User: Provides user name, mainly computer name. • Job Type: Displays details of the active job, such as job type, recipient phone number and other information. • Detail: Shows the detailed information of the selected option on the Current Job, Completed Job and Active Notice list. • Delete: Removes the selected job from the list. • Delete All: Removes all the jobs from the list. • Close: Closes the job status window and switches to previous view. Power Saver button When the machine is not in use, save electricity with the provided power save mode. Pressing this button puts the machine into power save mode. (Page 3.6) If you press Power Saver button for more than two seconds, a window appears, requesting that you turn the power off. If you choose Yes, the power is turned off. This button can also be used to turn the button on. Status Description Off • The machine is not in the power save mode. • The machine is in the low power save mode. Blue On The machine is in the power save mode. Blink The machine is in the ready power save mode. • This button allows you to move to Copy, Fax, Scan, Stored Documents menu directly. • Machine Status: Shows the current status of the machine. • Admin Setting: Allows an administrator to set up the machine. Interrupt button When you press Interrupt button, the machine goes into interrupt mode which means it stops a printing job for urgent copy job. When the urgent copy job completes, the previous printing job continues. Status Description Off The machine is not in interrupt printing mode. Blue On The machine is in interrupt printing mode. 1.6
-
 1
1 -
2
-
3
-
4
-
5
-
6
-
7
-
8
-
9
-
10
-
11
-
12
-
13
-
14
-
15
-
16
-
 17
17 -
 18
18 -
 19
19 -
 20
20 -
 21
21 -
 22
22 -
 23
23 -
 24
24 -
 25
25 -
 26
26 -
 27
27 -
28
-
29
-
30
-
31
-
32
-
33
-
34
-
35
-
36
-
37
-
38
-
39
-
40
-
41
-
42
-
43
-
44
-
45
-
46
-
47
-
48
-
49
-
50
-
51
-
52
-
53
-
54
-
55
-
56
-
57
-
58
-
59
-
60
-
61
-
62
-
63
-
64
-
65
-
66
-
67
-
68
-
69
-
70
-
71
-
72
-
73
-
74
-
75
-
76
-
77
-
78
-
79
-
80
-
81
-
82
-
83
-
84
-
85
-
86
-
87
-
88
-
89
-
90
-
91
-
92
-
93
-
94
-
95
-
96
-
97
-
98
-
99
-
100
-
101
-
102
-
103
-
104
-
105
-
106
-
107
-
108
-
109
-
110
-
111
-
112
-
113
-
114
-
115
-
116
-
117
-
118
-
119
-
120
-
121
-
122
-
123
-
124
-
125
-
126
-
127
-
128
-
129
-
130
-
131
-
132
-
133
-
134
-
135
-
136
-
137
-
138
-
139
-
140
-
141
-
142
-
143
-
144
-
145
-
146
-
147
-
148
-
149
-
150
-
151
-
152
-
153
-
154
-
155
-
156
-
157
-
158
-
159
-
160
-
161
-
162
-
163
-
164
-
165
-
166
-
167
-
168
-
169
-
170
-
171
-
172
-
173
-
174
-
175
-
176
-
177
-
178
-
179
-
180
-
181
-
182
-
183
-
184
-
185
-
186
-
187
 |
 |