Samsung CLX-8380ND User Manual (user Manual) (ver.5.00) (English) - Page 29
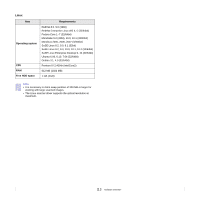
Supported operating systems, Configuring network protocol via the machine, Installing the software - service manual
 |
View all Samsung CLX-8380ND manuals
Add to My Manuals
Save this manual to your list of manuals |
Page 29 highlights
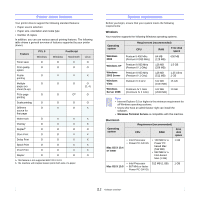
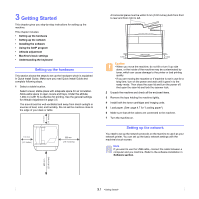
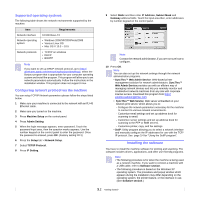
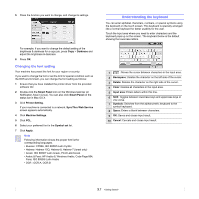
Supported operating systems The following table shows the network environments supported by the machine: Item Network interface Network operating system Requirements 10/100 Base-TX • Windows 2000/XP/2003/Vista/2008 • Various Linux OS • Mac OS X 10.3 ~ 10.5 Network protocols • TCP/IP on windows • DHCP • BOOTP Note If you want to set up DHCP network protocol, go to http:// developer.apple.com/networking/bonjour/download/, select the Bonjour program that is appropriate for your computer operating system and install the program. This program will allow you to set network parameters automatically. Follow the instructions in the installation window. This program does not support Linux. Configuring network protocol via the machine You can setup TCP/IP Network parameters please follow the steps listed below. 1 Make sure your machine is connected to the network with an RJ-45 Ethernet cable. 2 Make sure you turned on the machine. 3 Press Machine Setup on the control panel. 4 Press Admin Setting. 5 When the login message appears, enter password. Touch the password input area, then the question marks appears. Use the number keypad on the control panel to enter the password. Once the password is entered, press OK. (Factory setting:1111) 6 Press the Setup tab > Network Setup. 7 Select TCP/IP Protocol. 8 Press IP Setting. 9 Select Static and then enter IP Address, Subnet Mask and Gateway address fields. Touch the input area then, enter addresses by number keypad on the control panel. Note Contact the network administrator, if you are not sure how to configure. 10 Press OK. Note You can also set up the network settings through the network administration programs. • SyncThru™ Web Admin Service: Web-based printer management solution for network administrators. SyncThru™ Web Admin Service provides you with an efficient way of managing network devices and lets you remotely monitor and troubleshoot network machines from any site with corporate internet access. Download this program from http:// solution.samsungprinter.com. • SyncThru™ Web Service: Web server embedded on your network print server, which allows you to: - Configure the network parameters necessary for the machine to connect to various network environments. - Customize email settings and set up address book for scanning to email. - Customize server settings and set up address book for scanning to the FTP or SMB servers. - Customize printer, copy, and fax settings. • SetIP: Utility program allowing you to select a network interface and manually configure the IP addresses for use with the TCP/ IP protocol. See page 3.4 for "Using the SetIP program". Installing the software You have to install the machine software for printing and scanning. The software includes drivers, applications, and other user friendly programs. Note • The following procedure is for when the machine is being used as a network machine. If you want to connect a machine with a USB cable, refer to Software section . • The following procedure is based on the Windows XP operating system. The procedure and popup window which appears during the installation may differ depending on the operating system, the printer feature, or the interface in use. (See Software section.) 3.2
-
 1
1 -
2
-
3
-
4
-
5
-
6
-
7
-
8
-
9
-
10
-
11
-
12
-
13
-
14
-
15
-
16
-
17
-
18
-
19
-
20
-
21
-
22
-
23
-
 24
24 -
 25
25 -
 26
26 -
 27
27 -
 28
28 -
 29
29 -
 30
30 -
 31
31 -
 32
32 -
 33
33 -
 34
34 -
35
-
36
-
37
-
38
-
39
-
40
-
41
-
42
-
43
-
44
-
45
-
46
-
47
-
48
-
49
-
50
-
51
-
52
-
53
-
54
-
55
-
56
-
57
-
58
-
59
-
60
-
61
-
62
-
63
-
64
-
65
-
66
-
67
-
68
-
69
-
70
-
71
-
72
-
73
-
74
-
75
-
76
-
77
-
78
-
79
-
80
-
81
-
82
-
83
-
84
-
85
-
86
-
87
-
88
-
89
-
90
-
91
-
92
-
93
-
94
-
95
-
96
-
97
-
98
-
99
-
100
-
101
-
102
-
103
-
104
-
105
-
106
-
107
-
108
-
109
-
110
-
111
-
112
-
113
-
114
-
115
-
116
-
117
-
118
-
119
-
120
-
121
-
122
-
123
-
124
-
125
-
126
-
127
-
128
-
129
-
130
-
131
-
132
-
133
-
134
-
135
-
136
-
137
-
138
-
139
-
140
-
141
-
142
-
143
-
144
-
145
-
146
-
147
-
148
-
149
-
150
-
151
-
152
-
153
-
154
-
155
-
156
-
157
-
158
-
159
-
160
-
161
-
162
-
163
-
164
-
165
-
166
-
167
-
168
-
169
-
170
-
171
-
172
-
173
-
174
-
175
-
176
-
177
-
178
-
179
-
180
-
181
-
182
-
183
-
184
-
185
-
186
-
187
 |
 |